
In preparation for more camping this year I was thinking about improvements to the camping set up. One problem area that jumps out is the storage of small items and other camping kit. The smaller, easy to misplace items that need a dedicated home and to be at hands reach.
We currently use cheap storage boxes from B&Q. These quickly become unorganised at camp and as some people have commented on my YouTube channel, I “pay too much attention to detail“… how rude, but they’re not wrong.
Organisation is essential to a smooth and enjoyable camping trip.
There are many good quality storage bins and drawer systems for the more serious overland build but that is overkill for us.
To reiterate the goal of our dream Jimny camper set up… we do not want any mods that would mean the Jimny is transformed from its main purpose as our daily driver. We don’t want to be driving around each day in an overland style vehicle. Neither do we want it loaded down with permanently fixed equipment, drawer systems, slide out kitchens, etc.
Research
Space comes at a premium in the Jimny however one possible solution for the storage of small items is the inside of the tailgate door.
There seem to be 2 approaches people take for tailgates in the off road and overland world. Fold down tables and molle panels, or a combination of both.
Adrian at ROAM has one of the nicest rear table set ups I’ve seen. You can just see it in the distance here. Unfortunately I can’t find any close up shots.
EssexJimny has an awesome molle set up on his Jimny that ticks a lot of boxes for us. Nice touch with the bottle of vino mate! ?
It would save me a lot of time to buy the molle set online. It’s a good deal for what you get. However, the problem is I don’t want to put holes in the plastic trim (so I can return the Jimny to stock if I decide to sell it) and want to mount heavier items too, such as a camping axe. A rigid panel would serve our purposes better, avoiding any potential sag and if there’s any rattles it’ll drive me nuts!
The storage pouches and fixings need to be removable for the occasions where one, or both of us sleep in the Jimny. We don’t want to roll over in our sleep and chop our heads off on a camping axe ?. This mod needs to retain the 180cm flat lay length to allow enough head room to sleep in the Jimny when the need arises.
Design mock up
I try to visualise things before I make them. Using accurate measurements where possible. When it comes to buying the pouches I’ll work to the remaining space around my camping axe and bushcraft knife. However, I may or may not mount these, time will tell.

Materials
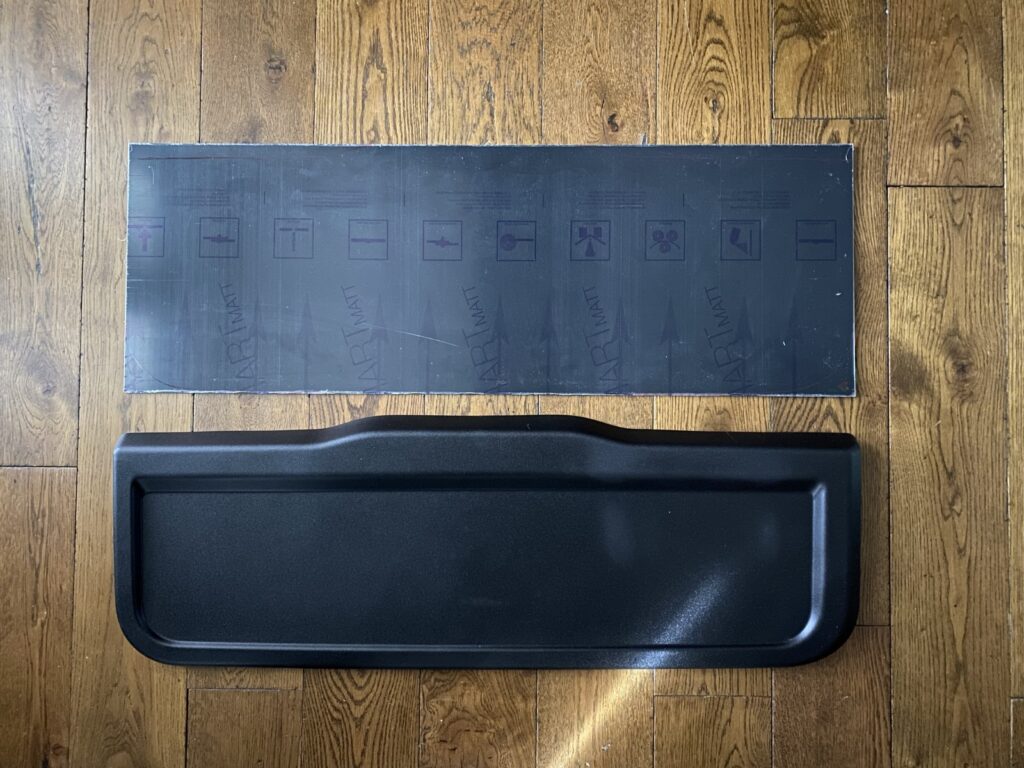
I want to keep the Jimny as lightweight as possible. As such I chose to use to use Black Aluminium Composite Sheet as the backing plate to mount the molle panel to. Some of the key features listed on their website included:
Aluminium composite sheet has a polythene core sandwiched by a thin sheet of aluminium on either side. Available in a deep black with a matte finish on one side and a gloss finish on the other.
Key features:
- Lightweight
- High stiffness and dimensional stability
- Easy to work with/fabricate
- Simple to cut, router fold and bend
- High resistance to weather and corrosion
- Low thermal expansion
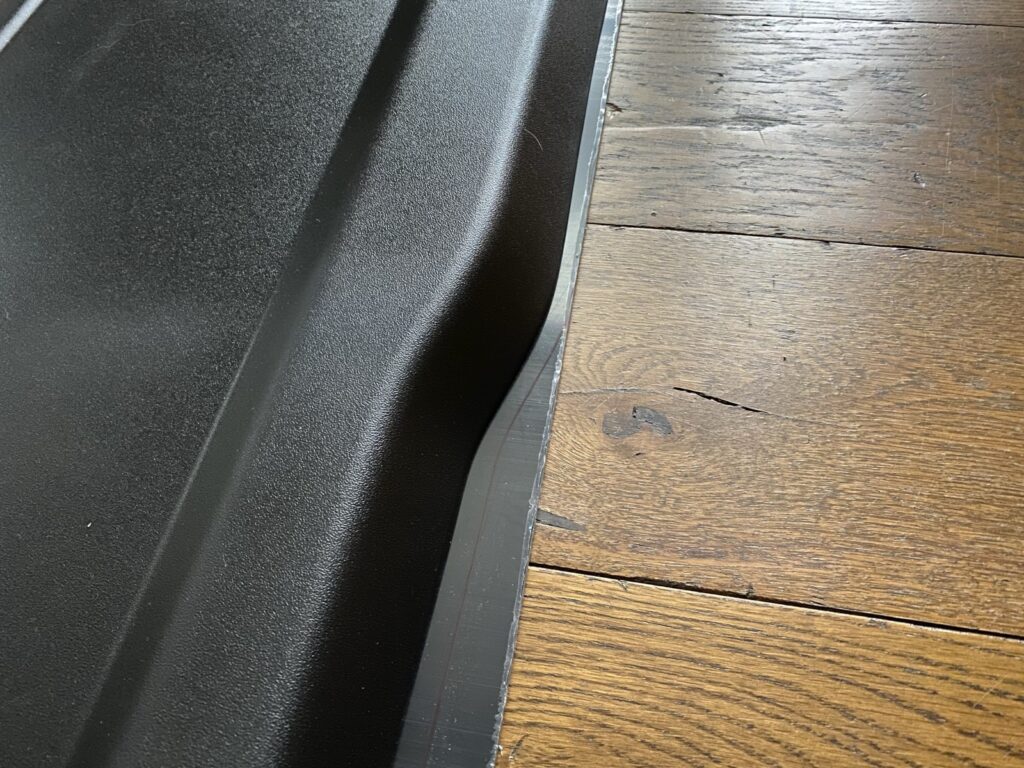
The sides of the sheet look like an aluminium and plastic sandwich so they needed something to finish off the edges. I found this Rubber U Channel Edging on eBay that works perfectly.
Removing the plastic trim
I watch a Japanese youtube channel that makes some cool stuff. One video he posted shows how to remove the trim. Give him some love if you find it useful 😀 but it’s very easy to do.

Cutting the shape
I traced around the trim with a marker to get the general shape. The top notch isn’t perfectly aligned to the centre so make sure you use the stock trim to get the right shape.
The panel I bought has a gloss finish on one side and matt on the other. I went with the matt finish on show. I guess either would look fine.
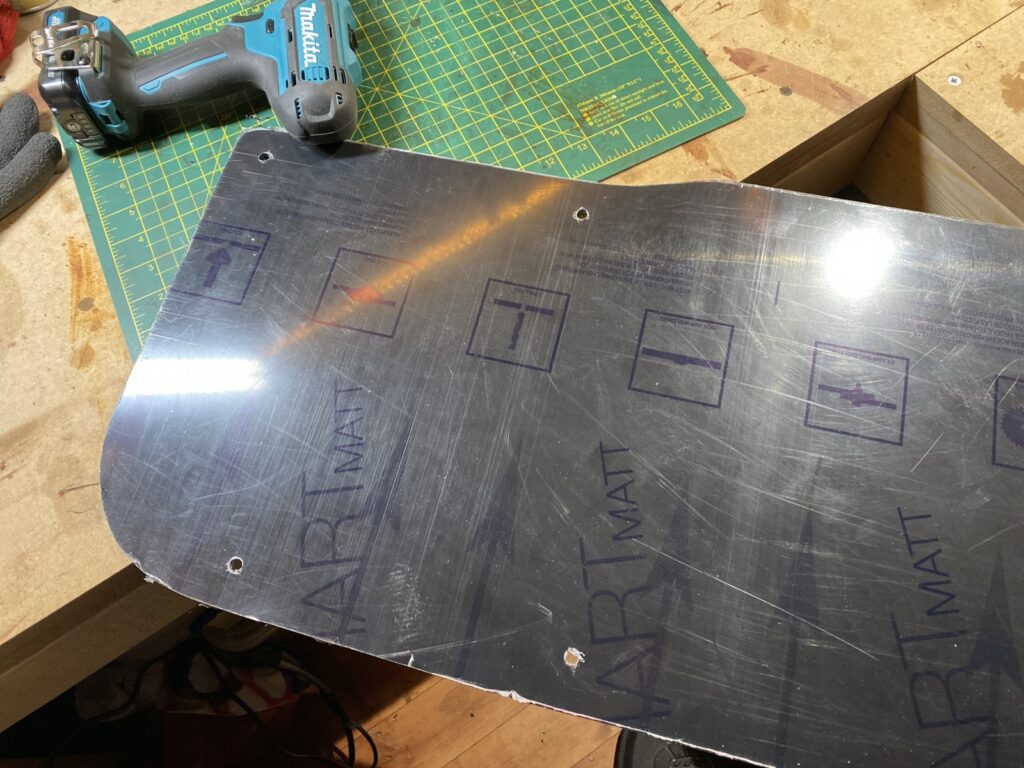
Using a Dremel cutting disc I roughly cut the shape then hand sanded it smooth ready to fix the rubber outer trim.

Finishing touch
The shape of the Jimny rear panel has a raised notch at the top and it was crying out for something to fill that void. I thought about securing additional quick fists however the idea of being able to quickly remove the entire molle panel appeals to our overall build goals of a daily driver and part-time recreational vehicle.
To finish the edges nicely I found some 3mm rubber U channel edging on eBay. This just slotted on, so far I’ve not needed to glue it.
I opted for something aesthetic and made a leather badge to screw directly onto the panel. It’s easily removable so I can make a bunch of different colours later should we wish too.
Fitting the backing panel
To ensure the panel will sit flush against the door I needed to replace one of the bolts with a flatter head as it was protruding out 10mm.

To attach the panel I inserted 8 x M5 rivnuts into the standard panel holes that the plastic trim mounts onto marked on the image below. If I decide to revert back to the original stock trim all I’ll need to do is carefully drill out the rivnuts.
UPDATE: I’ve since removed the rivnuts to use the new design that mounts onto the plastic trim and it a a total pain in the ass. Managed to get them out with a combination of using a drill and dremel cutting disk. Doing so has removed paint so I had to treat the metal to avoid rusting.

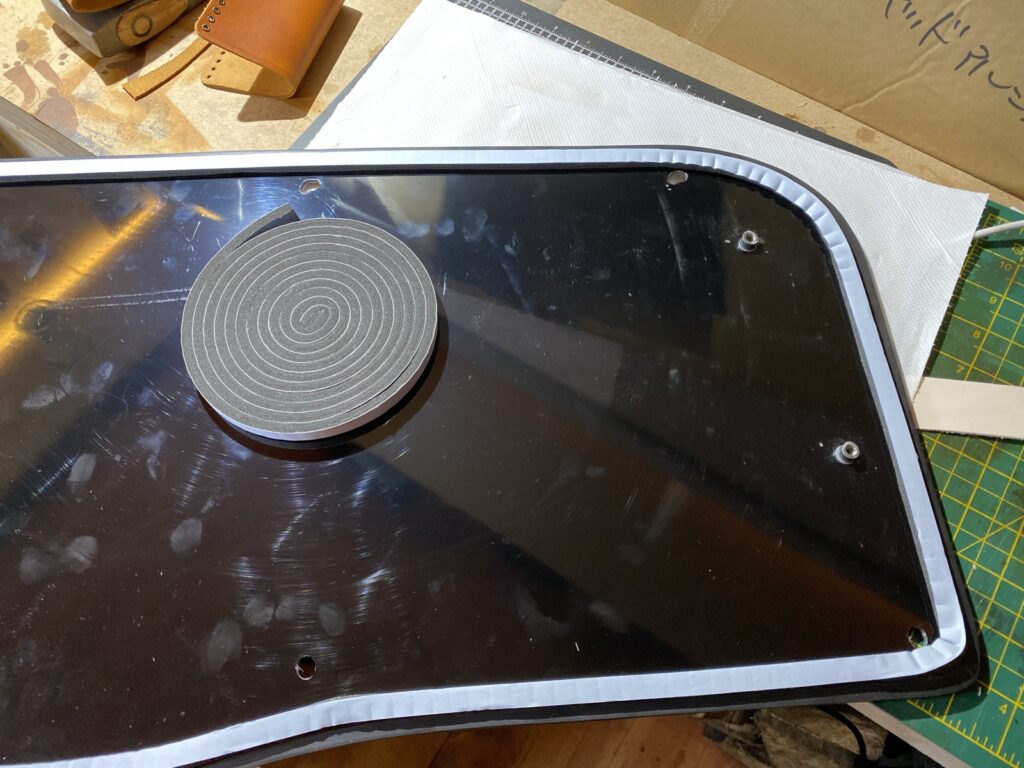
The holes I drilled in the panel weren’t perfectly matched up so they ended up bigger than they should have been. I used some M5 black stainless steel flat washers with 25mm diameter along with M5 button head screws. This covered my shoddy measuring errors ?.
To help close the gaps between the panel and the door I added some 5m Black Foam Draught Excluder Tape Single Sided Closed Cell 10mm Wide x 6mm.
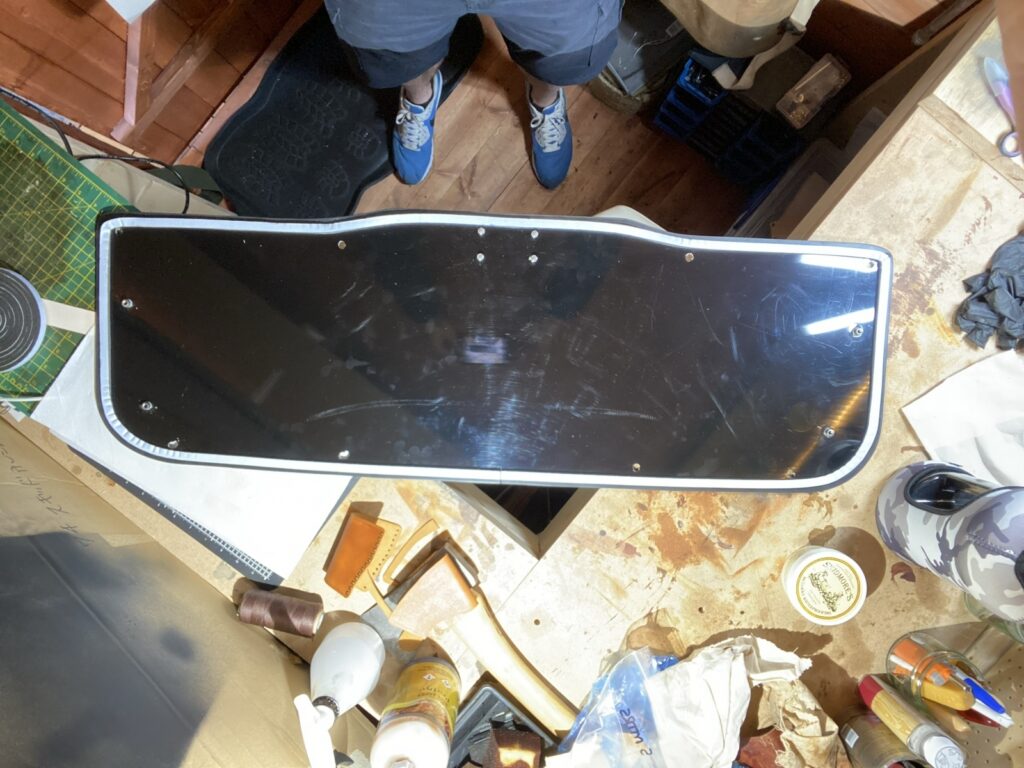
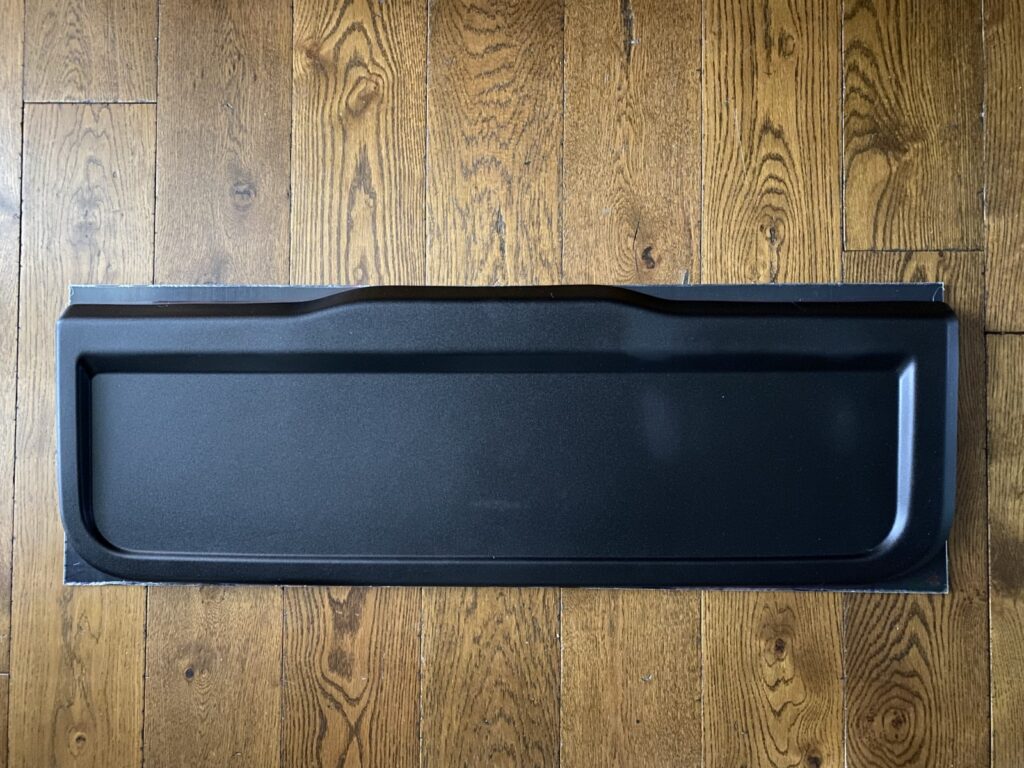
Here’s the finished backing panel installed.
I’ve driven around to make sure there’s no squeaks or rattles and it feels very solid and ready for the next stage to make the molle panel itself.
I’ve ordered 2 samples of high density plastic, 3mm and 5mm thick to see which one I’ll use. I did consider an aluminium sheet but I believe this will do just as good a job and hopefully be easier to work with.
UPDATE: If I make the backing panel again to tidy up the misplaced holes I’ll likely choose a different material. It’s easy to dent the Aluminium composite sheet when securing the molle panel to it. It’s not going to cause any failures in the mod but I’ll probably make it out of aluminium next time. However I’ll need to account for the shape of the rear door more if I use a more rigid backing panel.
Making the molle panel
Plan A
I ordered the plastic panel 950mm x 250mm x 3mm you could go with 5mm thickness if you want it more sturdy. It’s tricky to know what the best size would be and I know from a friend on Instagram that he made his 1000mm x 300mm so mine will definitely fit.
Here’s the panel with the molle sizing grid I made. Once lined up and stuck to the panel it was ready to start cutting the holes ?.

It took around 20 minutes to realise this idea totally sucked.
Drilling 512 holes, cutting 128 squares and sanding them smooth would be an absolute nightmare. The decision to bail on this idea was forced by the fact I cannot guarantee a finish quality I’d be happy with. Every time I open the tailgate looking at 128 holes that are all misshapen would drive me crazy.

Plan B
Back to the drawing board. I hunted around to see if there was a suitable option to get the panel frabricated. The main problem I encountered is creating a file suitable for companies that offer these services.
I found a company online called Fractory. This looked like a great option in respect to material options and cost. However I would still need to create a STEP file which is some sort of CAD file.
The first attempt was exporting a SketchUp design to a .DXF file. After sending it in for a quotation it turns out my file was just a long line ?. They rang me to help suggest ways to fix the file, pointing out Autodesk Fusion 360 as some software I should try.
3D software is confusing for beginners but trusty YouTube came to the rescue. After watching hours of tutorials I was ready to give it a try.
What a fun piece of software this turned out to be! I’ll definitely be playing more with this and have some ideas brewing for the Jimny camping build.

After a few days work I managed to create a perfectly aligned panel with the correct hole sizing and spacing for molle panels.
I placed the order on the 8th of April on their the website. You simply upload a file and pick your materials and coating. The costs can mount up, so I chose 3mm aluminium and the cutting service only. If I had a larger budget powder coating would have been great.
ETA for delivery 20th April.
Panel test fit
The panel arrived safely on the 16th of April! Impressive given the Coronavirus lockdown situation. It looks awesome and of course is accurate to my cad file measurements.


To attach the molle panel I used M5 rivnuts direct into the backing panel. To create the right amount of spacing between the two panels I used 1″ spacers. Plastic or metal will do depending on strength need.
Painting
I did some research online regarding how you paint aluminium and apparently a few coats of Self-Etching Primer is needed. Just follow the instructions on the can.
To prepare it to be painted I first smoothed any sharp edges then added 2 thin coats of primer and left it for 24 hours to cure. After which I added 3 top coats. I left it for a few days to make sure it was dry.
Finished Project
Wonders never cease. It worked out great!
Truth be told I didn’t expect it to come out as well as it did and it’s rock solid. There’s no rubbing or catching on any of the trim or the Suzuki rubber boot liner.


I wholeheartedly recommend good quality molle pouches as they fit and hold in place better than the cheaper ones. These have more structure to them too due to the inner lining and that helps a lot with reducing the sagging and shuffling around.

The green first aid kit in the demo video below is a cheap pouch and it doesn’t have the same number of molle loops as the ones I got from Military1st, so that’s going the journey. I’ve ordered a rip away first aid kit which will be way more useful in SHTF situations.
Now that I’m mounting my camping axe to the side of the Jimny I think I could have secured the molle panel to the original plastic panel if I were to drill holes in it. That would have saved the need to make the backing panel.
UPDATE: There was no need to make the backing panel. The panel mounts onto the plastic trim very well and hold everything I pack into the pouches. It would hold a camping axe too but I’ve no need to mount one there as it’s better along the sides underneath the windows.
I still managed to mount one of our knifes in a handy location for chopping some food up. Yeah, it’s no kitchen knife but it cuts anything and we’re not aiming for Michelin Star campsite cooking.

In every day use we store empty supermarket shopping bags, hiking boot cleaners, face masks, gloves, small umbrellas and all kind of things in the pouches. Nothing of value really until we go camping. Then we swap them for many useful camping tools and accessories such as fire lighting equipment, toiletries, LED lights, torches, cutlery, etc.
Final Costs
As always I end up spending more than I expected but that’s ok. Time wise I lost count of how many hours this took. However it’s fun, I’ll get a lot of use out of it and it’s my own unique creation. DIY is a positive hobby that keeps me out of trouble.
- Aluminium Composite Panel = £31.77
- Aluminium Molle Panel = £89.11
- Self-Etching Primer & Black Metal Spray Paint = £27.64
- Fittings = £3.99
- Molle Pouches = £122.80
- Rip Away Molle Pouch = £8.00
- Quick Fist Clamps = £13.50
- Molle Knife Holder = £19.00
Total = £315.81
I bought expensive molle pouches but you can get ones far cheaper, I’m just very particular and wanted those exact styles. You would probably spend £50 to fill the whole panel on AliExpress.
Links here if you need them.
Hope this article has been useful to spur you on to making something for your set up.
UPDATE:
I managed to work with the guys at Jimny Style to get this panel professionally made. They’re now selling them on their store here!


Improvements include:
- High quality finish. Still lightweight aluminium but professionally powder coated instead of spray painted like my version.
- Super quick to fit, you simply drill 5 holes in the OEM plastic trim. No need to make a new backing panel or insert any rivnuts into the door. Meaning no mods to the bodywork and a better overall finish.
- Better mounting position. It sits higher than the DIY one I made so there’s less chance of the pouches catching on whatever boot rubber mat you use.
- Better sized and spaced molle holes. Some molle pouches come with really thick webbing and these fit easier on this new design than on the first iteration.
- Lower cost. It’s £50 cheaper to buy professionally made by Jimny Style than it was for me to DIY my own. Also no prep or build time needed.
Great, exactly what I was looking for 🙂
I want to mount a folding table to the door & apply the ‘open-door-from-inside” hack without ruining the original cover.
I will try with plastic first & then maybe go for a checker plate.
Anyway, how did you determine the right position for drilling the holes..?
Hi.
I measured the distances of the holes on the door then tried to apply them to the panel. I searched in vain to find a good guide for perfectly aligning holes from one place to another.
I was not accurate enough on many of them. So I ended up ordering the black m4 penny washers to cover my mistakes 🙂
May I suggest making a template using a sheet of paper taped over the area and the holes imprinted using a pencil.
The template can then be placed directly onto the panel for marking.
Yeah I should have done that on the door hole marking thanks Tom 🙂 I might make another one later that has accurate holes.
The paper or core flute template is what I did. The one factor I never accounted for was the slight curvature of the door. I just transfered flat template to flat alloy straight away. so my holes where still out just a little bit .
Im in the process of getting a molle panel drawn up with cad. The variation of mine it it will double as a fold down table. Im very keen to see what yours looks like, its been the inpiration for my setup.
Hey Tom, I’d love to see the end result of yours mate 🙂
Sorry to disappoint but haven’t done mine yet. Looking to soon though for a door mounted table.
Where did you source the plastic panel?
Hi Tom, I’ve added a link above to the website that I bought the plastic panel from.
what size did you order the back panel you shaped on the original one? thanks!
ouch nevermind! found it! <3
No worries mate! 🙂
Hey Mate. I love the build! How did you create that nice finished edge trim on the front part of the backing panel. I know you used foam for the rear side but curious about the front. Very clean
Hey Tom, I’ve added a bit to the blog but it’s basically 3mm Rubber U Channel Edging.
Works a treat 🙂
Love this, any chance you’d be willing to share the graphics file?
Never mind, just saw you were thinking about putting it up on Etsy, I’ll hang out for it.
Hey Cameron, I’m now working with a company to get these manufactured properly with an improved design ?
Any update on this. I’d be keen to buy.
Hi Glen, probably best to register your interest Jimny Style https://jimnystyle.com. I know they’ve been doing test fits of the first prototype they’ve made but not certain when they’ll be available to buy. Cheers!
Hi Glen, Jimny Style are selling them now https://jimnystyle.com/collections/just-listed/products/jimnystyle-x-geordie-jimny-tailgate-molle-storage-panel-for-suzuki-jimny-2018
Cheers Paul
Hi mate,
Are you willing to share your measurements for you Molle hole sizing and spacing?
I’m going to get a similar tailgate made for my Jimny.
Hi mate, I would have originally but I’m working with a company on the design, so can’t release the CAD file now. Sorry bud!
Hello mate,
If you ever decide to sell this as a kit please let me know, I wouldn’t mind being your first customer for it.
This and the one you have on your rear window
Hey bud, busy working on it with a reputable company! Hope to see them available soon 🙂
Hi Layth, Jimny Style are selling the molle panel now 🙂
https://jimnystyle.com/collections/just-listed/products/jimnystyle-x-geordie-jimny-tailgate-molle-storage-panel-for-suzuki-jimny-2018
Cheers Paul
Looking into buying your kit through jimny style
Keen to make it fold down at the bottom to use as a table (already looking into telescopic legs that would support it) – for some reason no one seems to have made one of those awesome flip town tables you see for Jeep wranglers for the new jimny
Would your design/product accommodate room for hinges at the bottom where the spacers would go? (If they’re 1 inch spacers I’m thinking this would be a big enough gap)
Cheers
Hi mate. I personally would make a strong backing panel and attach a flip down table to that. The molle panel would make things awkward for the set up you need.
Checkout these posts for inspiration:
https://www.instagram.com/p/CG1f8X_gcuH/?igshid=e6bbsqzau3x1
https://www.instagram.com/p/CJgHZOdAlI2/?igshid=11w2g54khyo16
https://www.instagram.com/p/CHX1NXoAQx7/?igshid=1a8huci1dr3tg
Hope this helps
Hi there, I’ve ordered/received your molle panel. I was just wondering whether there was a particular reason a screw and spacer haven’t been fitted at the bottom middle section? Curious to know the thought process? Tempted to fit one myself to balance out the metal support. Otherwise cracking product and glad to see your passion has moved into the market, top work!
Hi Jon, glad you like it! The bottom middle section we left free as the original version only needed 4 (sides) but we added the top one to lessen any flex.
I’ll add a bottom one to mine to see if it improves the mounting. Let me know if you do and what you think? 100% keen to make any improvements based on customer feedback.
Just installed the tailgate molle storage – super easy to install & looks great. Setting up my Jimny for an overland trip in Australia.. this is going to be heaps helpful for storage and organisation. Continue the good work!
Fantastic! Really happy it’s working well for you. Safe travels, you’re so lucky living there with a Jimny 🙂
Hi dear ..
I am Mohammad from Kuwait I need this panel but I need more, I need panel and can make table can you make..?
Hi Mohammad, unfortunately I don’t make them. I managed to get a company to manufacture the normal Molle panel but there’s no plans for adding a table to it.
Hi! For your original backing board, what solution did you come up with after removing the rivnuts? I have cut a sheet of aluminium as I was looking at getting the molle storage panel from jimnystyle but I’m keen on making a table and attaching the molle panel to the bottom of the table. I’m trying to work out the best way to attach my metal backing board sheet to the jimny tail door. Cheers from Aust
Hi Keith, I added some rivnuts into the holes that the OEM plastic trim popped into. I’ve since drilled them out and just mounting to the oem trim which is working perfect. Obviously no drop table though.
Cheers
Paul
Hey Gerodie, great work man. Seriously impressive. I read through the entire thread and had no idea that its you who created the JimnyStyle one (the whole time i was thinking, why didnt he just buy it from JimnyStyle) haha.
Anyway, was wondering why you didnt let the screws reach the metal part of the door that way the molle would be a lot more secure. Im just worried I would pull something out or go over some heavy off-road land and the weight would pull out the entire plastic panel/cover. Am I clear ?
Was wondering if there is a way I could reach the metal part of the door in order to secure the molle better this way I wouldnt worry.
Again, great work, thank you for your efforts for the entire Jimny society !
Hi yeah they have made it a great quality product compared to my first prototype 🙂
The weight for typical items stores in molle pouches does warrant a rigid backing panel to replace the trim. We’ve had ~6-10kg of total weight including the trim and molle panel without issue. For most peoples needs being not having to modify the car other than a few holes in the easily replaced plastic trim is a better option.
If you want to carry some heavy items then a rigid backing panel similar to what I originally made will be better suited. I had to insert rivnuts into holes on the bodywork to mount it so that’s obviously a bit more difficult if the customer does have the equipment.
Easy DIY project though if that would serve you best. I managed it so that must mean it’s idiot proof 😉
The tailgate and window molle are still my most used mod. I’m biased of course but love them !
Cheers
Paul