
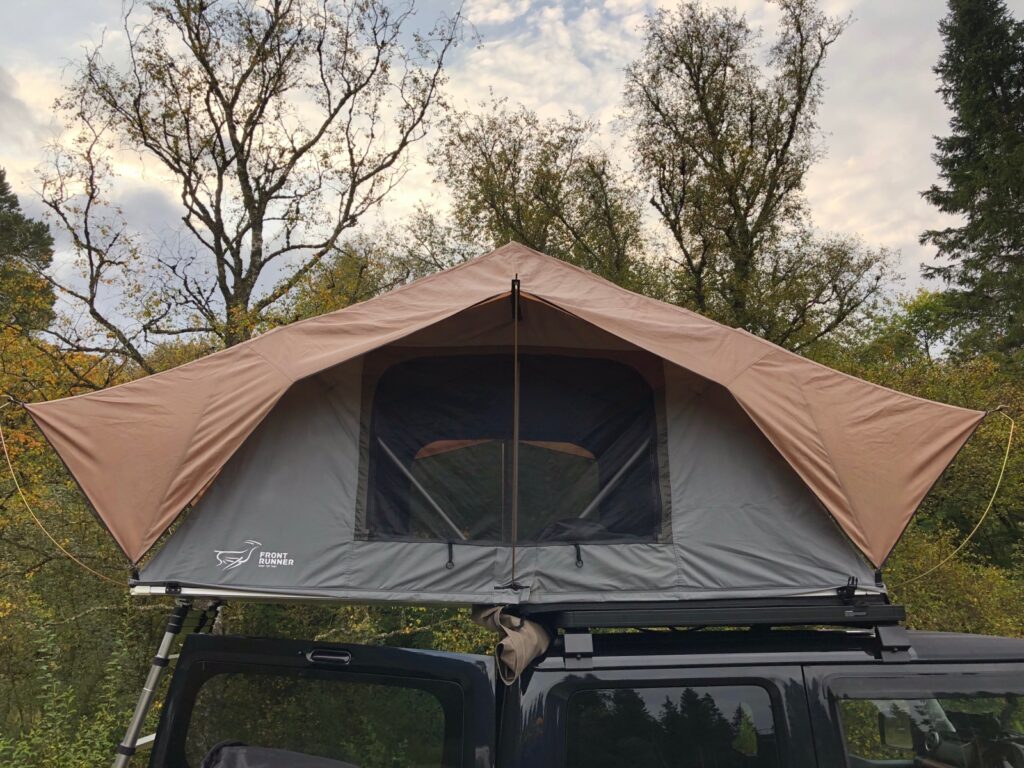
This guide is suggested equipment and the easy modifications anyone can do to have an ultralight Jimny roof tent build.
From experience this is a good balance between roof load weight and overall camping comfort. For a roof tent set up this is not only ultralight, it is ultra comfortable.
IMPORTANT!
Read about roof weight loads and how it impacts the Jimny and your driving experience.
Shopping list
I’m not affiliated to any company linked in this guide. I’ve bought everything with my own money. I can only vouch for the quality of their products as a paying customer.
I’ll list everything in GBP (£) for what I paid and links to their respective websites. Prices may not include shipping and you may get a better deal if you shop around, good luck.
- Roof Top Tent = £969.72
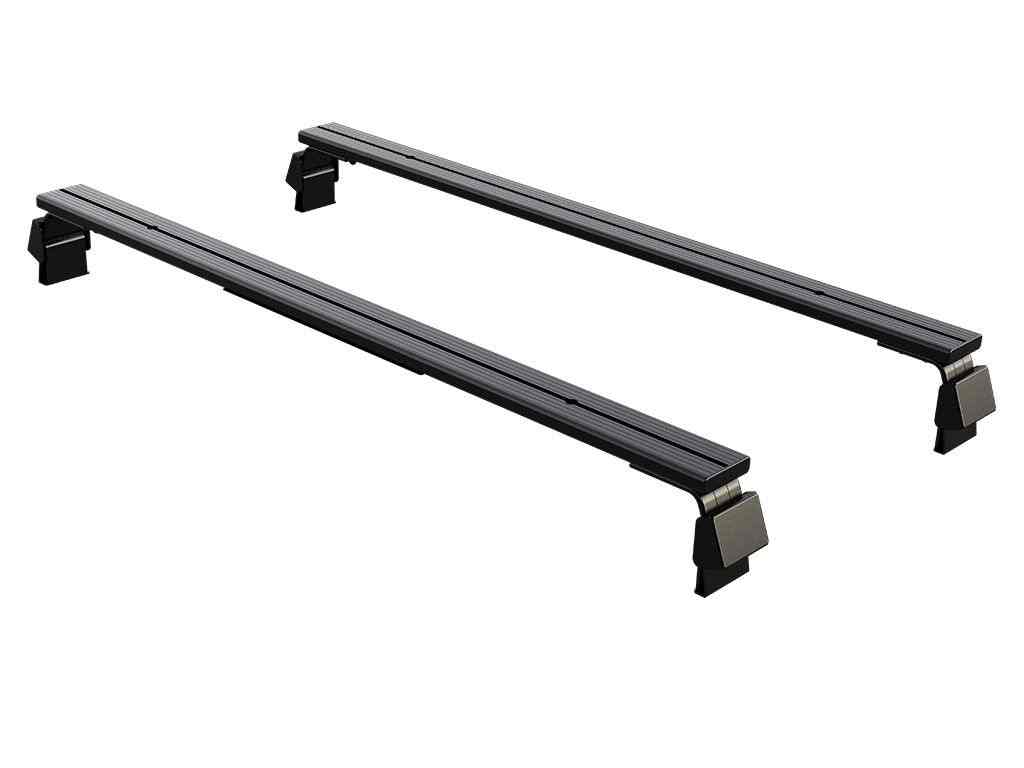
- Suzuki Jimny Load Bar Kit = £278.96
TOTAL = £1248.68 (at time of purchase)
The roof tent is one of the lightest on the market and with some mods it becomes even lighter.
The load bar kit is brand new from Front Runner. In actual fact the Slimline II 3/4 rack that I previously bought has the necessary components to mirror the load bar kit. I only needed to buy the load bar end caps.
Subscribe
Get our monthly email, Out There Life for latest interviews, blogs, camp stories, gear tips & guides, new products and more… straight to your inbox.
Register freeHere’s a quick video of the final ultralight set up.
Modifications
Here’s how you take an already lightweight set up and make it ultralight.
Tent ladder mod
Make the ladder quick release and store it in the Jimny during transit. It’s not hard to reach up and fix the ladder back on at camp and storing it in the Jimny reduces the roof load by 4.6kg! This is the single biggest reduction in weight you can do.
You can make this process even easier by using quick release seat post bolts instead of the M6 bolts.

The ladder that comes with the tents fits in the Jimny boot space (seats dropped obviously lol) but it takes careful manoeuvring to avoid scratching your interior. I learnt the hard way but it’s doable.
If you want save space in the Jimny while also upgrading the tent ladder to something more substantial, then go all in and make your own quick release telescopic ladder. I’ve posted an article about how I easily modified a telescopic ladder from Amazon and made my own quick release brackets. This has been a great mod and fun to do and has made getting in and out of the tent easier due to the extra ladder width and adjustability.

Tent poles
This obviously isn’t a mod and no effort is required for this weight reduction. The poles that fix to the rain fly are generally left in the tent when you fold it down. They weigh 1.2kg but every bit counts.
They fit neatly behind the front seats so you can store them in there on the go. We used to tuck them into the first replacement mattress we bought but it didn’t stand the test of time. Regardless, the poles easily slot anywhere in the back.

Removing the mattress
There’s very little weight reduction gains here (0.5kg) but it’s more to do with increasing the sleeping comfort and reducing height profile of the tent when packed down to reduce the wind drag. Read more in A Detailed Guide To Camping with a Suzuki Jimny.
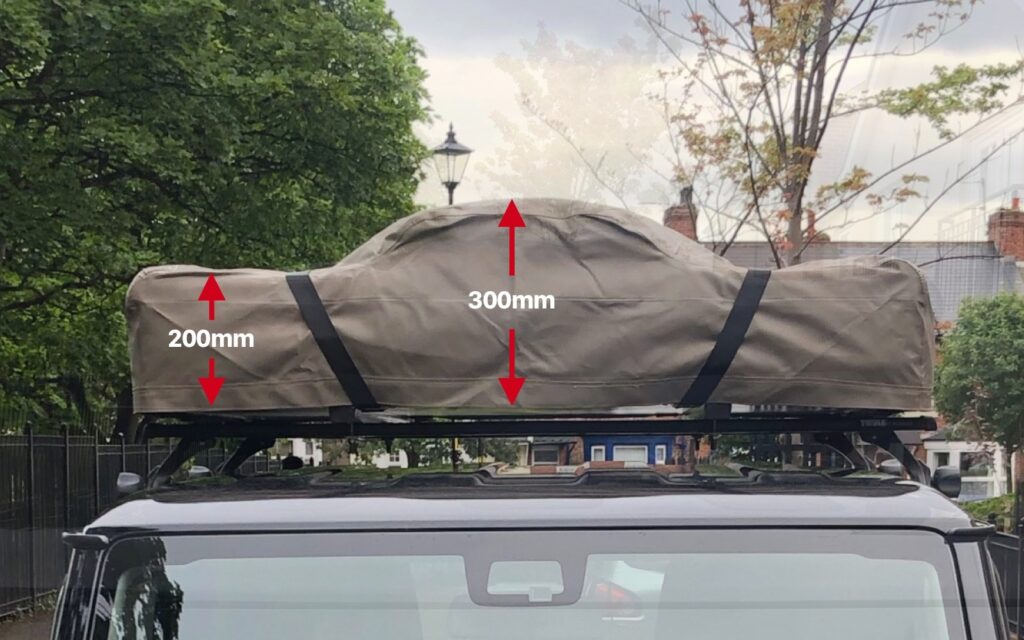
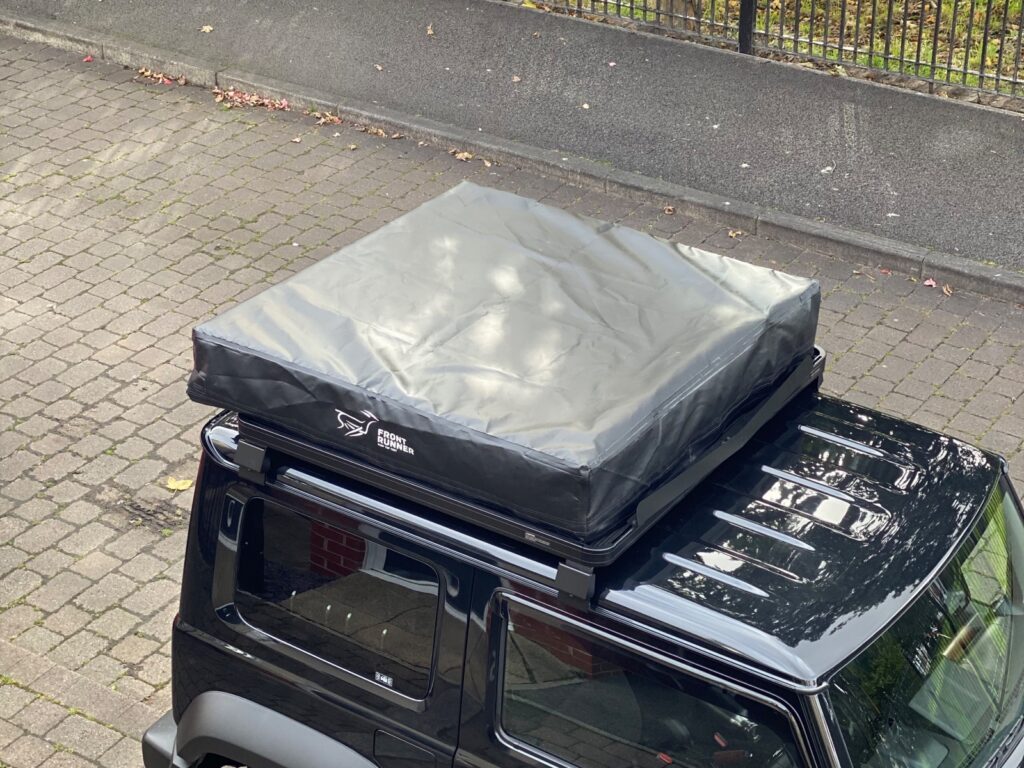
Reducing the height of the tent
Okay, so this mod doesn’t effect the weight but it does have an impact on the wind drag and potentially the fuel economy. This effects your driving pleasure so it’s worth doing. The tent with the ladder attached has a total height profile of 300mm. That’s a big blocky chunk up there on a car that’s got the aerodynamics of a Borg cube.
When you remove the original tent mattress you’ll notice the height at the front of the tent reduces considerably when it’s packed down.
NOTE: This only applies when you mount it off the rear of the Jimny as we do (see the picture at the start of the guide).
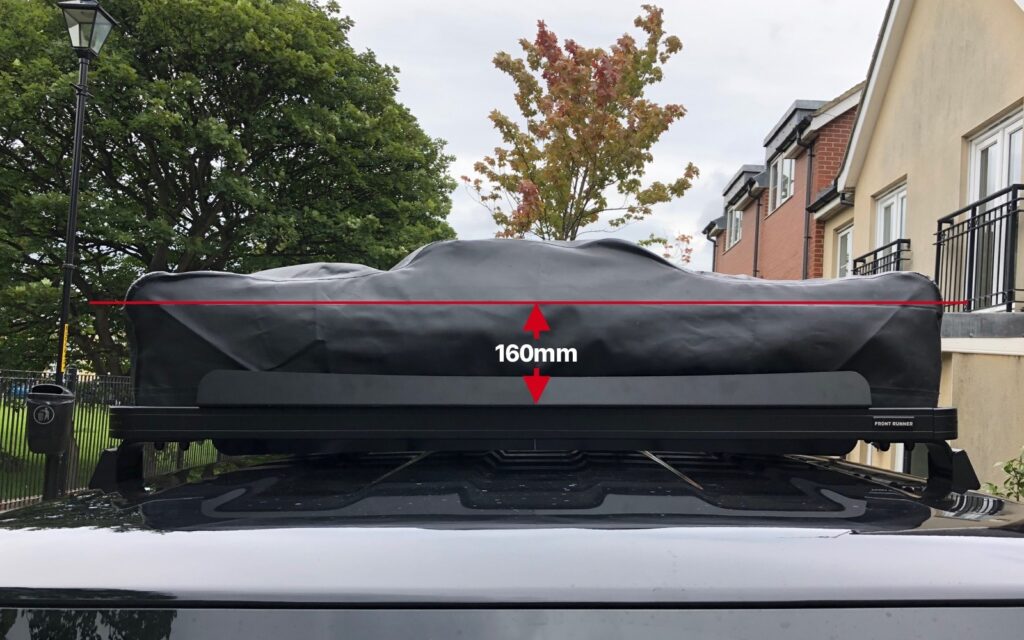
I’ve had the tent cover modified to fit the new shape and profile of the tent. The red line indicates where the new height is. Here’s the finished cover that no longer needs the 2 big straps on the top too.
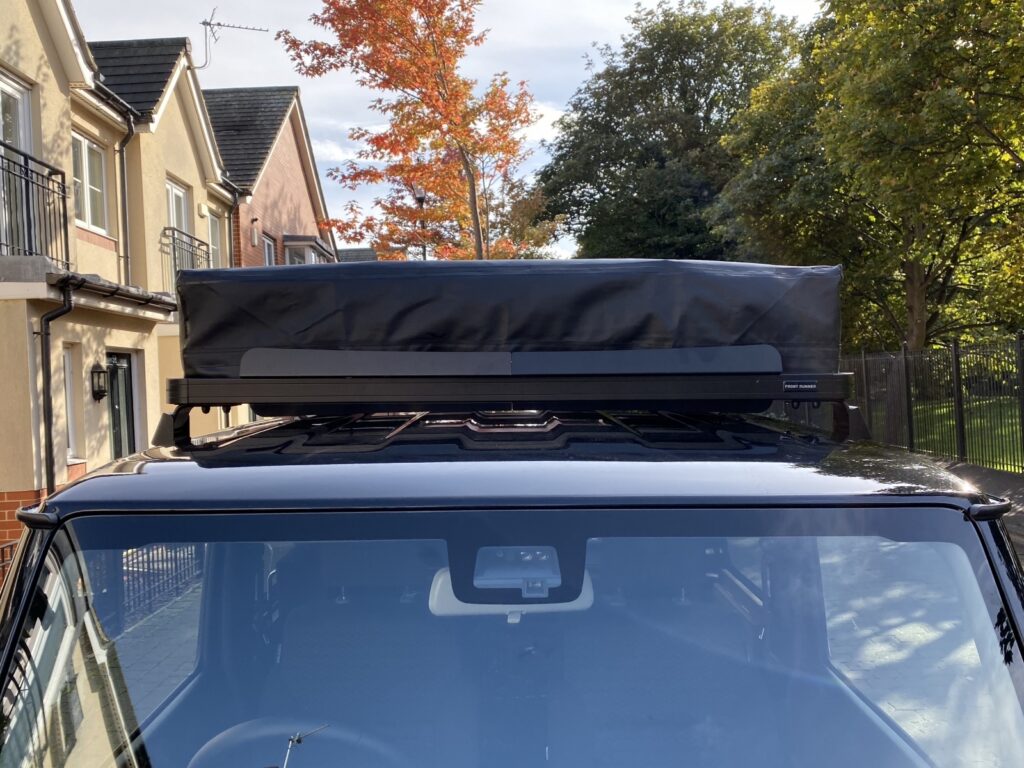

Using the load bars and the original tent mounting brackets is also recommended over buying the tent mount kit from Front Runner. Not only do you save £50 you also lower the overall height of where the tent sits on the vehicle by 60mm. Giving you a total height from the ground to the top of tent of ~192mm.
Subscribe
Get our monthly email, Out There Life for latest interviews, blogs, camp stories, gear tips & guides, new products and more… straight to your inbox.
Register freeTop tip: Get shorter hex bolts or cut the ones you get with the tent shorter. You’ll need to do this due to the low profile gap between the roof and the bottom of the tent. Plus you’ll need a long ratchet spanner to reach the bolts to tighten them up, this can be fiddly especially if you have big hands.

You can also choose to drill holes directly into the load bars for the tent bolts to drop into. I’ve chosen to do this as it means I only have to secure 4 bolts rather than 8 when mounting/removing the tent.
Fuel economy
You can expect a fuel economy improvement of ~35 mpg to ~38 mpg on a run once these adjustments have been made. As the Jimny has a small fuel tank this can help more than you think.
After further fuel tests with the roof tent on and off the Jimny there is little difference in fuel economy. Rather than make false claims I’ll keep testing and update this article once I know more.
UPDATE: Recent tests on the auto Jimny with 5000 miles on the clock are showing 29 mpg with the tent and awning attached to the front runner load bars. We’re getting 35-37mpg without the tent and awning on the car, just leaving the load bars on 24/7 for normal daily driving.
UPDATE 2: We’ve settled at around 31mpg for daily driving depending upon conditions, winter is obviously worse and tyre pressures impact this figure.
Total Roof Load
Crunch time! With all the changes let’s do a side-by-side comparison of weight. I’ll round up the numbers to factor in things like the tent mounting plates.
Without Mods
- Tent 43kg
- Load Bars 7kg
50kg
With Mods
- Tent 37kg
- Load bars 7kg
44kg
Summary
As you can see none of the recommendations in this guide are hard to do. The cost isn’t bad for roof tent camping, it’s still crazy for what it must cost to make the roof tent, imho.
I think 44kg is incredibly low for what you get in return. A 44kg roof load you hardly even notice. I’ve been in high winds with more. Many roof tents weigh 70kg without even considering the roof rack or load bars. So this is 70% lighter than the average roof tent alone and 12% lighter than the unchanged kit.
The result is a lighter, more comfortable and convenient camping build with quality kit that make the experience better.
- Set up time is still quick coming in under 5 minutes.
- Fuel economy is better.
- Help maintain the feel on road.
- Helps to maintain its off-road capability (any significant roof load will impact off-road capability)
- Aerodynamics are better.
- Reduced wind drag.
- Warmer and more comfortable to sleep in.
- A wider and more stable ladder with more adjustability to find the perfect height.
- The tent sits perfectly on the roof of the Jimny, no overhang.
As always I’ll update this guide as I discover any improvements or better kit.
Hope it helps you on your adventures.
Subscribe
Get our monthly email, Out There Life for latest interviews, blogs, camp stories, gear tips & guides, new products and more… straight to your inbox.
Register free

Thanks for a lot for a lot of very useful information. I like the set up of a roof top tent, but have been worried about the aerodynamics. A lot of that has now been put to rest with your article. I read that you first used Thule racks but changed over to Front Runner. What was the reason? In Australia front runner is harder to find compared with Thule products.
Hi Alister, mainly changed due to lack of strength of the thule bars I originally bought. They were rated to 100kg. With a 2 bar thule setup the one that takes the majority of the weight when we sleep in the tent (towards the boot end in my case) started to sag too much. It did hold but we were too worried it would give way. I added another thule bar a few inches away from the one that sagged and this held really well though. With the front runner bars I only need 2 of them, so it was just a case of trying to keep things as minimal as possible. Stronger thule bars I’m sure will be just as good.
Hi, great blog and great choice of vehicle as well. I also have the front runner RTT. And I chose it for exactly the same reasons as you. Its light, low and well-priced. As my garage has a somewhat low ceiling, I also have strived to make the tent as low as possible, including removing the ladder. I am very impressed how low and neat you have managed to get your tent and I’m going to try this myself. What most impresses me is your tent cover. I understand that it’s a modified Front Runner cover, were the top has been replaced with a flat one. But where did you find the material, which matches so well with the rest of the cover?
Hi Erik, thanks! The top section material was sourced by the company that made the modification to the cover. It was standard black PVC material that matched perfectly ?
Hi Geordie Jimny, what exactly has been changed on your black cover? Did you only have the bulge for the ladder removed or did you also have the height changed?
You write that the two thick straps are no longer necessary in your “construction”, can you explain why? I think that the cover is already strong enough to hold the tent together and the straps are just an additional safety feature, but why you explicitly say that they are no longer necessary would interest me.
Greetings Philippe
Hi Philippe,
The cover has the top removed and replaced with a flat piece of PVC. The straps that ran either side of the ladder weren’t needed after modifying the top to remove the bulge from the ladder. You could still leave them on but I found them a pain to use and it’s had no detrimental effect to securing the cover on. Also I had my cover reduced in height at the same time as removing the top section. This is because I removed the big mattress in favour of better inflatable mattresses which means the total height (not the hinge side) dropped lower. The total height is around 180mm sloping to 200mm (hinges). However the 2 brackets for the ladder on the opposite side of the hinges balance the overall height profile to 200mm.
I plan on making more modifications to try and make the total height profile and weight even lower. It’s on the list anyhow 🙂
Hi, great blog thank you, I have just ordered the front runner tent and Fr slimline2 full rack, please explain in more detail how to mount with the brackets you mention.”Perfect fit for the brackets that come with the tent” and can they be modified for quicker release if you want to take the tent off when not going camping?
Hi David, this is talking about mounting the tent in load bars only, you will need to buy the front runner text brackets as you’re using the slimline 2 rack. More details here https://geordiejimny1.wpengine.com/a-detailed-guide-to-camping-with-a-suzuki-jimny#roof-top-tent
Good morning Geordie, have you ever thought to mount an hard she’ll roof top tent as for example a Skycamp mini (56 kg)?
Many thanks.
Hi, yeah the sky camp mini I mention a lot in guides. It’s at the cap weight I would go to but it’s quite expensive. Couldn’t justify the price for my use. If I did longer, regular overland trips I wouldn’t hesitate.
Their x-cover mini is another great one that’s due to be released. It’s even lighter.
Forgot to say, I’d remove the awning if I went for the skycap mini and keep the ladder in the car during transit. This I believe would get total roof load while driving to 57kg (Tent + Load Bars). One caveat is that’s higher weight than I would personally run with and would not do any proper off-roading with that attached.
I didn’t see a weight of the Front Runner mattress, and the weight of the inflatable one you replaced it with? Do you know those weights?
Did you install some sort of eva foam pad as well on the floor of the tent? I found a 6mm marine grade foam on Amazon that has a Teak look. A bit spendy.
https://smile.amazon.com/dp/B08Q23WZN4/?coliid=I17VRH4YAGU868&colid=2D4AG1XBACYM9&psc=1&ref_=lv_ov_lig_dp_it
Lastly I figured out a way to fabricate a ladder quick disconnect bracket out of aluminum extrusion T and U shaped. I may just use the U shape with the factory T shape brackets.
Regards. Mike
Not sure what the original mattress weighs. I don’t leave the inflatable mattress in the tent and the two I use are different weights.
I did add some foam mats though which added back probably the same weight as the FR mattress. These might not be good for condensation in some climates but I’ve not had any problems here.
It’ll be good to see the brackets you make too Mike ????????
Hi Geordie Jimny, I’m looking into getting myself a jimny as a daily driver but also as a little adventure car and off roader. This will be my first 4×4.
Very thankful I came across your blog because my initial plan was to carry a heavy load on the roof.
How have your front runner load bars handled with the roof tent?
Do you add anything else onto them along with your tent?
Is it possibly to add other front runner accessories onto them such as an awning or possibly the vertical surfboard carrier along with the tent installed ?
Many thanks
Louis
Hi Louis, glad the blogs help. There’s a lot of articles under guides for roof load. Basically you need to keep roof lid as low as possible. If you’re exceeding 40kg including the load bars you’re over the max weight recommend by Suzuki.
Rather than go into it all again here have a read of the roof load article but essentially my personal preference is less than 60kg under normal driving conditions. Ideally ~50kg. That’s just me though.
Load bar wise they’re super strong no issues supporting a tent 🙂
Thanks. Great ideas.
Of course lowering the weight reduces body roll.
Did you consider making a scoop just above the windscreen line to deflect the wind a bit. That might decrease wind resistance more. It certainly makes a huge difference on my motorcycle.
Cheers
Hey Ralph, might try to make a wind deflector too. If the new low profile tent works it might not be worth the extra weight as I genuinely couldn’t see that big a difference in fuel economy with the old boxy tent on. I think the Jimny has such poor aerodynamics the extra drag made little difference 🙂
Worth a try though and I’ll definitely make one if I get excess wind noise from the new tent.
Cheers Paul
Great ideas to save some weight!
I was wondering how the swap from the 3/4 roof rack to the load bars affects the load capacity. Will it be able to support 2 people inside the tent?
Cheers
It’s just the same as buying their load bar kit, plenty strong enough to hold the tent and 2 adults. Much better than the full rack imho. 🙂
Hello Geordie,
since we’ve planned to do it like you and mount the FR tent to FR loadbars instead of the SS2 rack, I´d like to ask which Windshield or Windsplitter do you use with the loadbars? I’ve mounted the 10mm mini Windshield/splitter that came with the loadbars and it don’t seem to help much against wind noises. But i have to mention I’ve don’t tried it out without any kind of wind splitter yet -could be much worse indeed 😉 You’ve said you had no windnoises at all when using the loadbars, so what kind of splitter do you use? Thx and greetings from Germany, Tim
Hi Tim,
When I first bought the front runner 3/4 rack it came with the small of the 2 (40mm I think) wind deflectors they make for racks. I subsequently stopped using the 3/4 rack and instead took 2 of the slats and load bar legs/feet to run as basic load bars.
As far as I can see, the wind deflector on the front runner load bars isn’t the same as the one I got with my 3/4 rack, it looks like it hangs down less than the one I have. I suspect that is why you might be getting a bit more wind noise.
Out of interest the first wind deflector I got with the 3/4 rack didn’t fit, it was the normal height one that they sold with other racks. I contacted Front Runner and they said it was the wrong one I been sent with the 3/4 rack. It had not long been released so perhaps they were still working things out. So if you try to buy the rack wind deflector make sure you get the shorter version, height wise or it’ll not fit under the load bars and between the roof.
Cheers
Paul
Hi Geordie, I appreciate what youre saying, however the spec says the load bars are only up to a max of 100kg, which is less than two adults. Have I misunderstood something? Are they strong enough for a tent, mattress and two adults?
Hi, The front runner load bars are plenty strong enough to hold a tent and adults. There’s many jimny owners using them also. Perhaps that eating is dynamic load rather than static.