
This little kitchen has eaten months of my life… in a good way. Dozens of prototypes, far too many mistakes, late nights in CAD, and a whole lot of head-scratching went into making it work in a Jimny. I did seriously consider turning it into a full Out There Equipped product, but the reality is simple: too many third-party parts, too many suppliers, and the logistics of packing it all into a neat DIY kit would be a complete nightmare. The risk outweighs the reward, so I’m opening the doors instead.
You’ve got the full build guide, CAD files and parts list. No paywall. No nonsense. Just take it and make it your own. And if you enjoy this kind of deep-dive project, or want to support the time that goes into projects like this, the best way is to pick something up from the Out There Equipped store.
Every order helps fund the next mad idea.
The design objectives
You might have struggled to find a compact, lightweight slide out kitchen to fit in your 4×4. This is especially so when owning a Jimny.
This design gives the best functionality for the least amount of space used. It has been tested in the field many times and has proved to be a reliable piece of kit.
This slimline camp kitchen is an essential piece at the heart of the camper set up.
Let’s get into it.
The design needed to meet these objectives:
1) Must be easy to build
I chose to build the frame using 2020 aluminium extrusion (20mm x 20mm). This is readily available and most good retailers even offer a cutting service so you can save a lot of time. Aluminium extrusion is strong and lightweight. The modular design means you can build your perfect kitchen. Size, style and functionality are all open for you to personalise to your needs.
2) Use off the shelf components
Brackets, nuts & bolts and drawer runners are all standard sizes available. There are a lot of parts I ended up getting laser cut (I’ll provide the files) but you don’t have to do this. I’m very particular on the aesthetics of what goes into the Jimny build and opted for aluminium, texture powder coated tables and side panels. You could use marine plywood or whatever materials you prefer.
3) Be self supporting
Heavy duty drawer runners with enough strength to hold the weight at full extension. No need for supporting legs. Just slide out and get cooking.
4) Be lightweight
Payload inside our campers is always a key consideration. The more we add the more we need to optimise! The main weight comes from the heavy duty drawer runners. Thankfully the kitchen itself weighs very little.
5) Have a large work surface
The usable worktop space across both sliding sections is over 135cm long and approximately 35cm in depth. Ample space for a single or double gas burner, worktop cooking prep area and an inset small sink (optional, you can simply use a collapsing portable sink if you wish).
6) Be compatible with a drawer fridge
Space is at a premium, especially in our Jimnys. A drawer fridge has proven to offer us the best solution for our style of trips. I appreciate many folks out there need more than 20 litre fridge space. However, from our experience in the UK you’re rarely far from a shop to restock. The top loading fridges are simply too bulky, taking up valuable space.
7) Easy to remove
If like me, your Jimny is your daily, then you know having it set up 24/7 as a camper isn’t always convenient. Whether it’s trips to the tip or that rare occasion there’s more than 2 passengers, having the Jimny back to ‘normal’ is better for day-to-day life. The ability to quickly remove any camping specific equipment is an element of the design I cannot compromise upon.
Building the frame
To build your frame you’ll need the following parts:
- 14 lengths of 2020 aluminium extrusion cut to specific sizes (listed below).
- A large bag of M5 x 10mm bolts, washers and drop in nuts. Aim for stainless steel if you can.
- 26-42 Corner brackets compatible with 2020 aluminium extrusion.
Below is a cut list for each length of extrusion. I recommend Ooznest.co.uk for black anodised 2020 extrusions or if you’re not in the UK, source nearer to your home. At the time of writing this guide the price on Ooznest.co.uk for all lengths totals to ~£78.
Note: You can have both ends tapped with M5 threads. I always do this in case I decide to modify the design in the future. For example you could use a drill press to add through holes where appropriate instead of using corner brackets.
From longest to shortest lengths:.
6 x 680mm lengths
4 x 400mm lengths
4 x 160mm lengths
4 x 80mm lengths
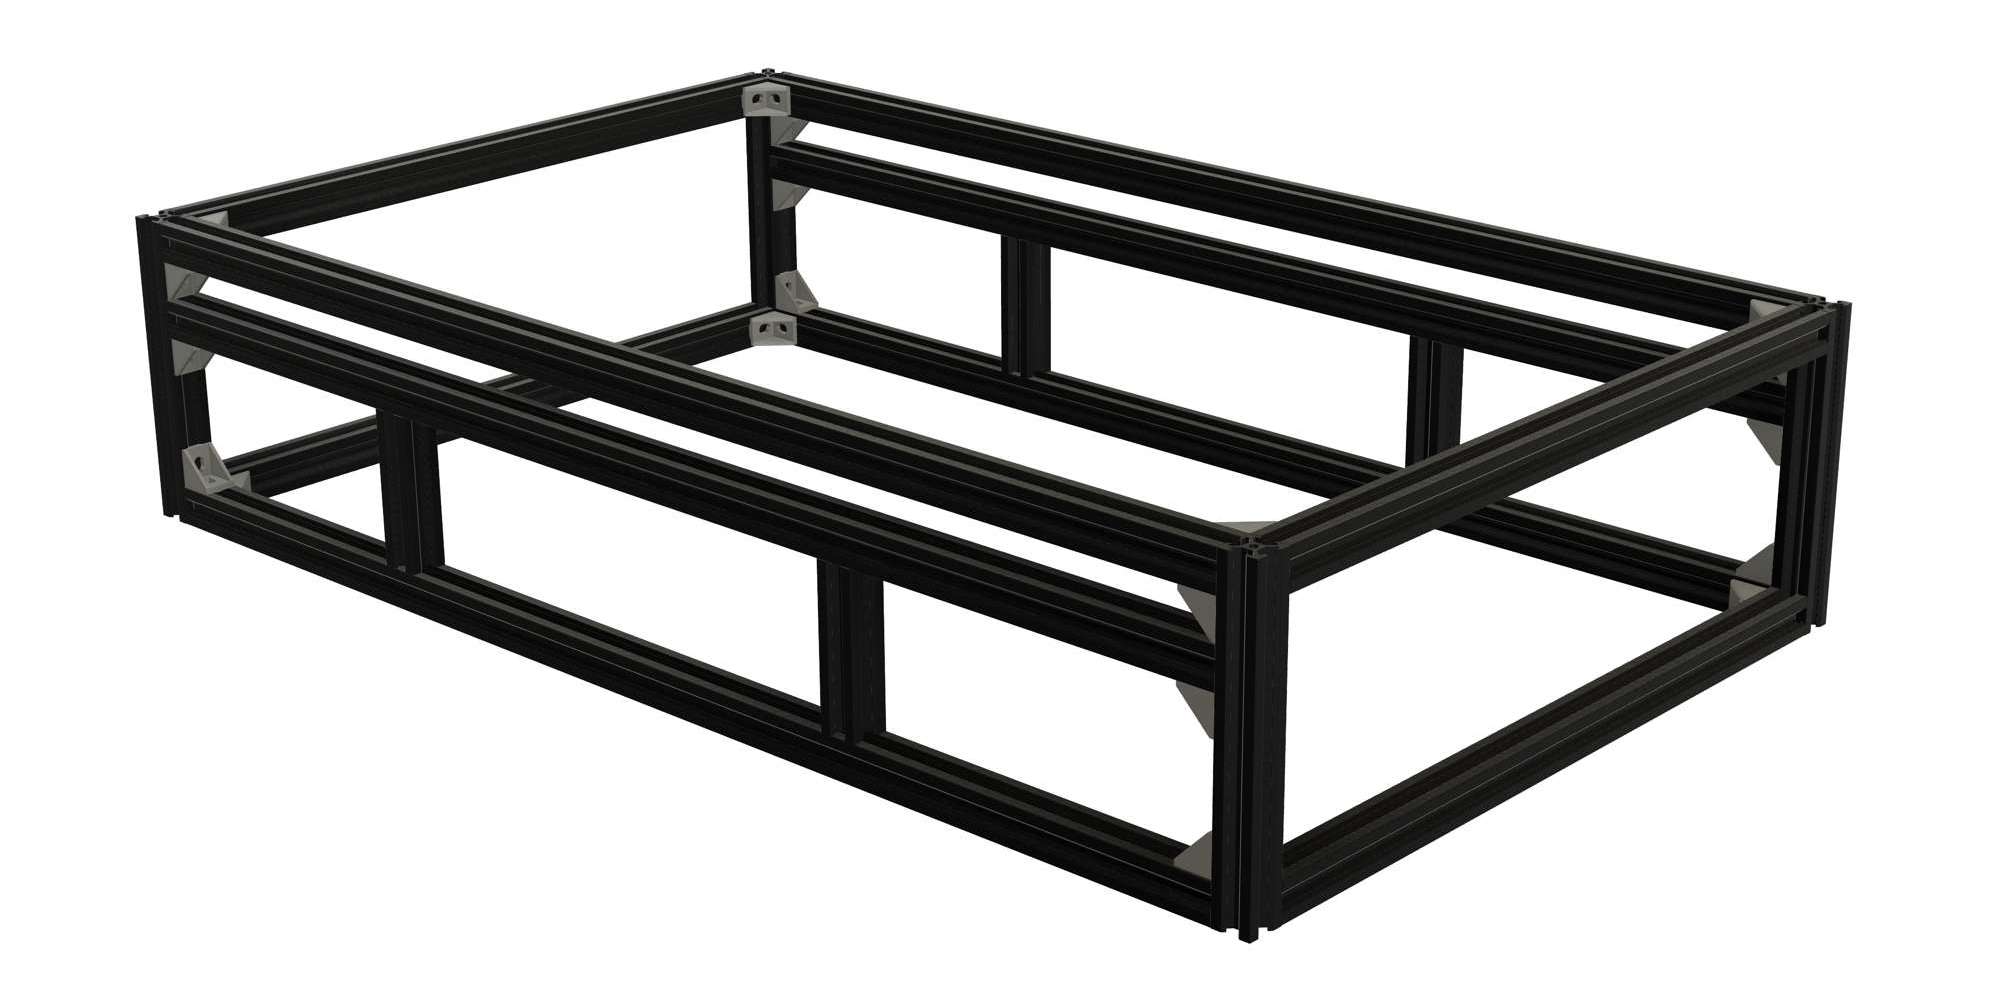
Assembling the frame
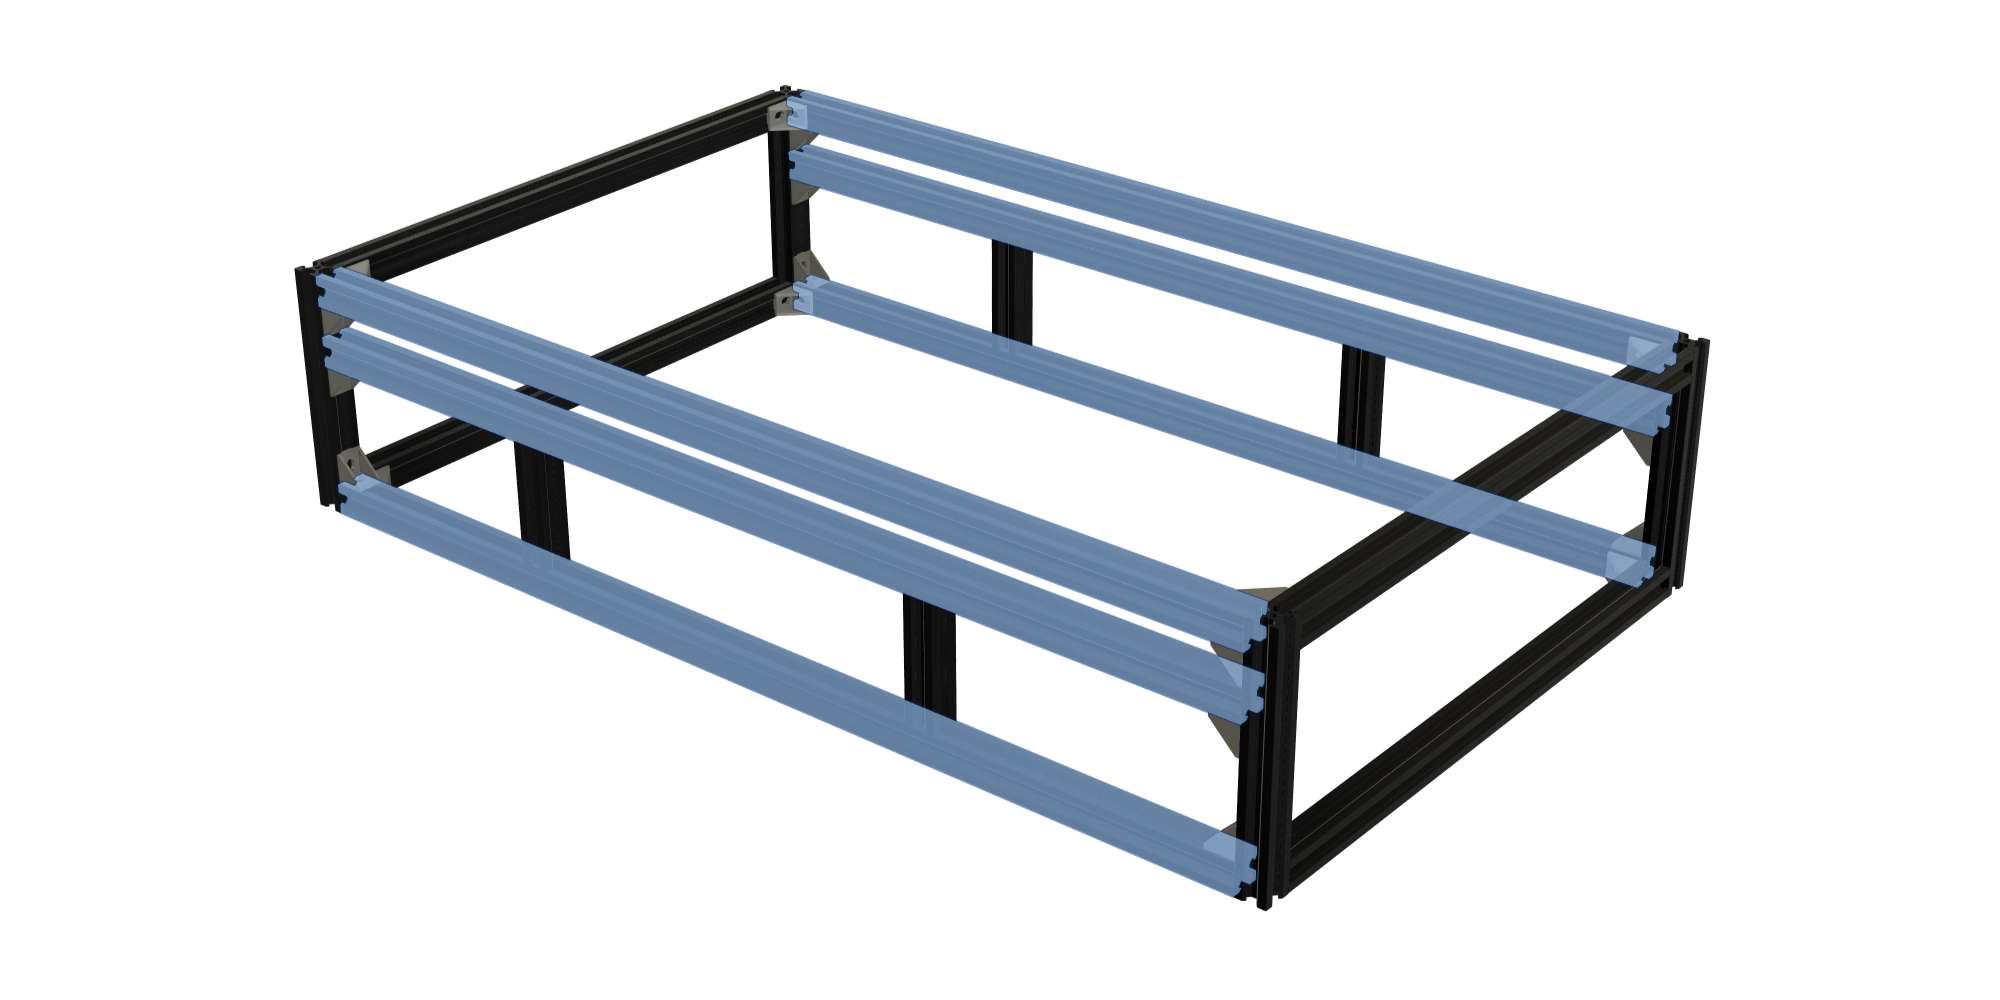
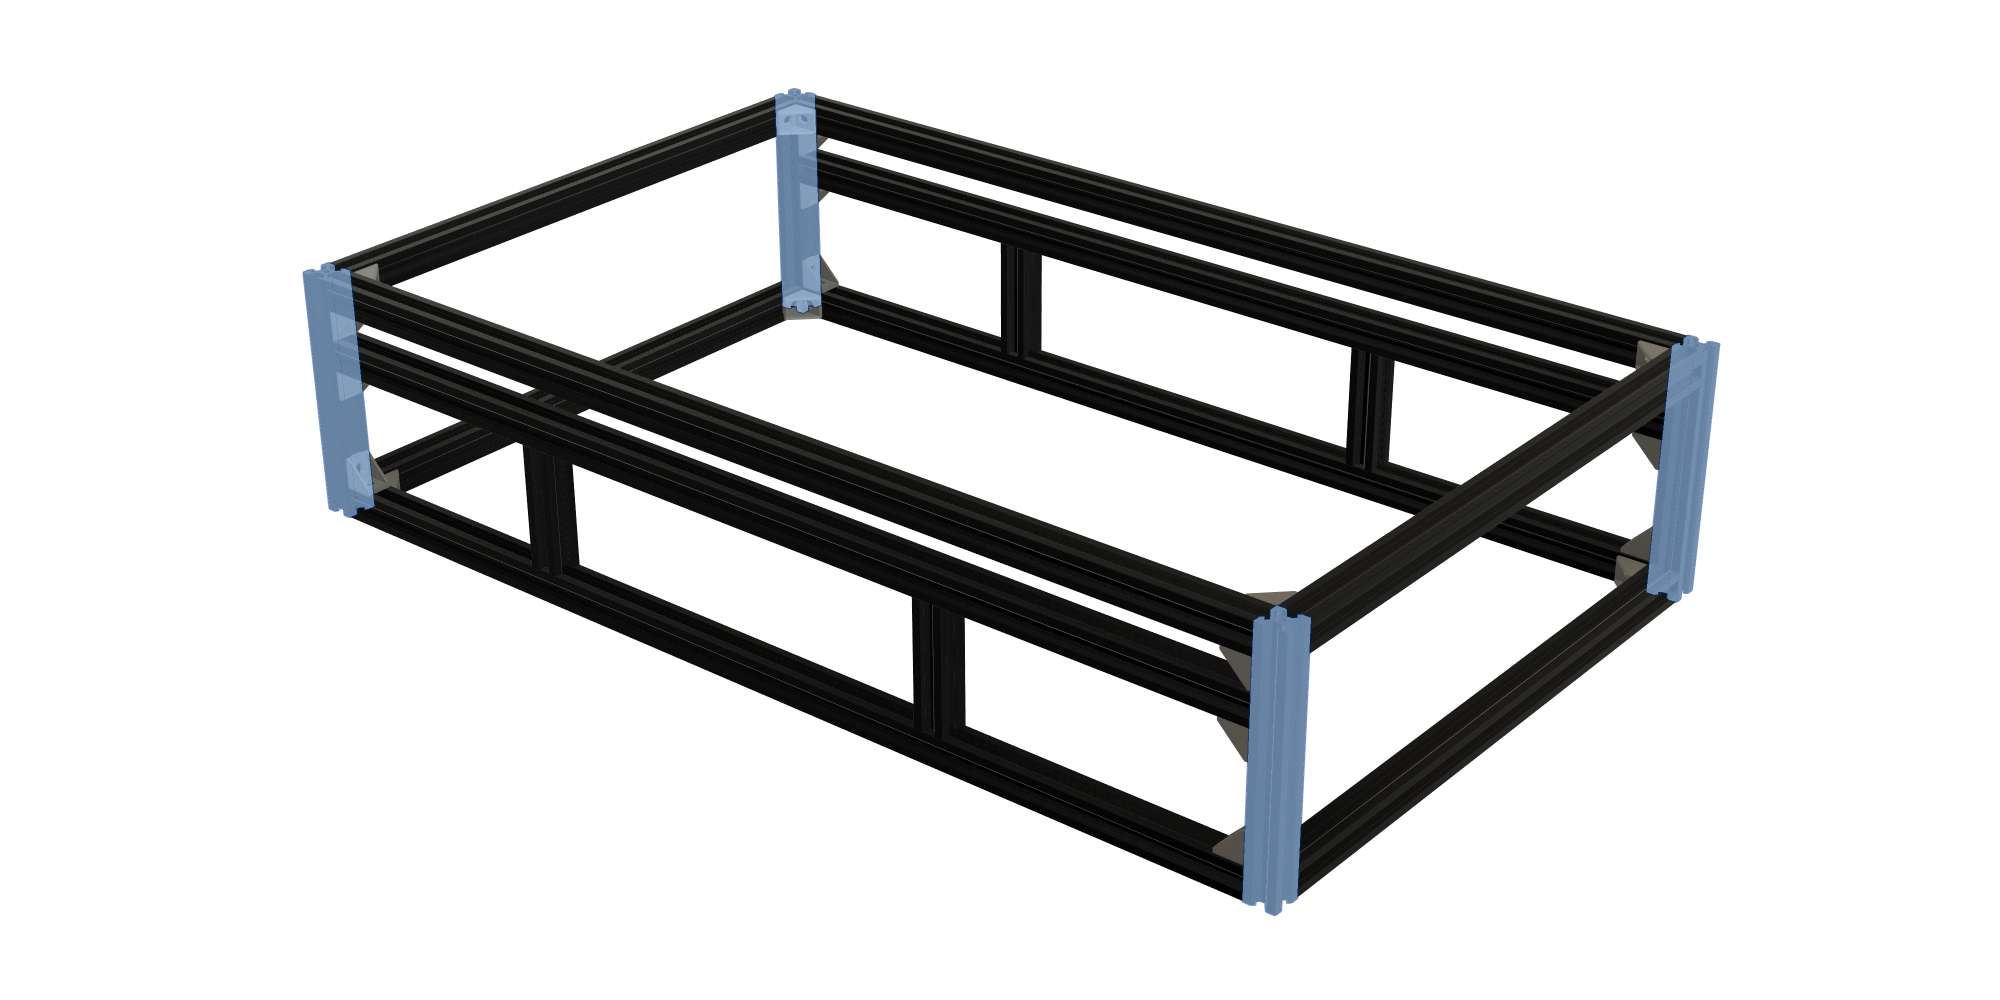
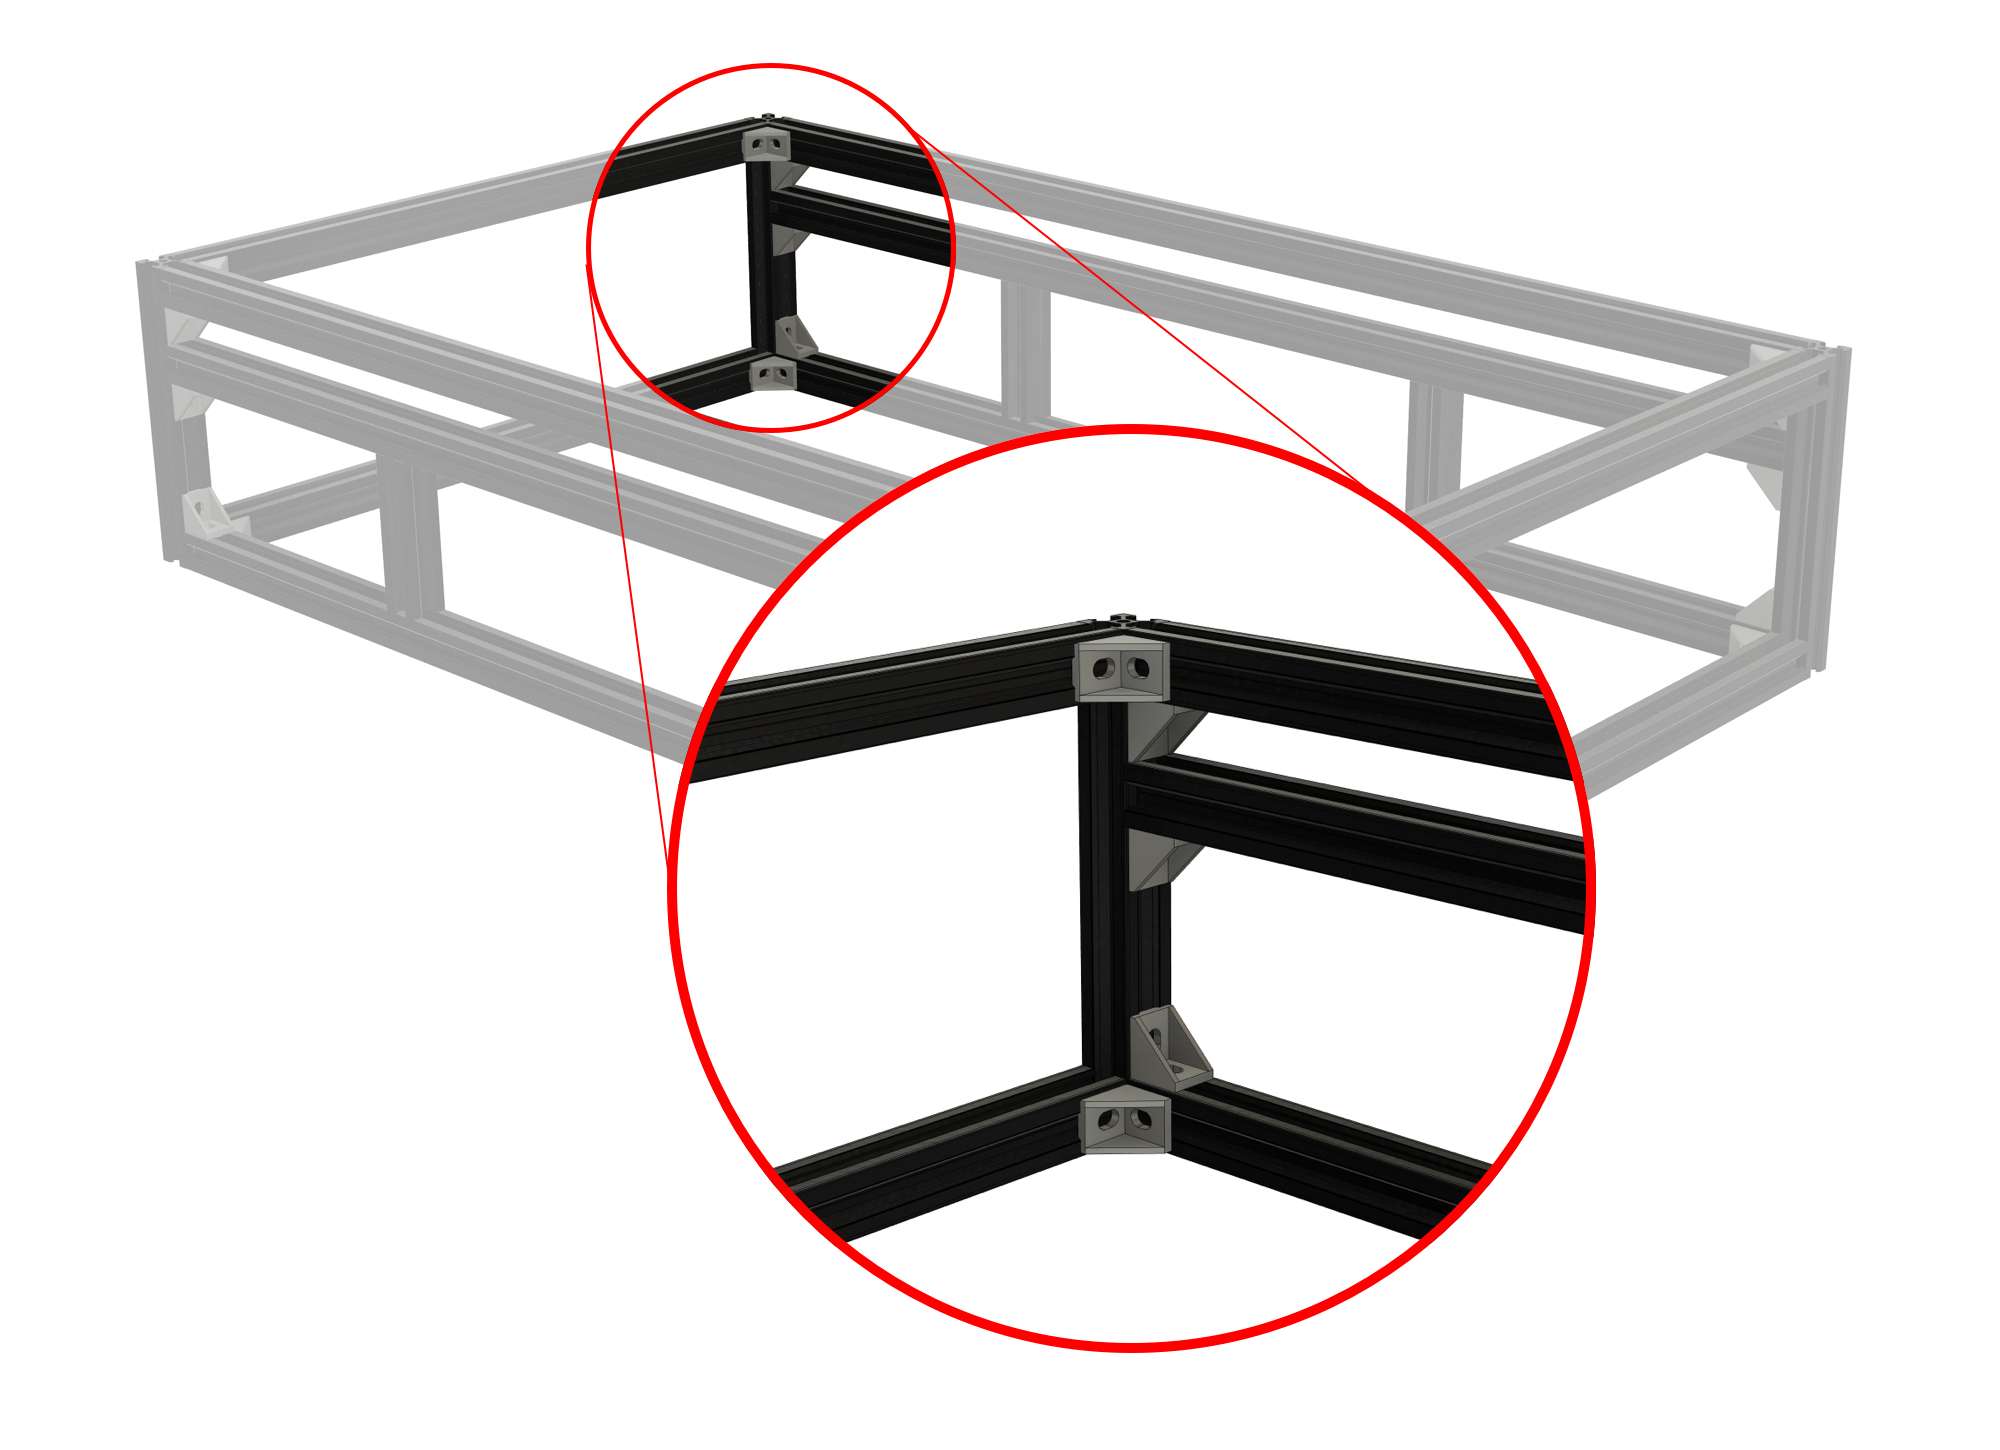
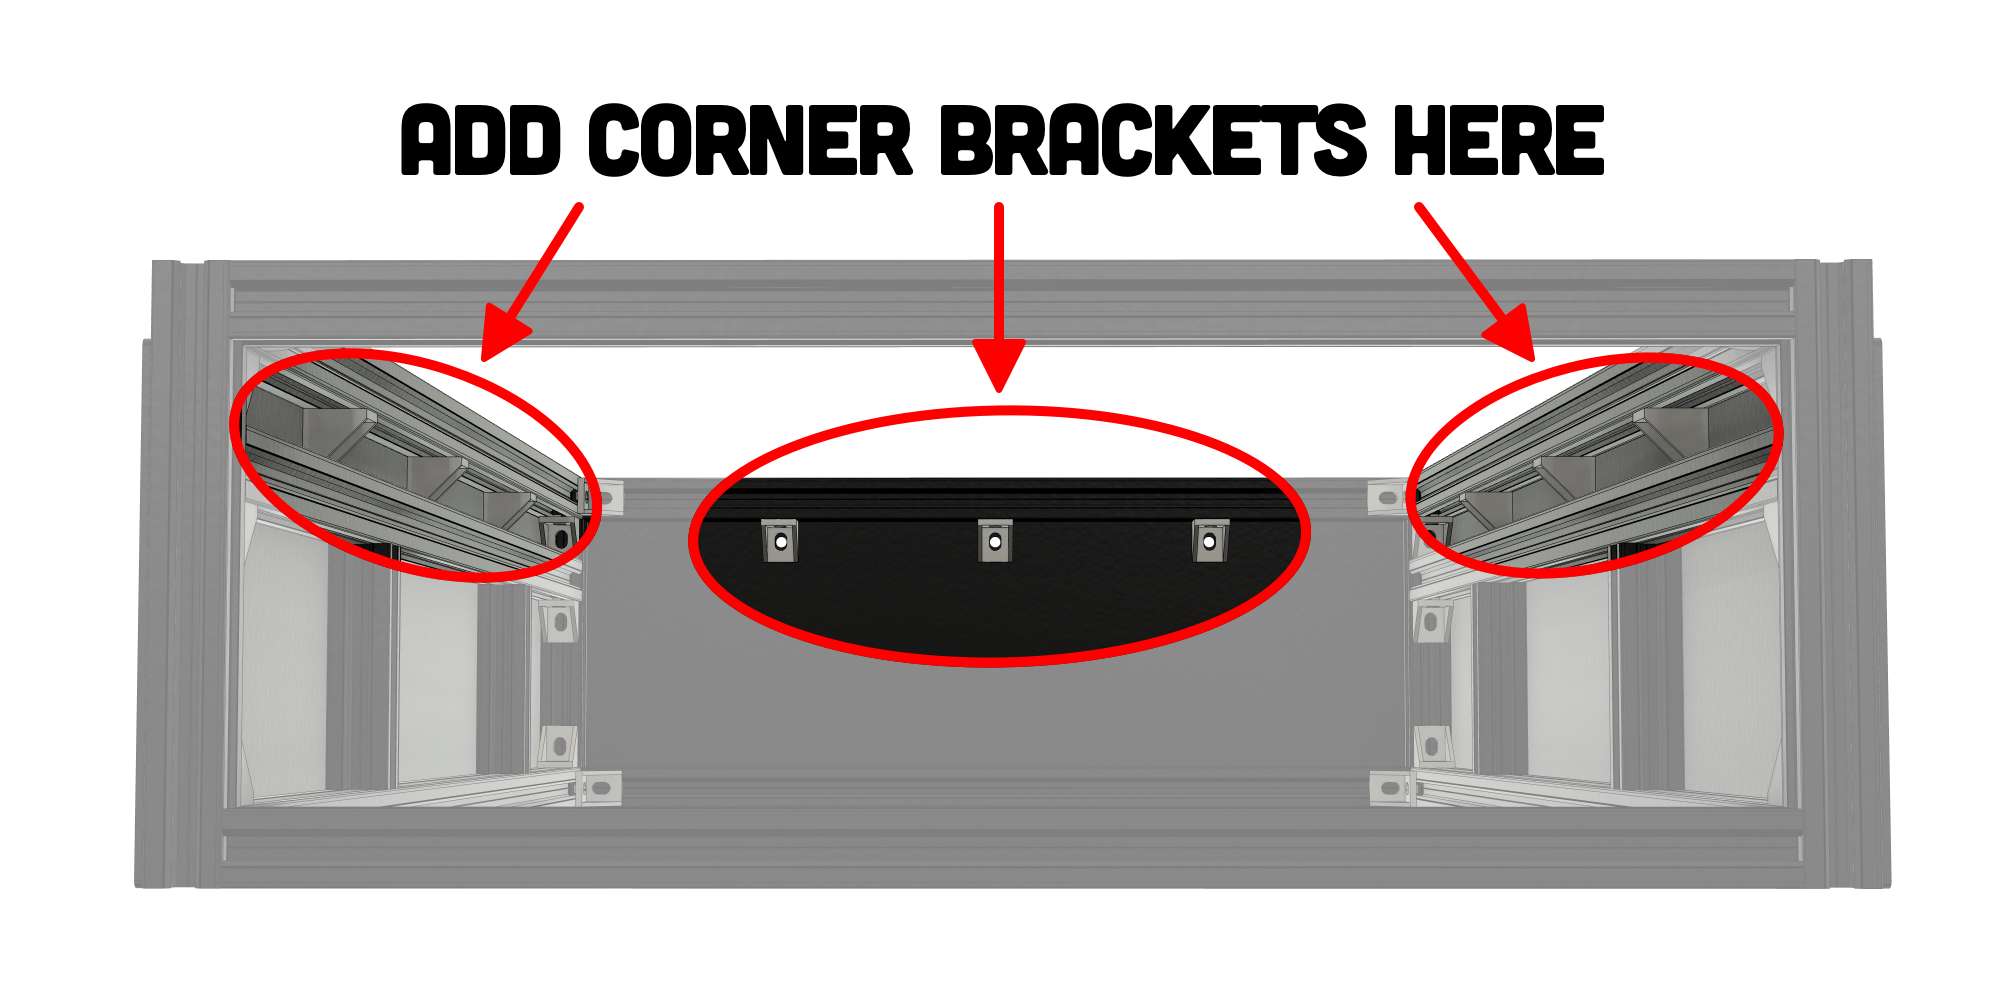
Here’s a close up of how the corner brackets are positioned. Mirror this across each corner.
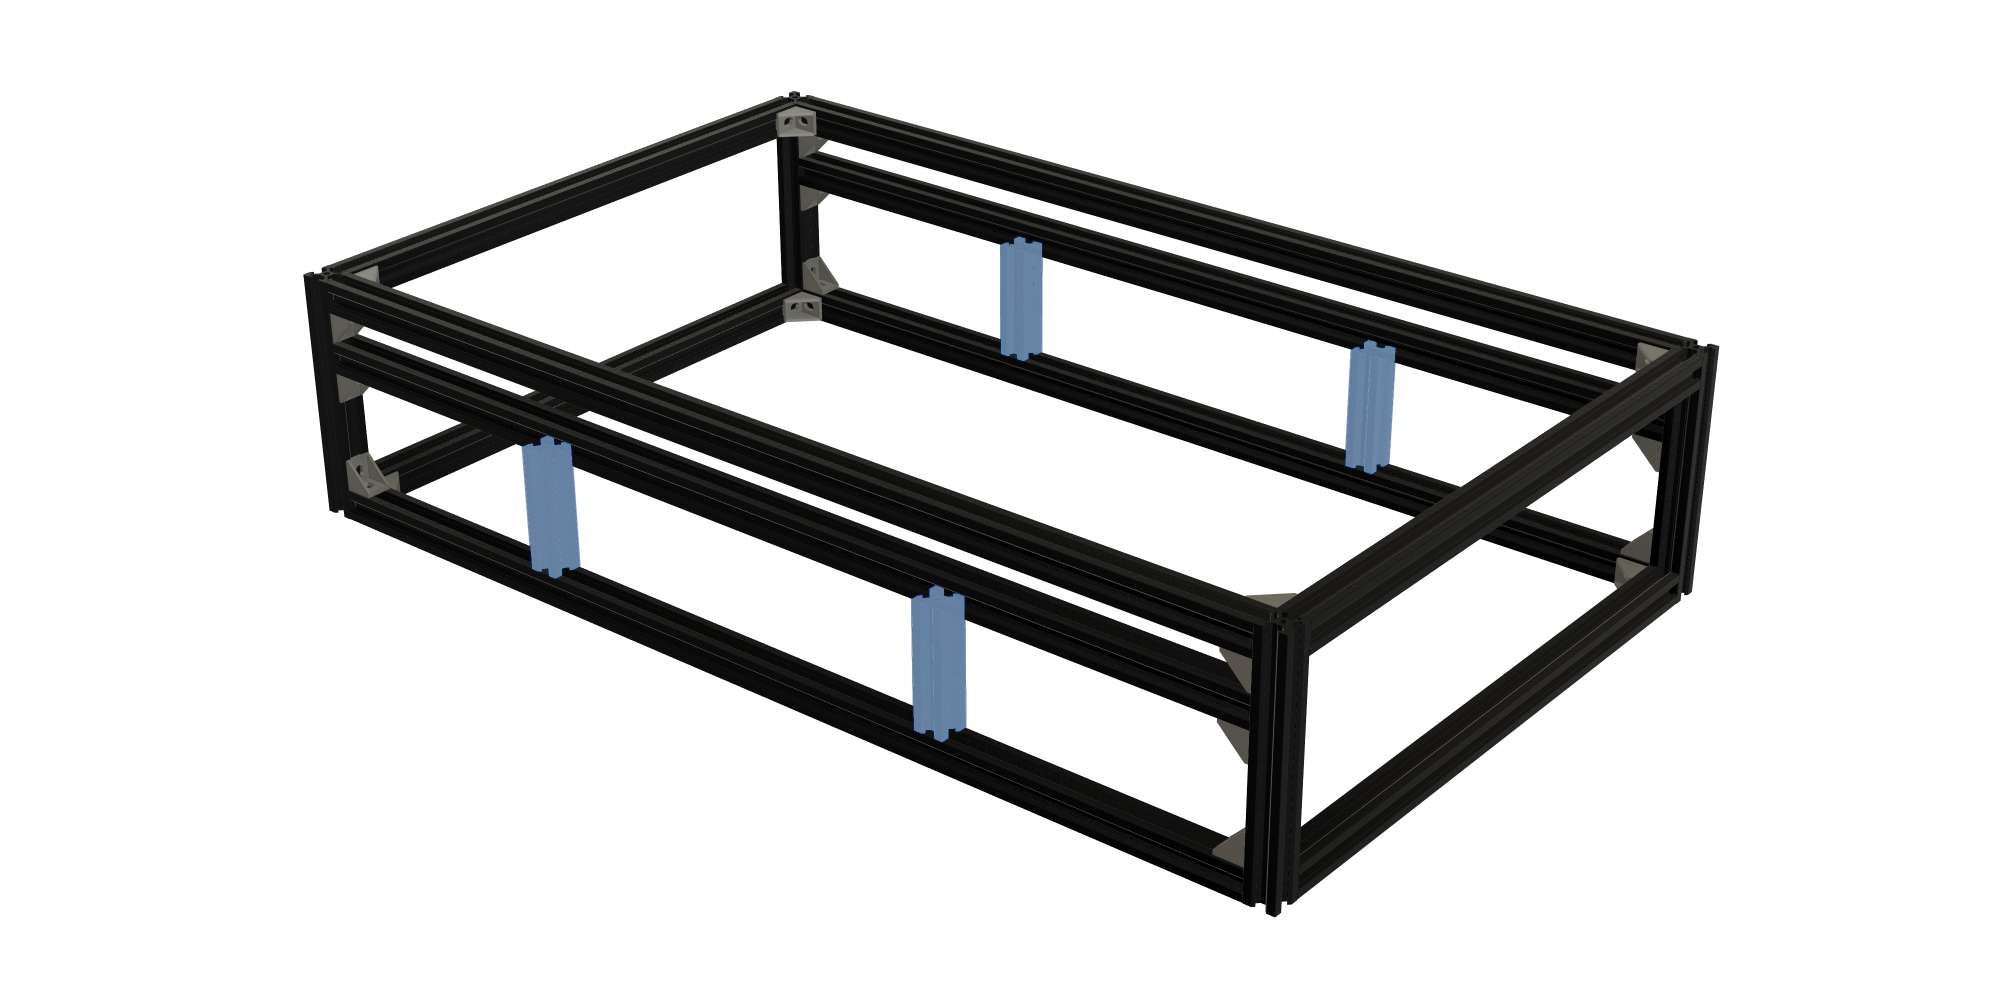
I found it easier to assemble the longer sides first. Starting with the outer frame then adding the long centre rail that holds the main drawer runners in place. The 80mm lengths help support the weight of the drawer runners and tables.
The corner brackets I’ve linked to above are 20mm high meaning the drawer runner rail can butt up to them. The 80mm lengths then take up the remaining gap below the drawer runner rail.
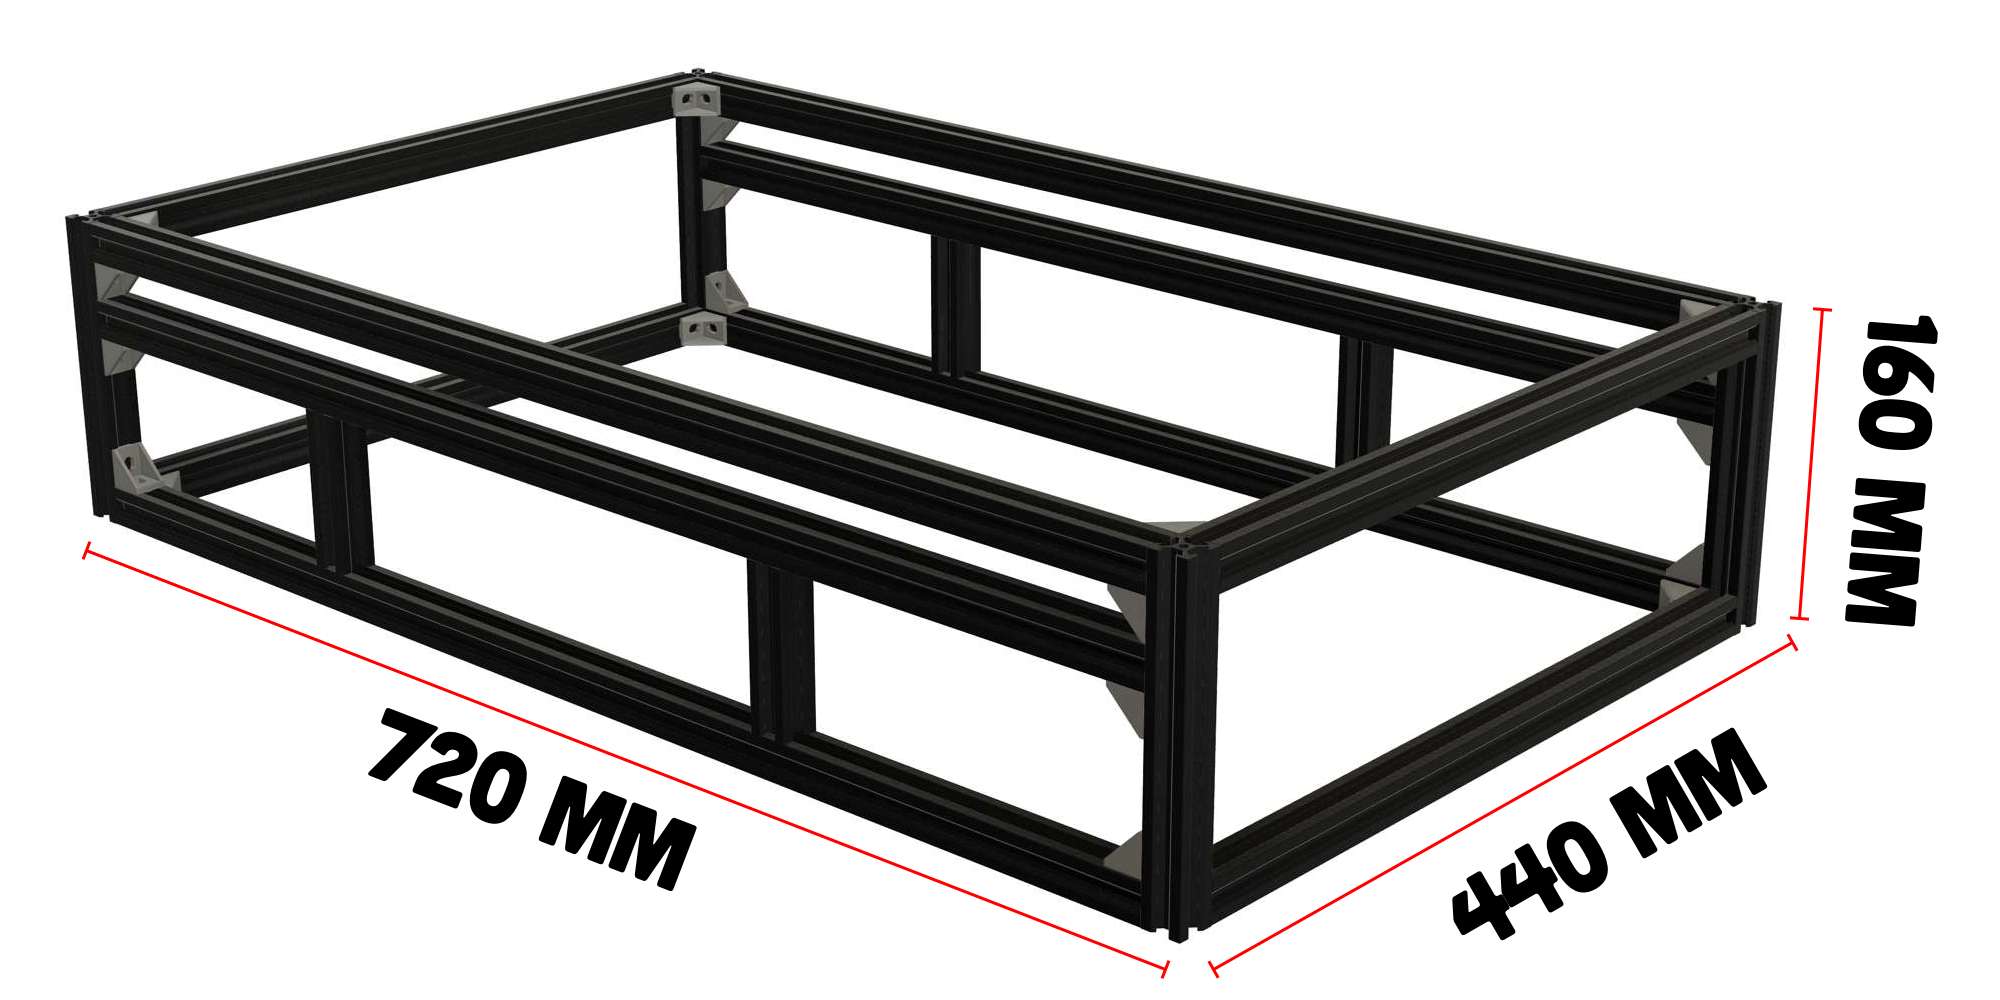
The total height of the corner extrusions is 160mm. Therefore the top and bottom extrusions added to the height of the rail and small supports fills the entire space perfectly.
Top extrusion 20mm + corner bracket 20mm + drawer runner extrusion 20mm + short support extrusions 80mm + bottom extrusion 20mm = 160mm
Important:
- Make sure everything is perfectly square as you assemble each part.
- I used slot-in M5 nuts, get stainless steel if you can. This way you don’t have to plan ahead for how many nuts need to be pre-loaded into the extrusions.
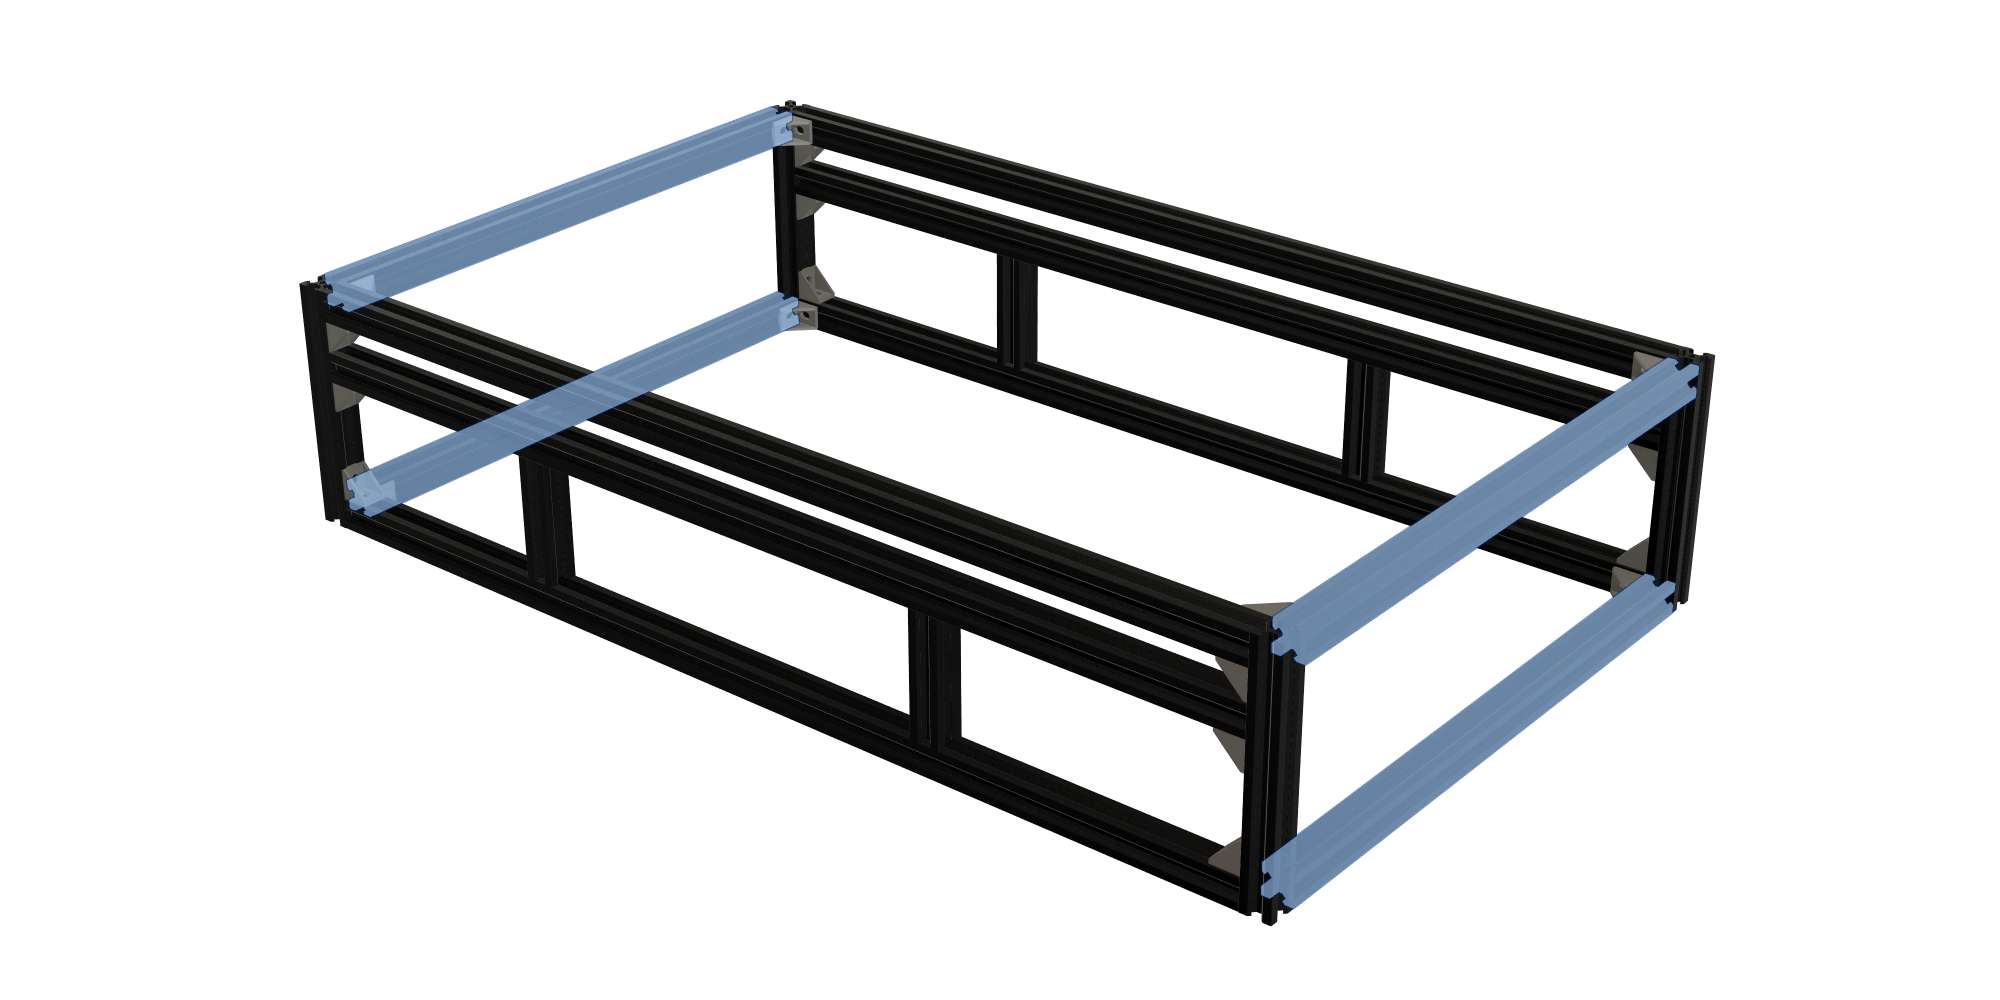
- For the 80mm supports I drilled a through-hole into the bottom frame and the drawer runner rail. Then bolted into the tapped ends of the 80mm extrusions. If you want an easier build, simply add 16 more corner brackets to fit the 80mm supports into the frame. This is the quickest method and keeps your frame modular.
- The horizontal position of the 80mm supports does not matter but for reference in this design they’re 190mm in from the frame corners.
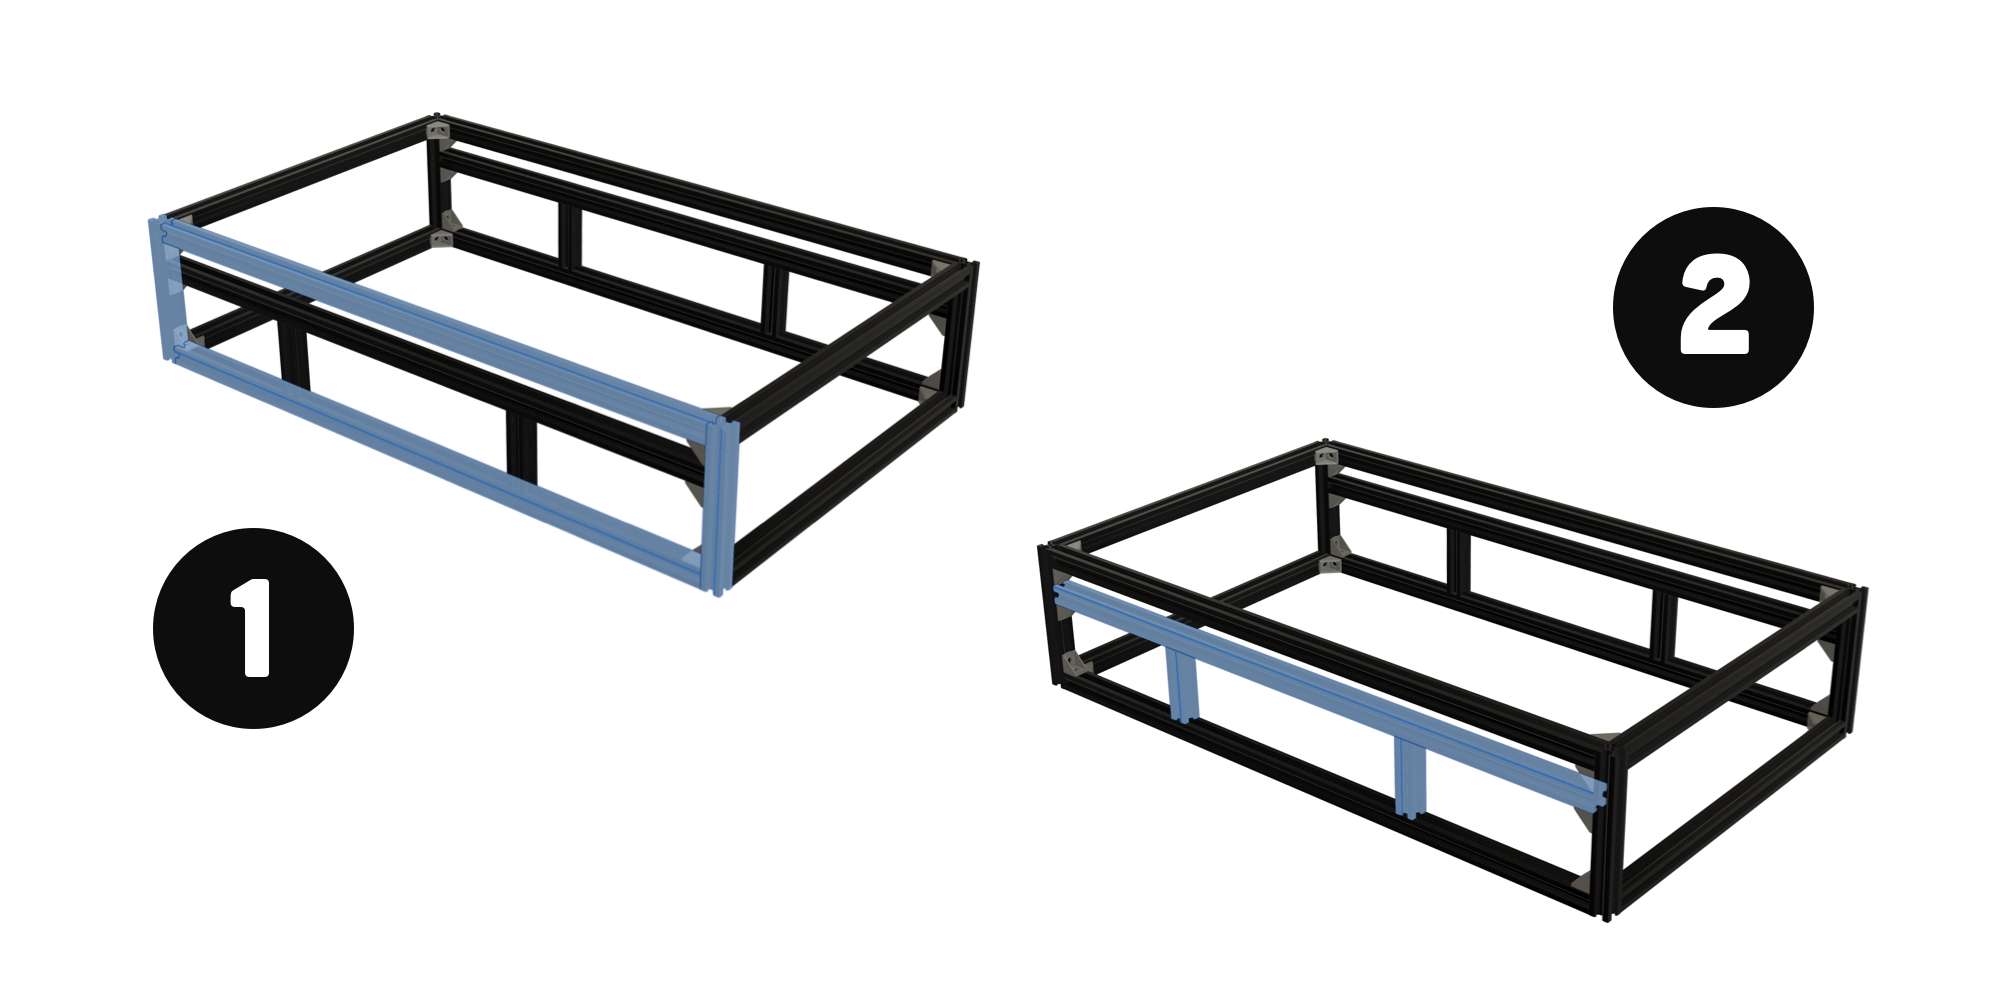
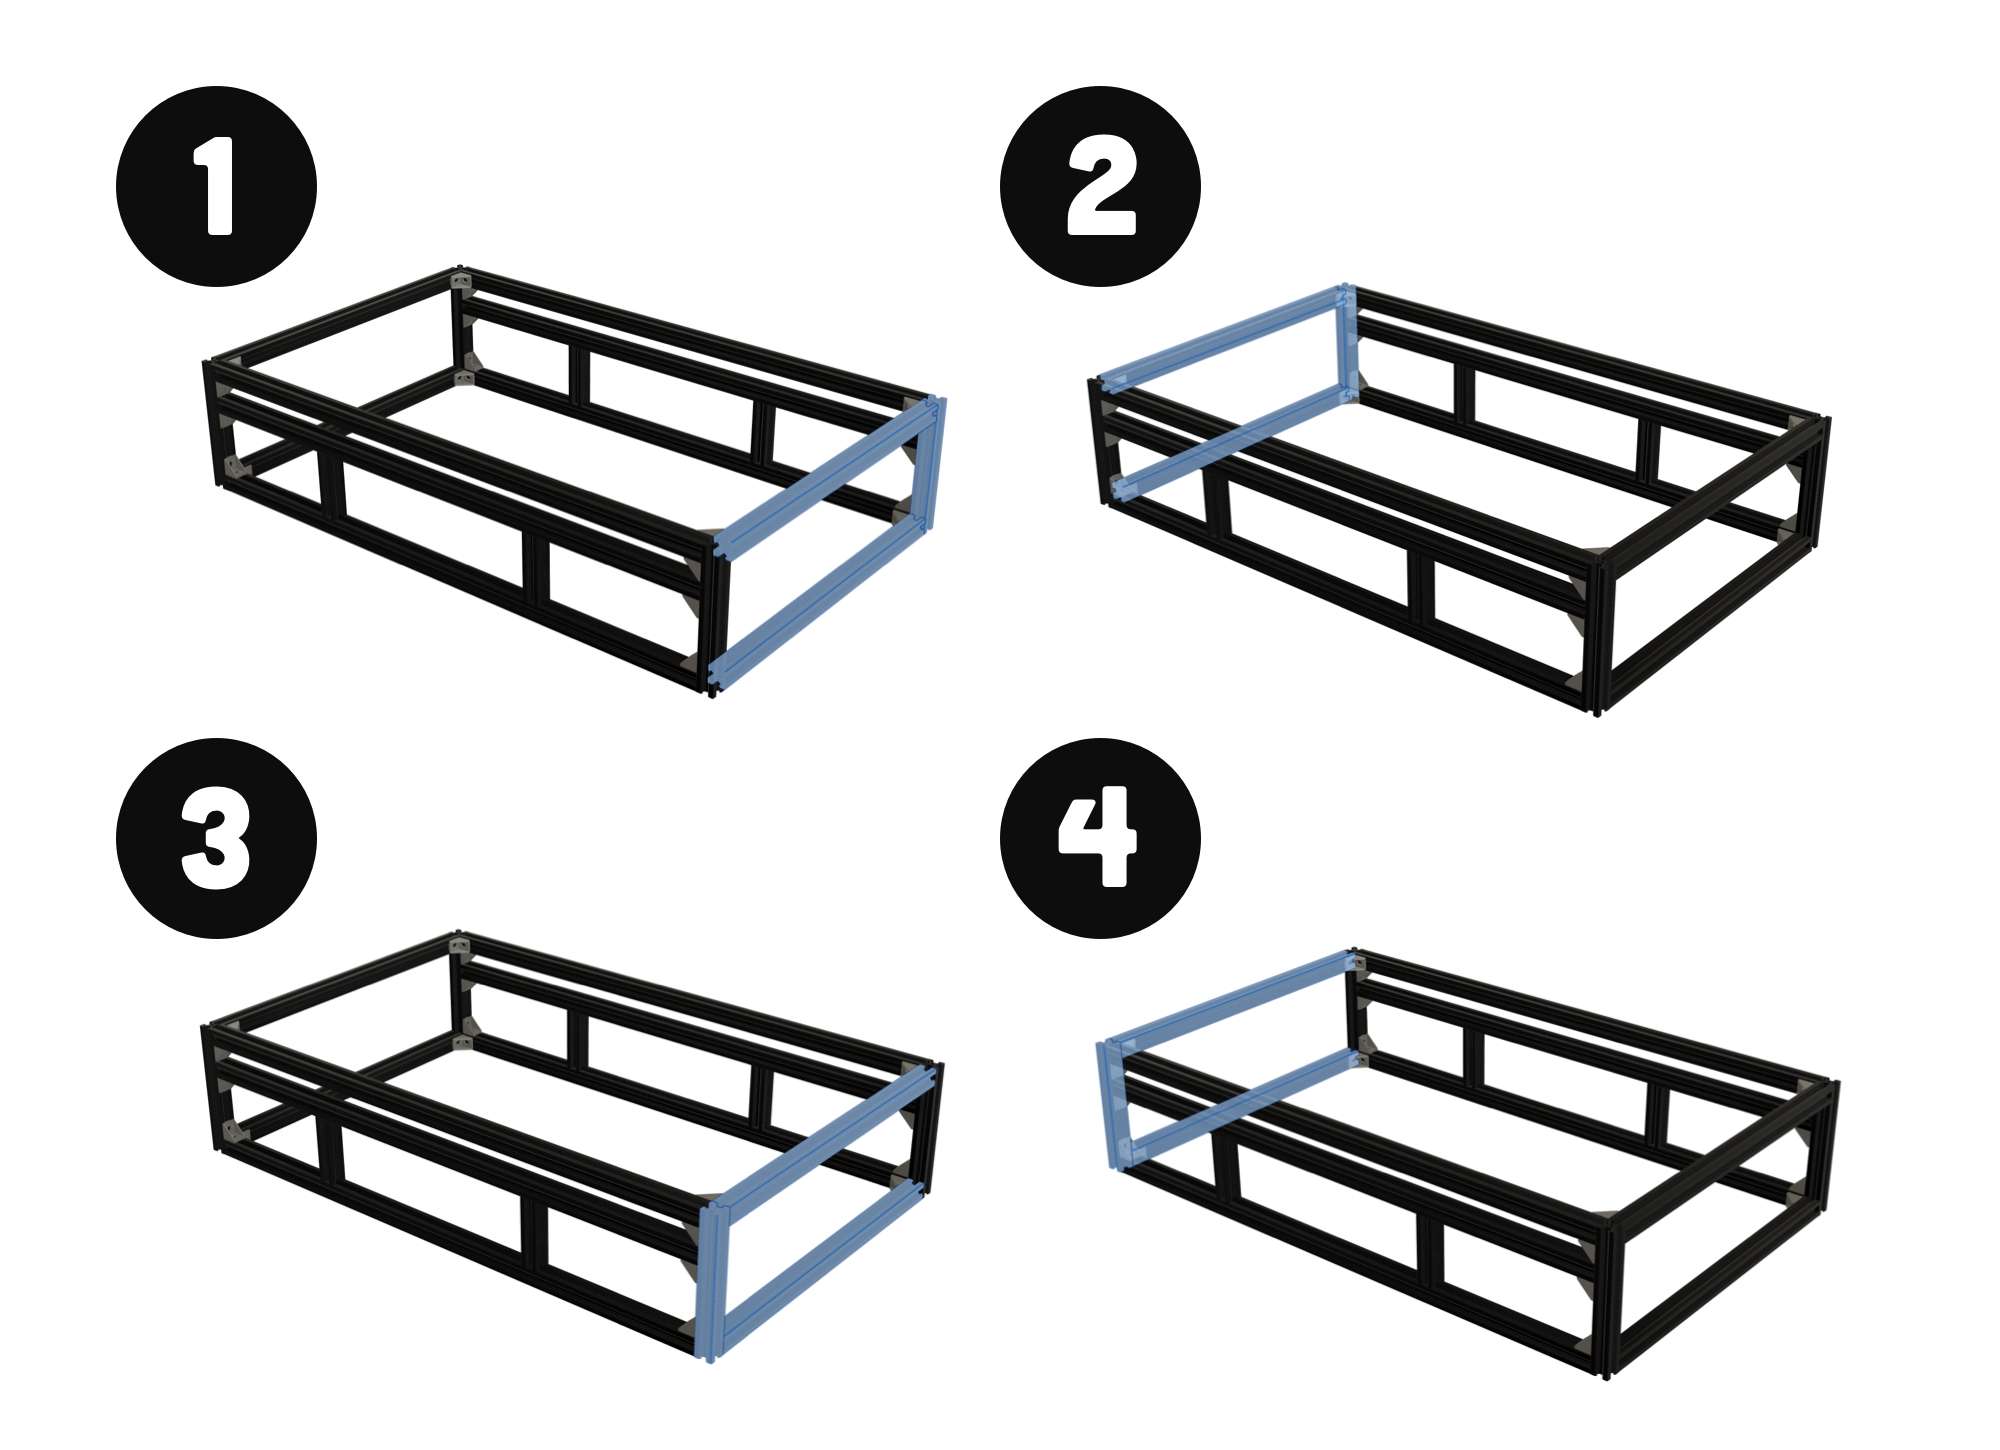
Once both of the frame sides are bolted together and checked for square, you can secure the 4 horizontal lengths at the front and back of the frame. I did one end at a time as shown below.
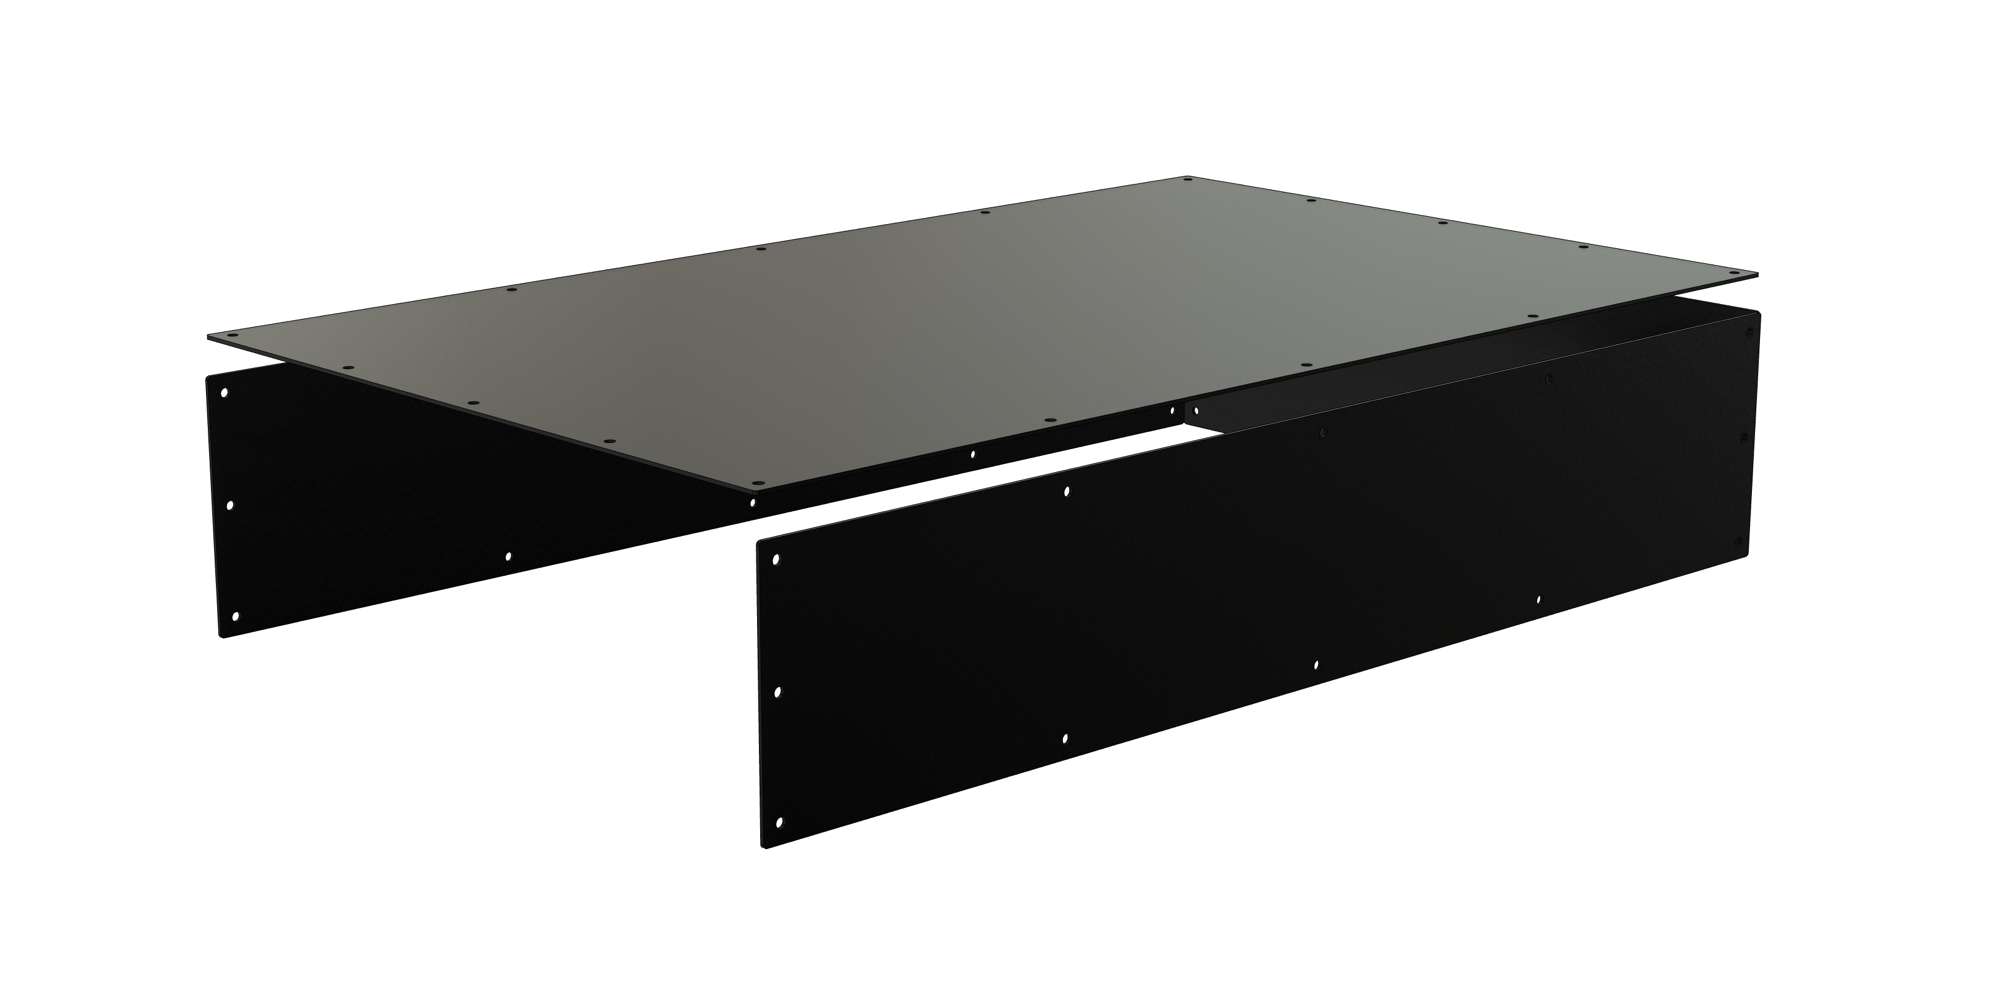
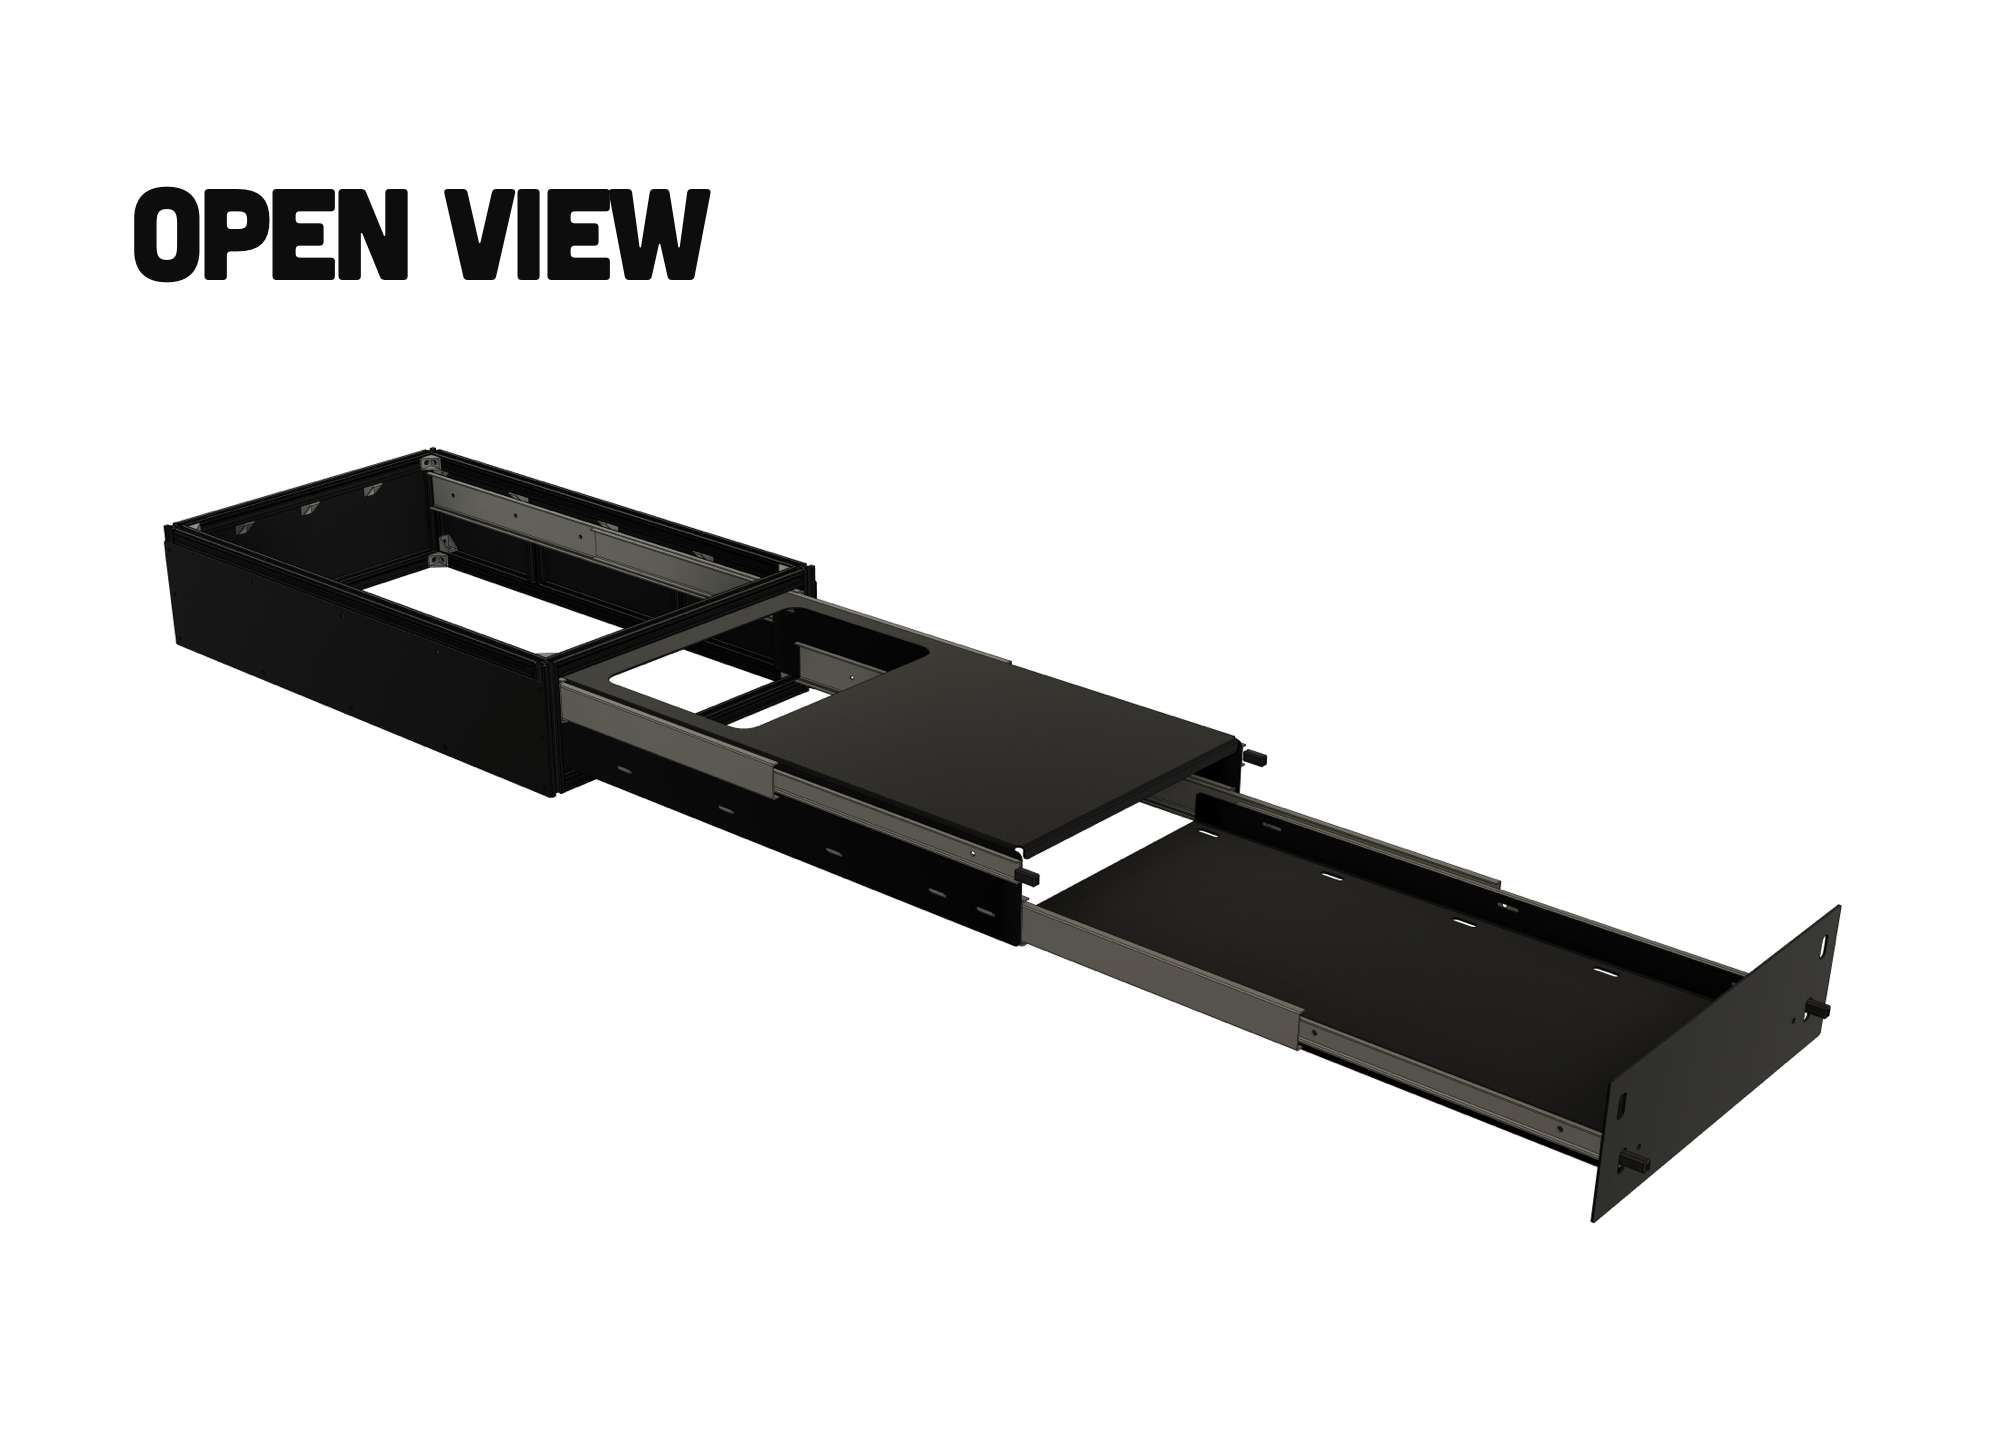
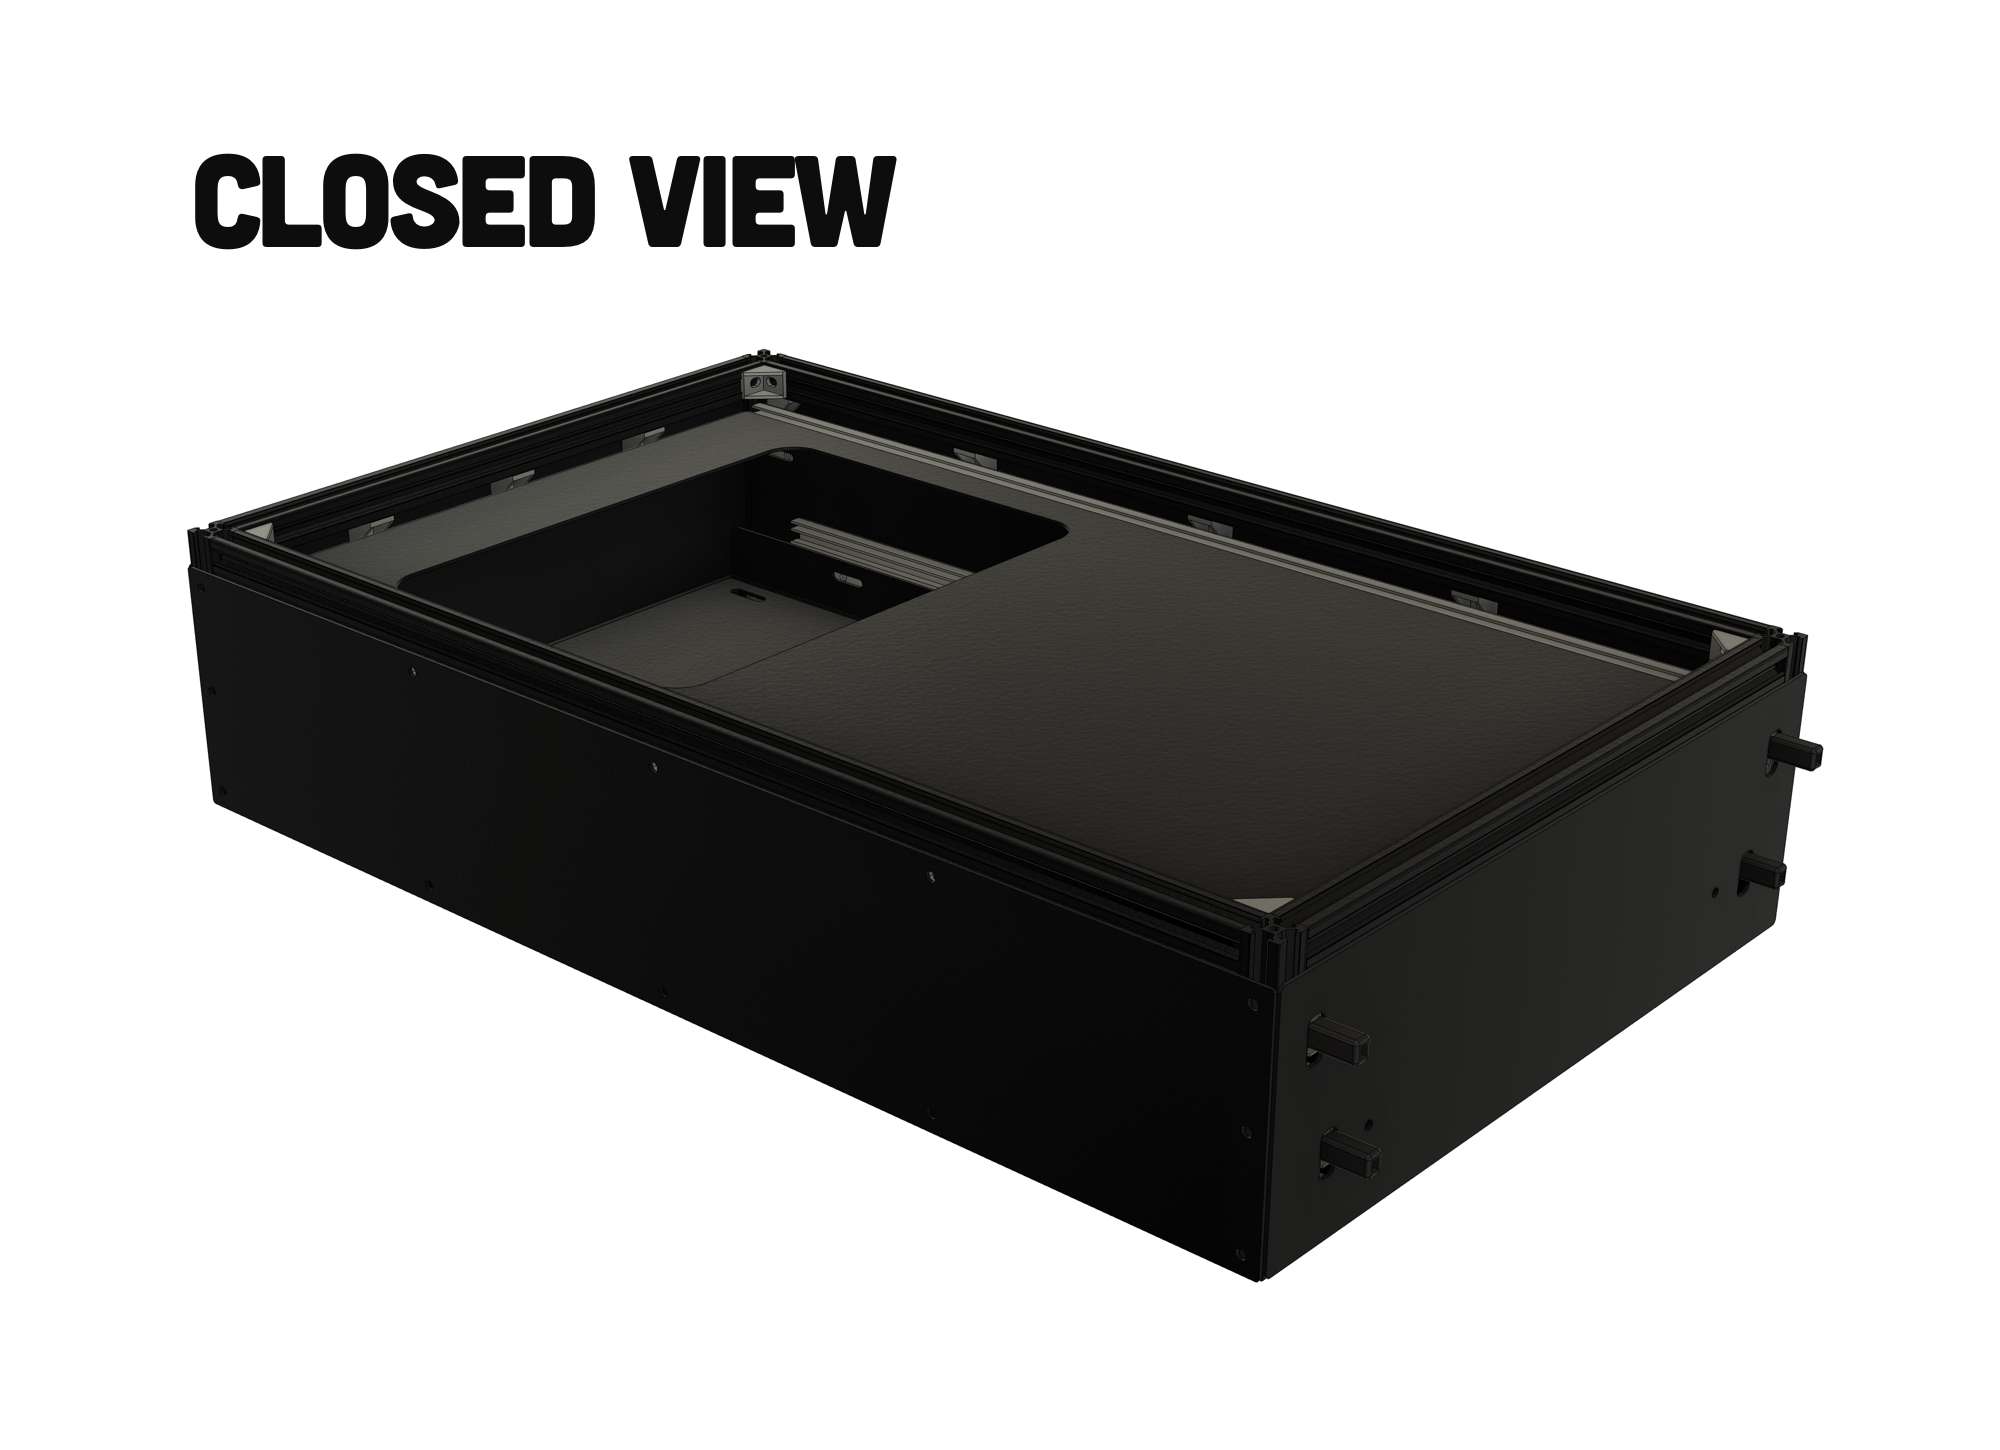
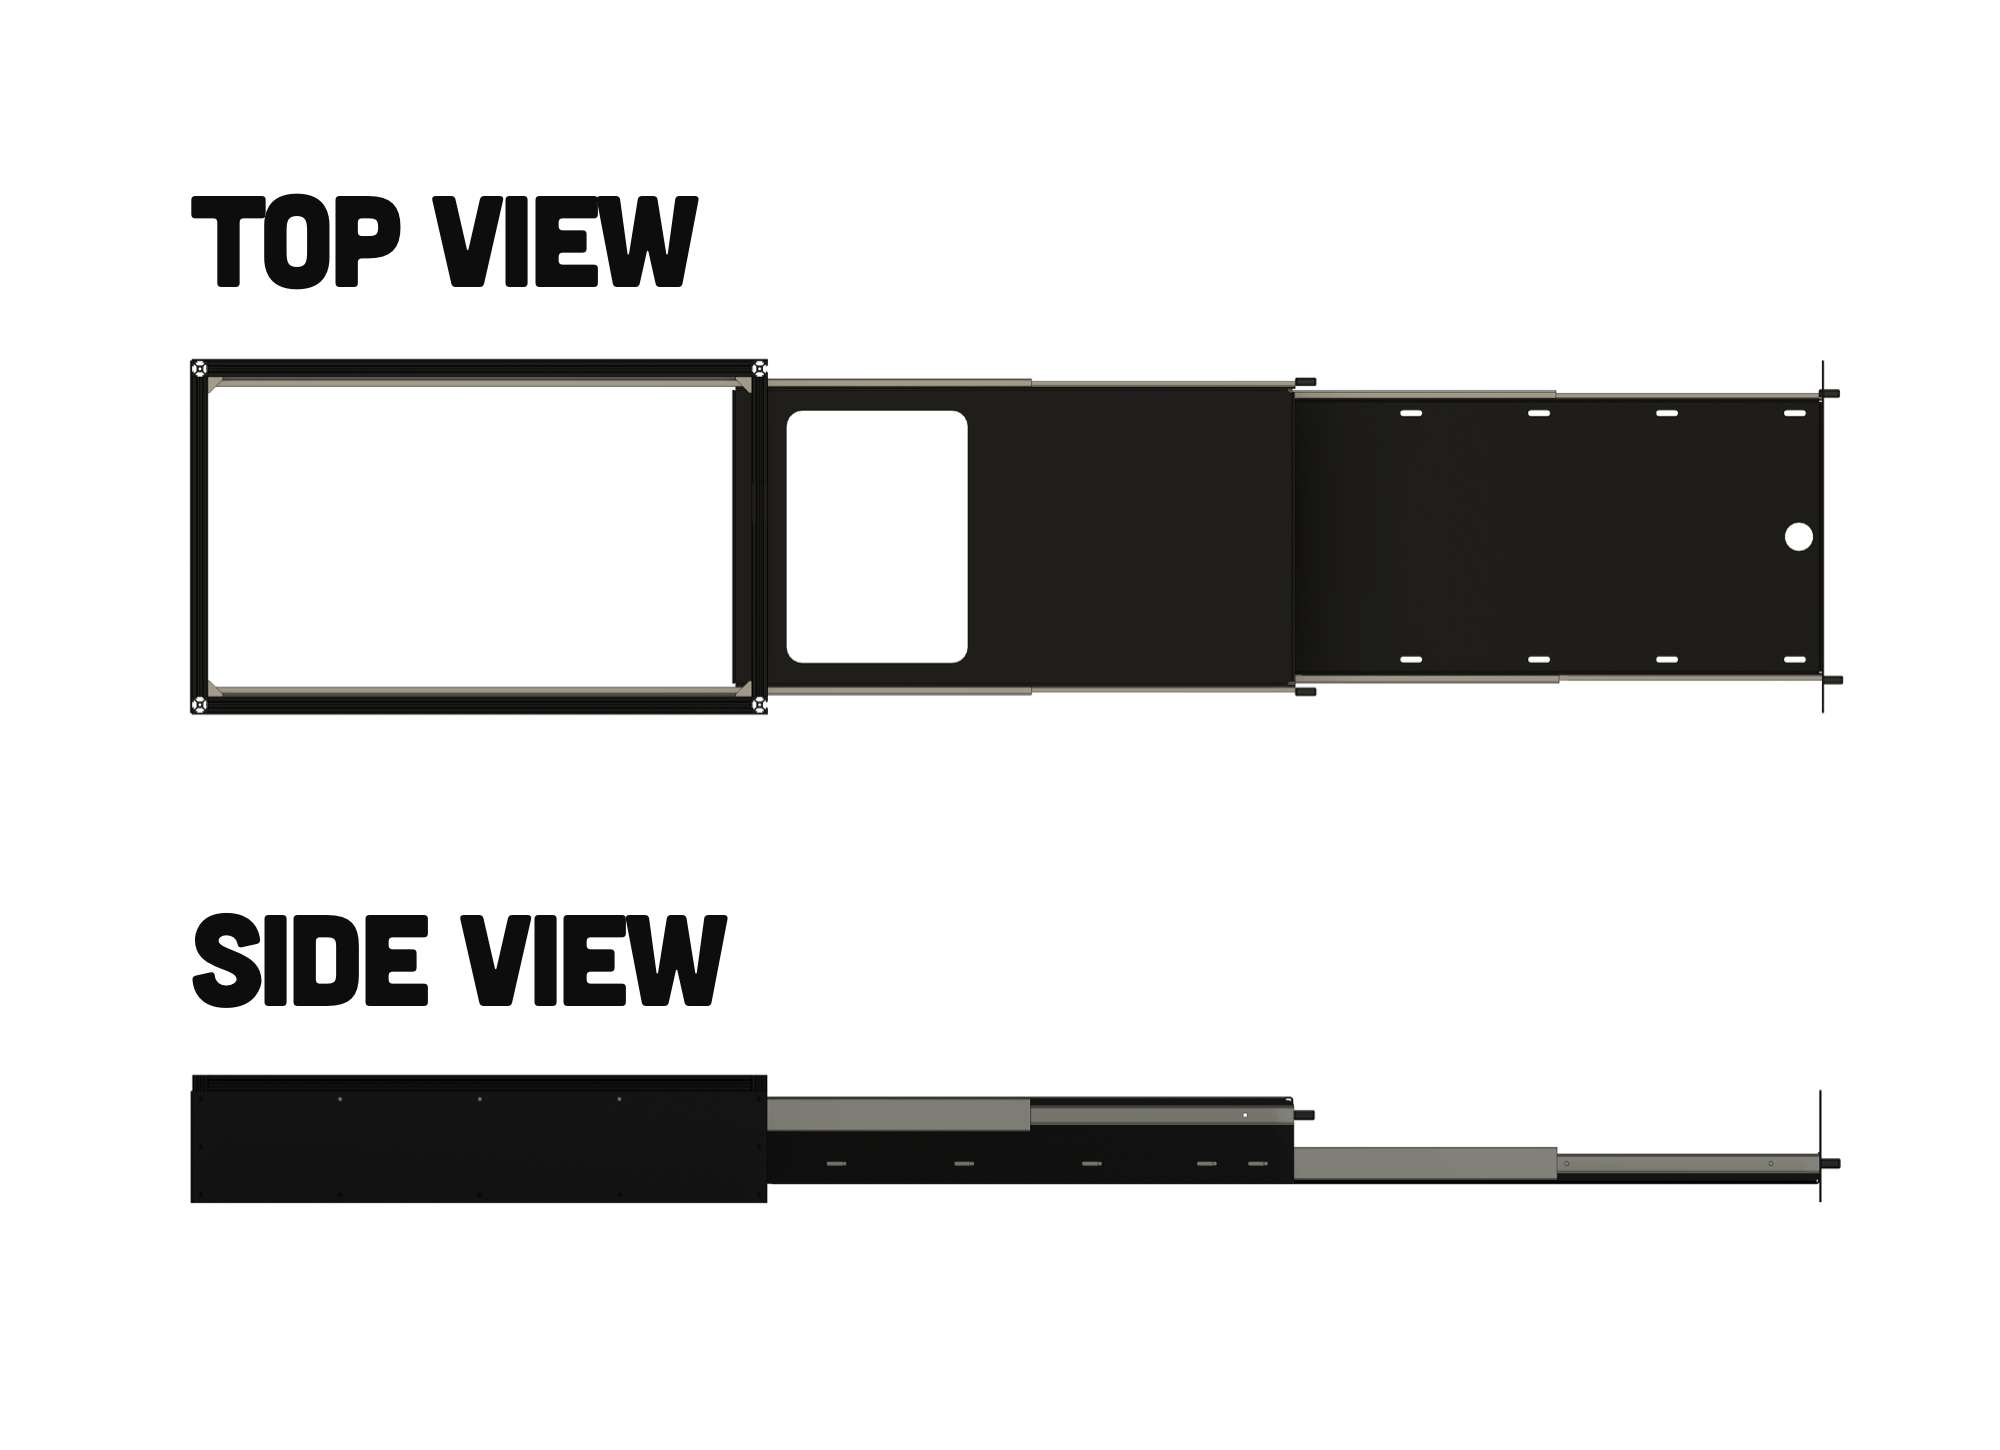
That completes the frame. You now have a strong, rigid and lightweight frame that measures 720mm x 440mm x 160mm.
The table slides
This is where things get interesting. I’ll provide the CAD files for the custom made aluminium top and bottom tables that I had made. This wasn’t the cheapest way but for me it gave the most professional finish.
You could make your slide out tables using plywood or other suitable materials, perhaps stainless steel sheets with aluminium angle riveted on. That’s how I made the first prototype and it worked fine. In the current version I wanted something that looked as close to professionally made as I dare to claim.
Let’s start with how much space we have to play with. The inner space within the frame is 400mm wide by 120mm tall.
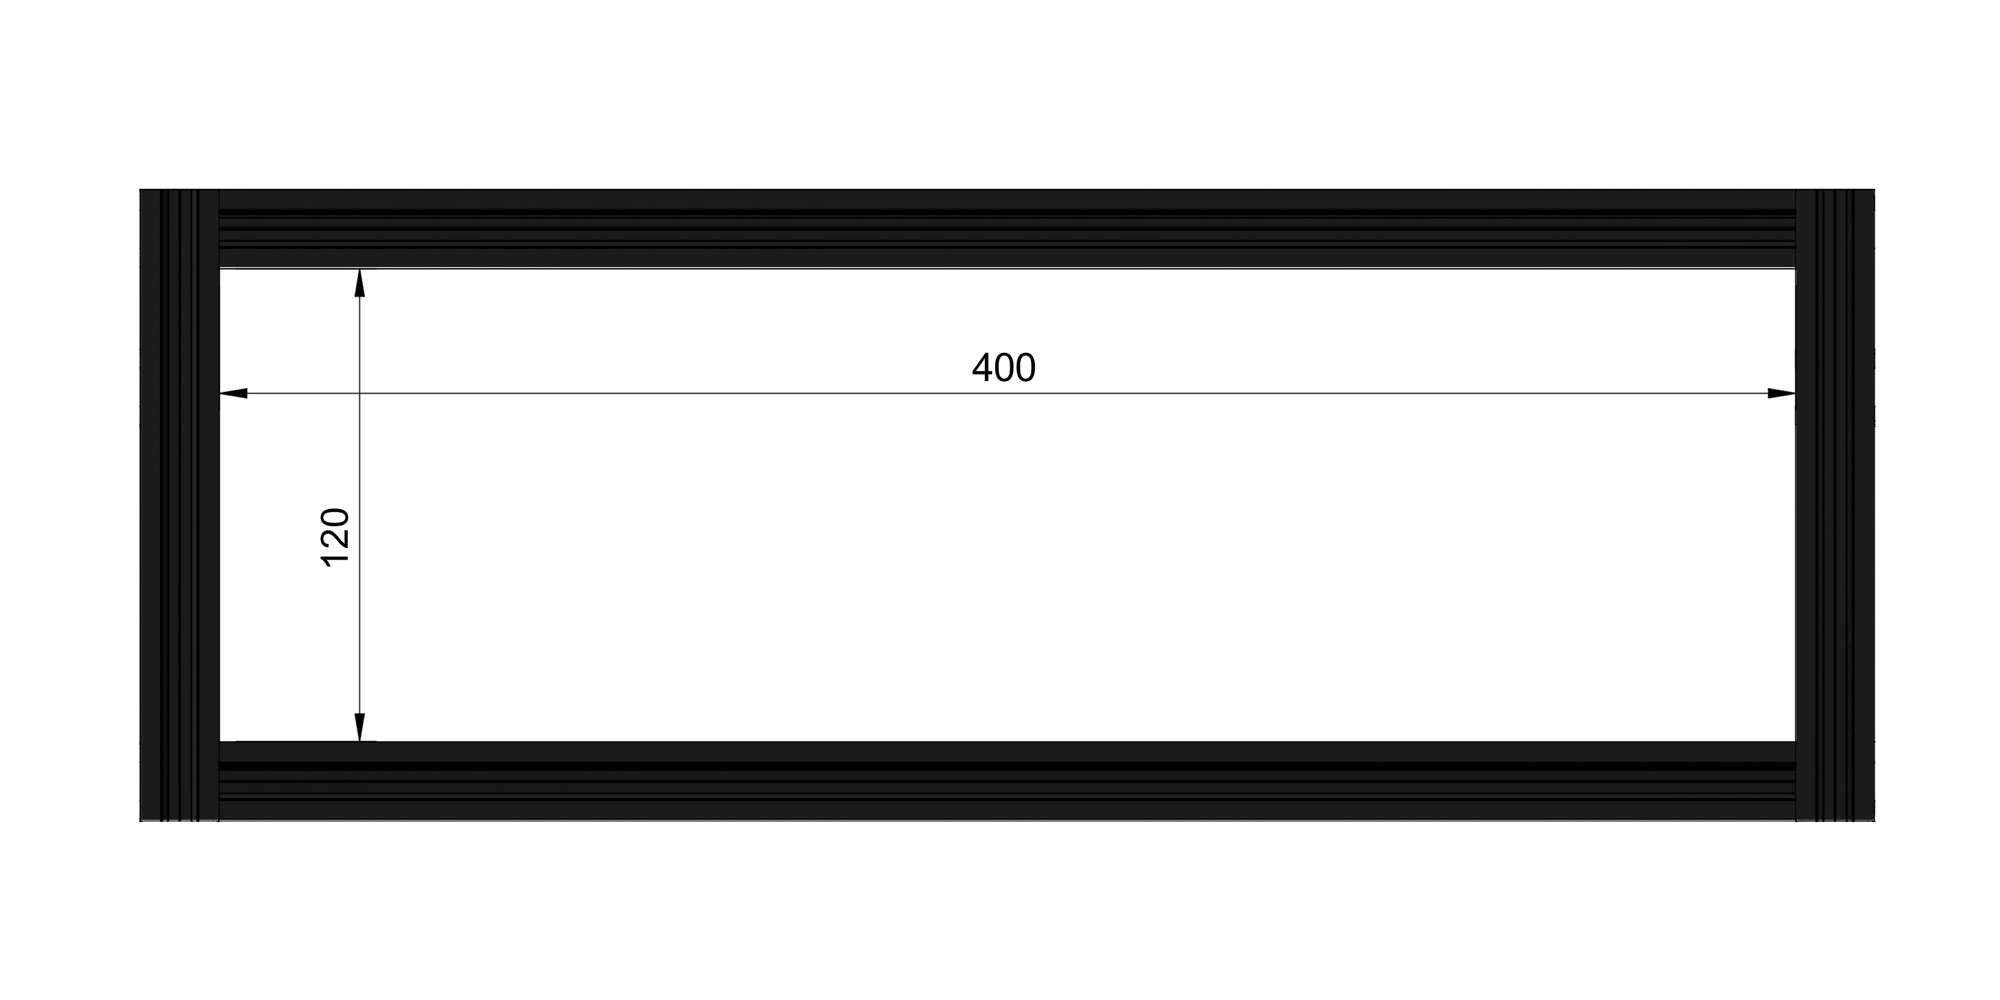
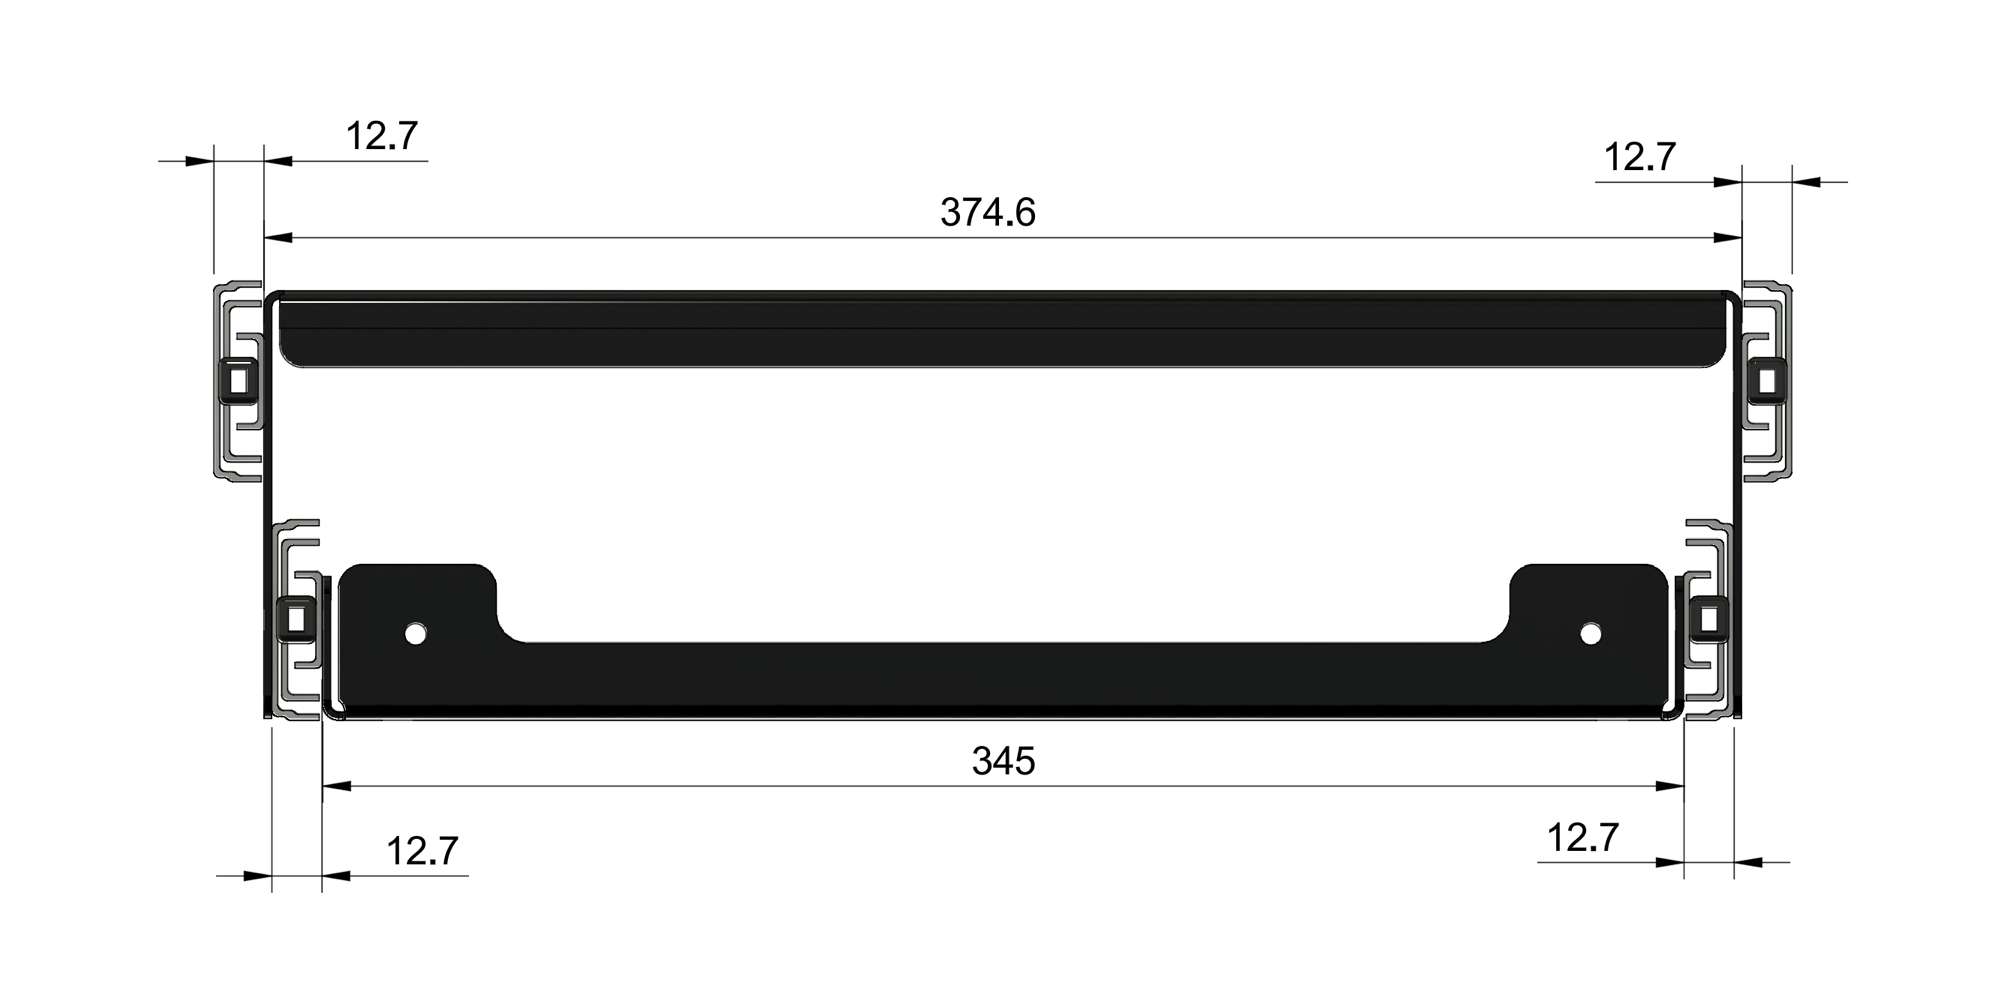
The drawer runners I purchases have a thickness of 12.7mm. This leaves a top table max width of ~375mm once you account for the aluminium table. Then a 345mm max width for the bottom table. Subject to using 2mm thick table slides.
On that note 2mm stainless steel adds a lot of weight, it’s a great option if you don’t wish to powder coat the tables and want food safe surfaces. I personally prefer lighter weight aluminium and to add a thin food safe chopping board to the main worktop surface.
Hopefully these measurements will help you to make your own adjustments should you decide to use thicker materials.
Top table slide
The thickness of the top table is 2mm. Keep this in mind if you decide to use different materials. Allow of the thickness of the table and the thickness of your Drawer runners. If you buy different drawer runners make sure they’re 12.7mm depth. The ones I’ve linked on this guide are 12.7mm depth and 51mm high. If you buy something else make sure to change your dimensions to fit.
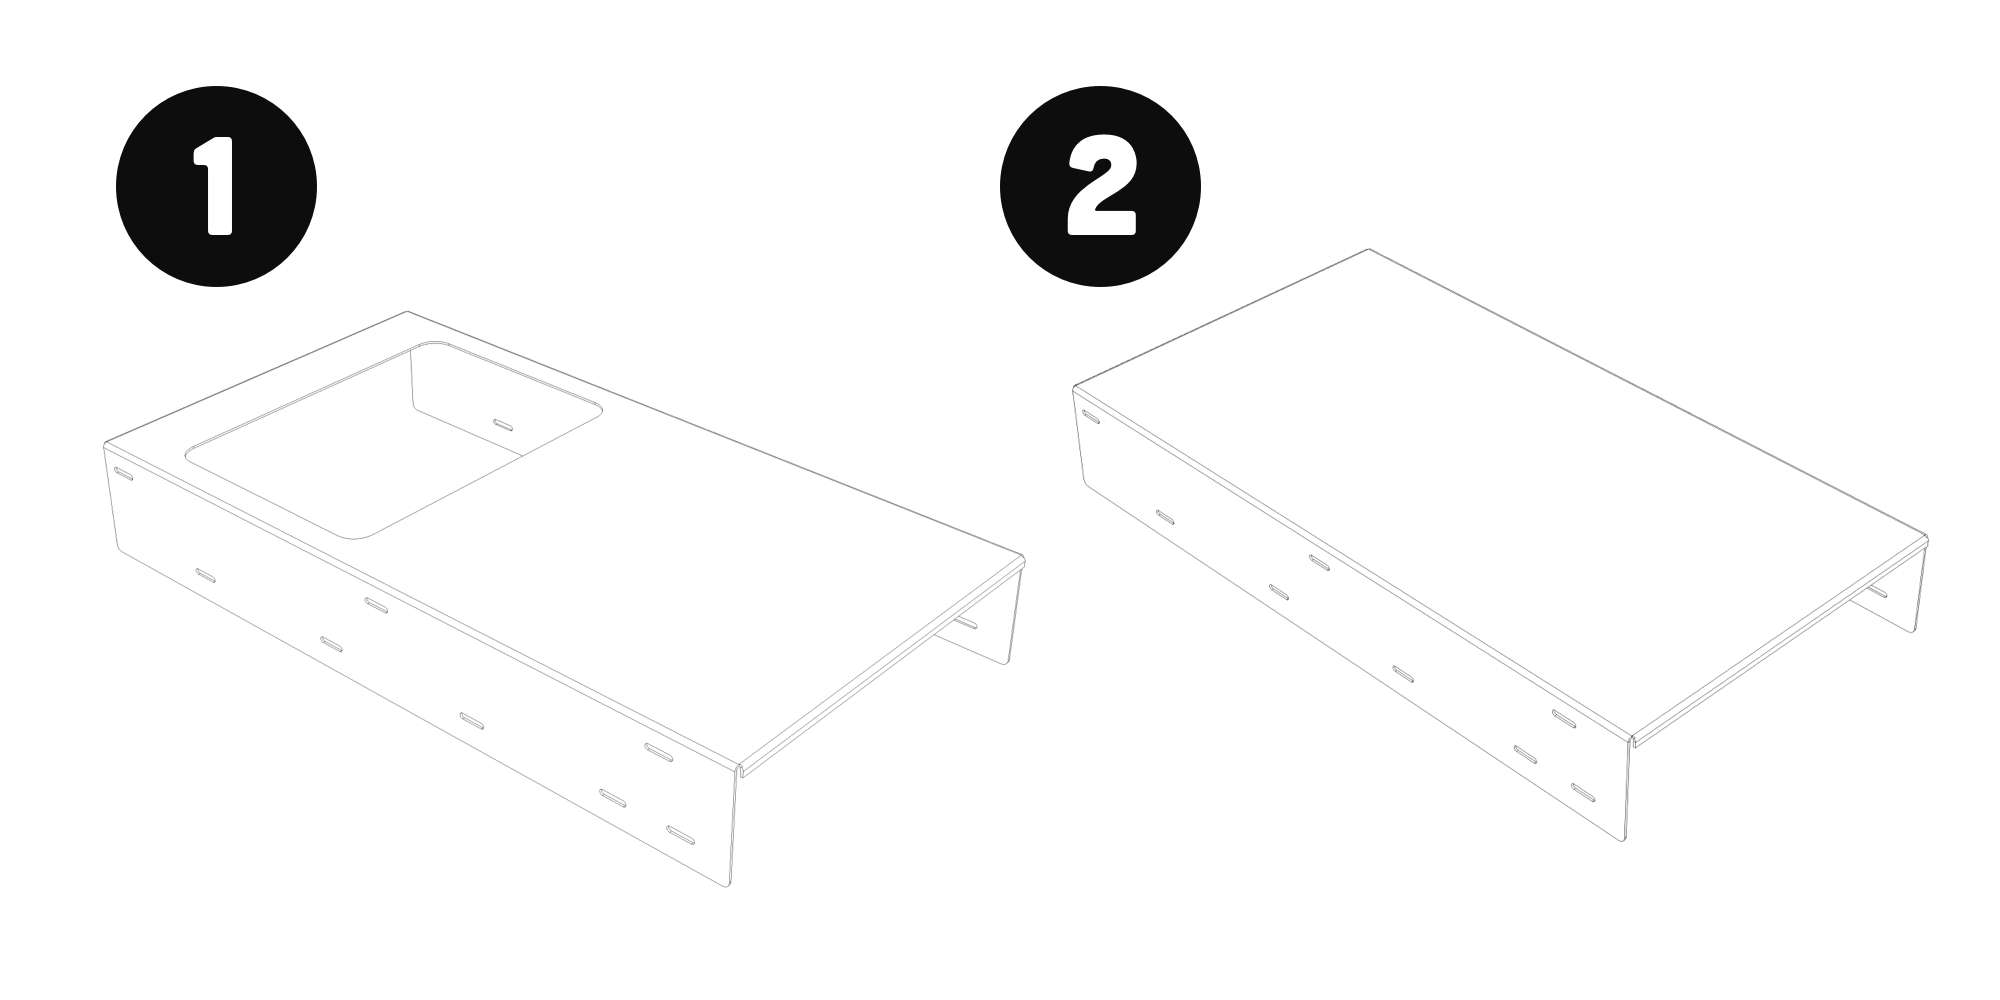
Option 1 – With sink cut out (download CAD file)
If you want a fitted sink then consider the Naturehike 6L sink. That was the only one I could find that fitted the small space and allowed for a single burner to be permanently fixed to the bottom table.
On an earlier version I had to remove the sink when closing the slides, which was annoying so I switched to a single burner gas stove to leave enough clearance for the two slides to close without the contents hitting each other.
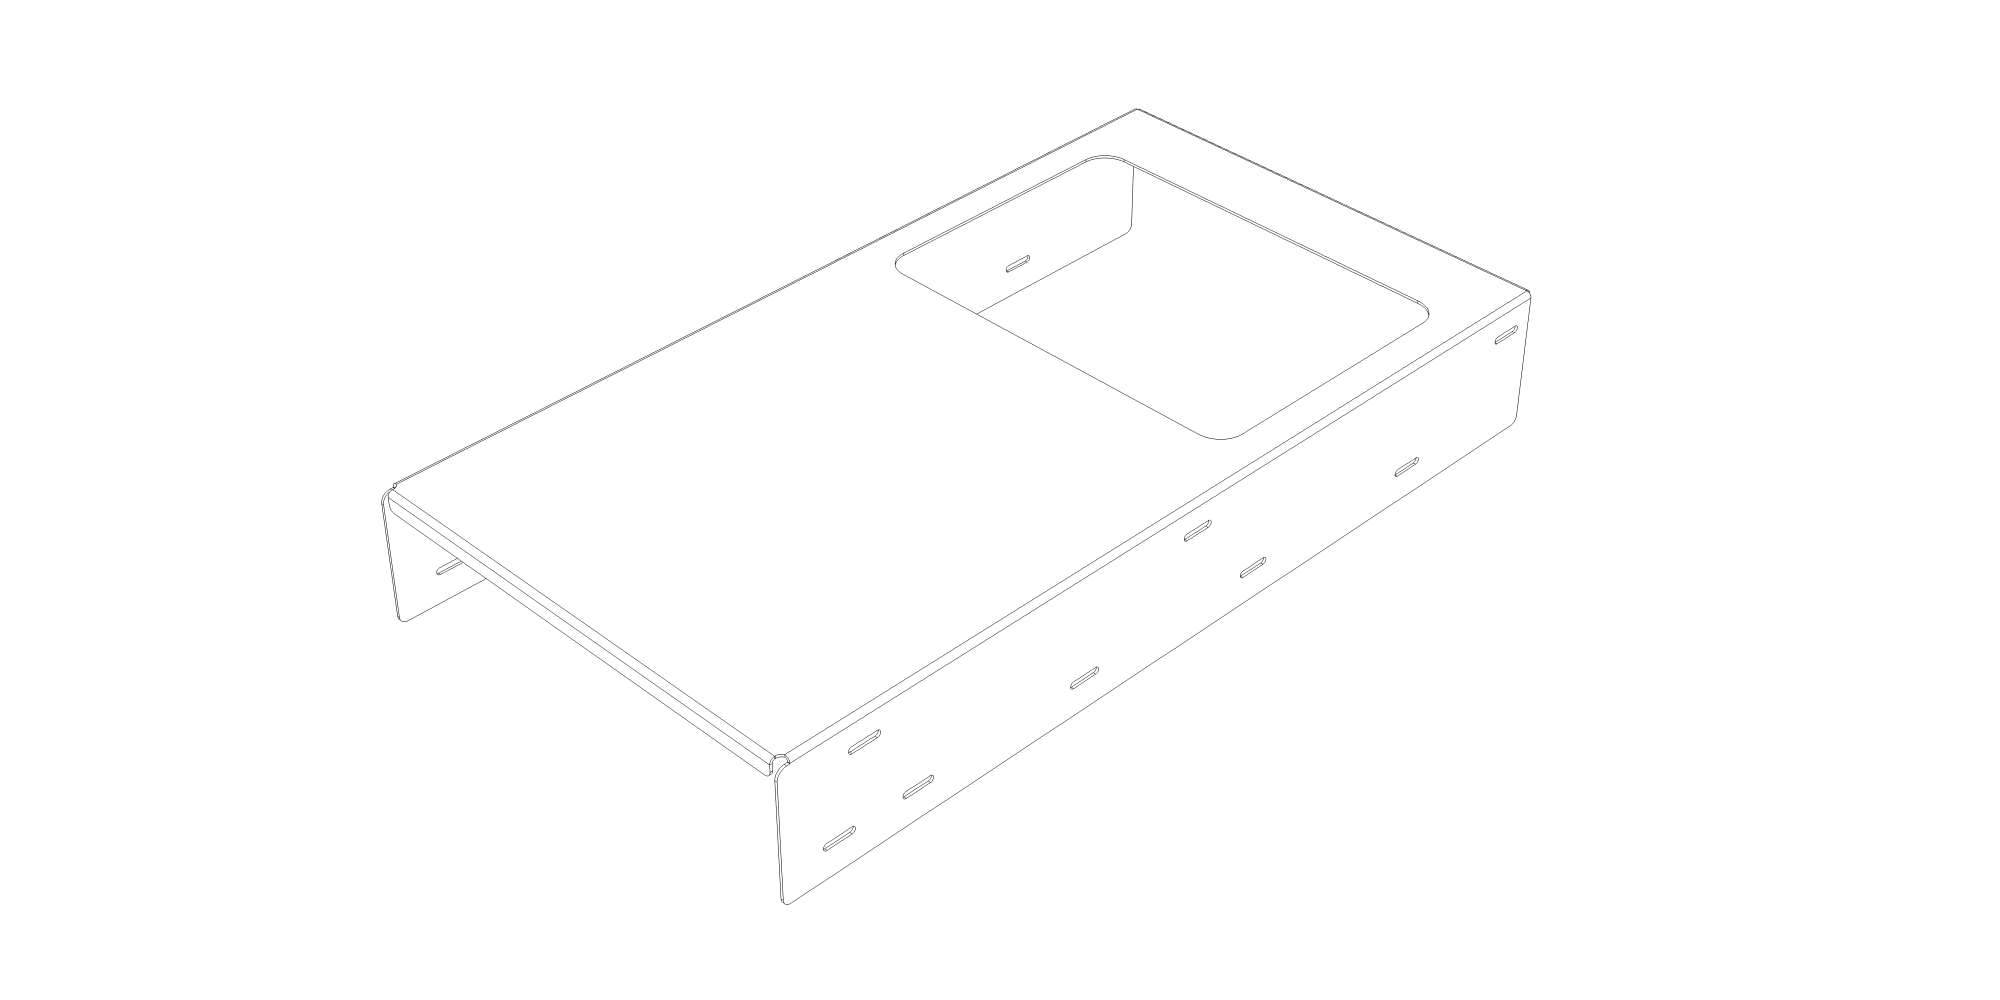
This design allows for the sink to be lifted out and emptied when required. I mount the kitchen in the car so that the sink plug can be removed to let the water to drain out. It’s just clearing the inside of the Jimny boot space, draining onto the bumper. However, in natural environments dirty water is best disposed of properly not dumped onto the woodland floor for example.
Either way the sink simply drops into place and can either stay there or be lifted out and stored elsewhere. If you are using a double burner gas stove and leaving that mounted into the outer slide table (very useful!) then the sink will need to be removed regardless to close the table slides.
I have no affiliation with Naturehike so buy at your own discretion. I cannot accept any liability for purchases made or the sellers you choose to buy from. Shop around, read reviews etc.
Option 2 – Without sink (download CAD file)
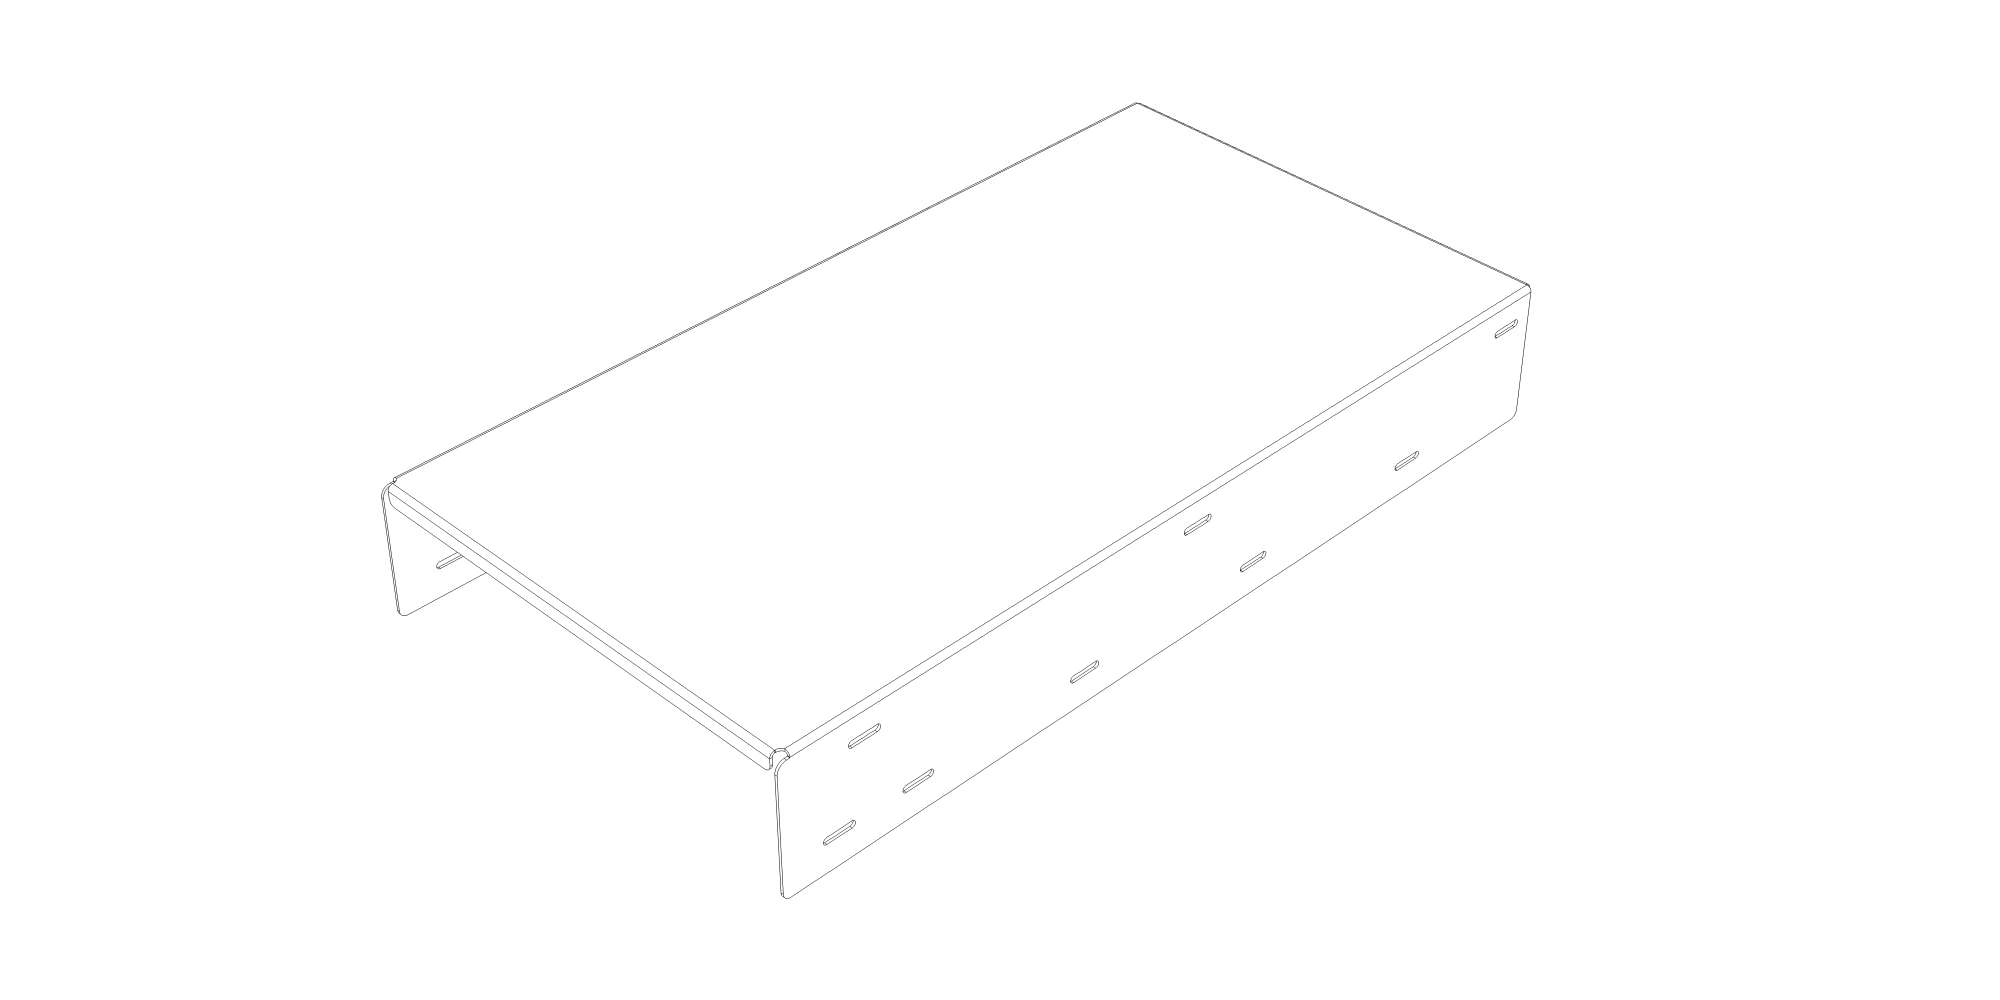
The easiest option if you want more worktop space is to simply use a collapsing sink. This also gives you more flexibility in respect of what gas stove you choose as most will fit the space in the bottom table slide.
Top table slide drawer runners
I used some fairly cheap drawer runners that so far have not let me down.
- AOLISHENG Heavy Duty Drawer Runners With Lock
- 700mm length (28inch)
- 51mm wide
- 12.7mm thickness
- 60Kg Load Capacity
I’ve added slots in the CAD design for the top table which should allow for different brands of runners to be used. I can’t guarantee you won’t need to drill some holes in your top table if you use other branded drawer runners. Just make sure you do a test fit if you are sending them to get powder coated.
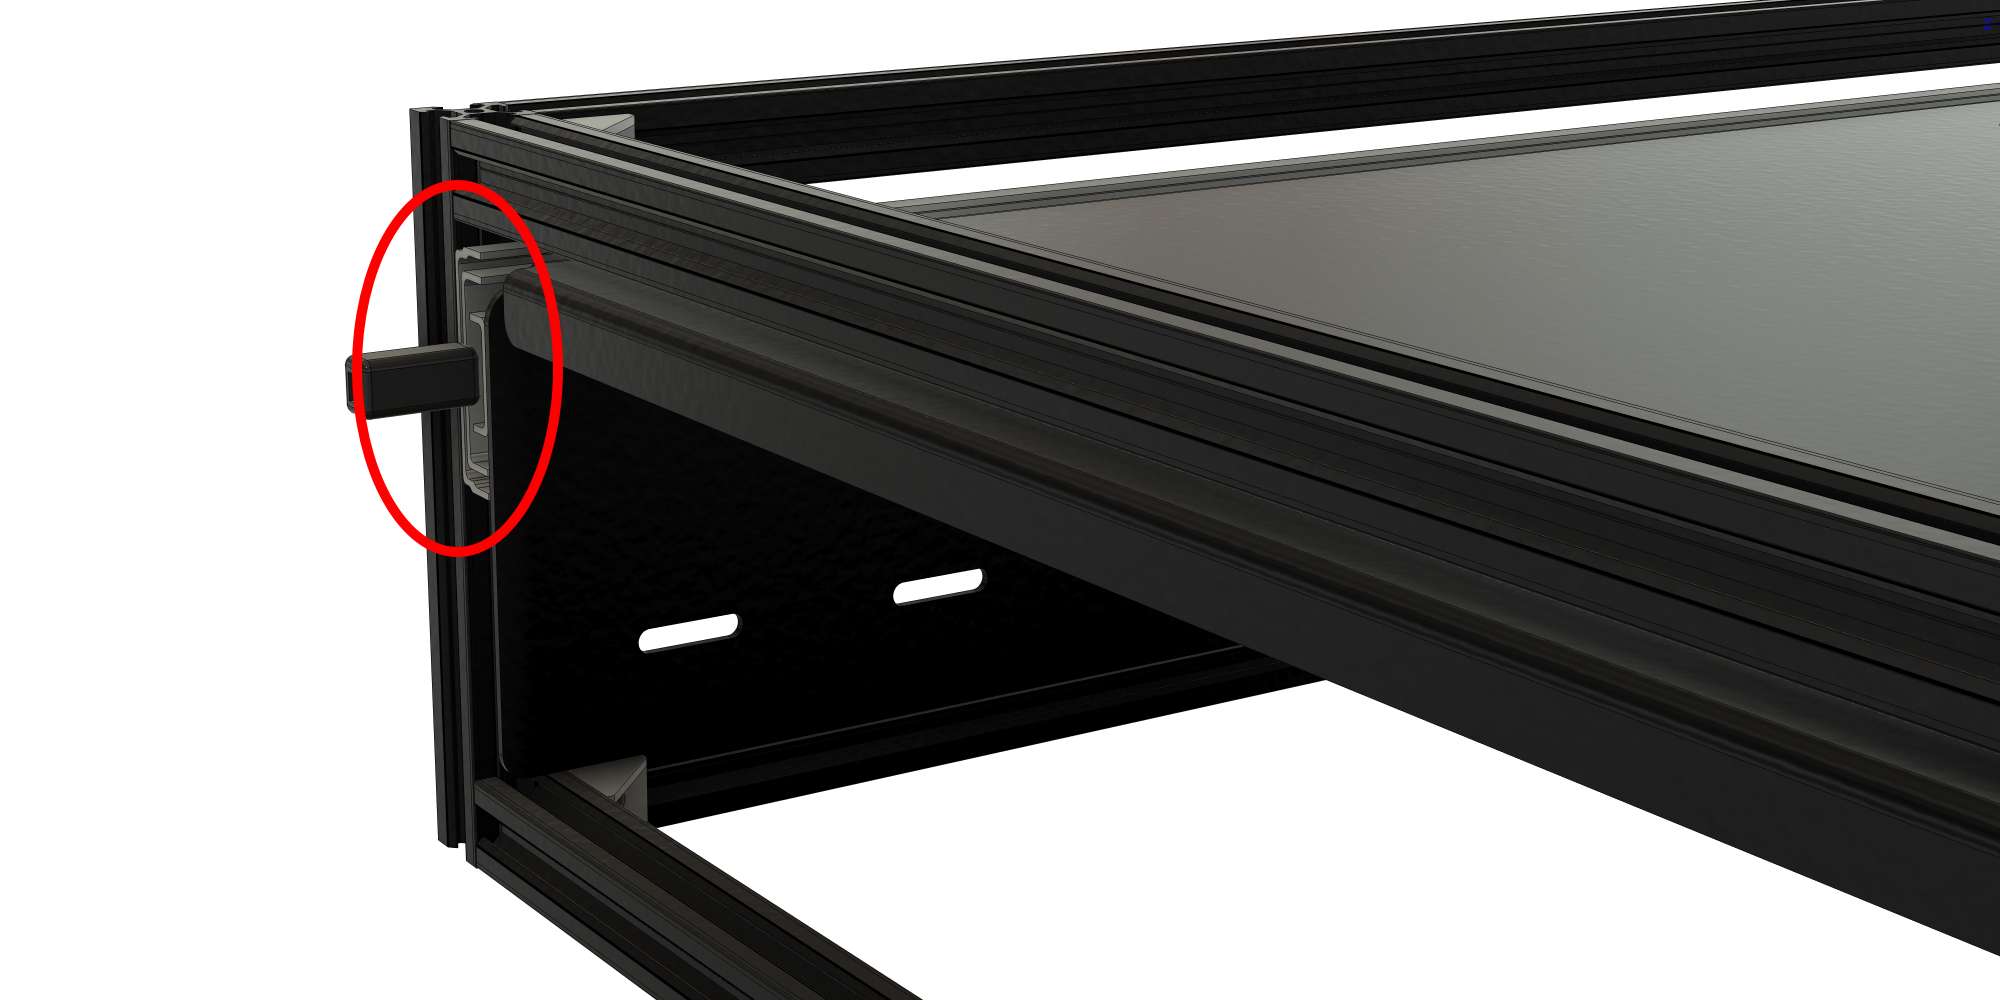
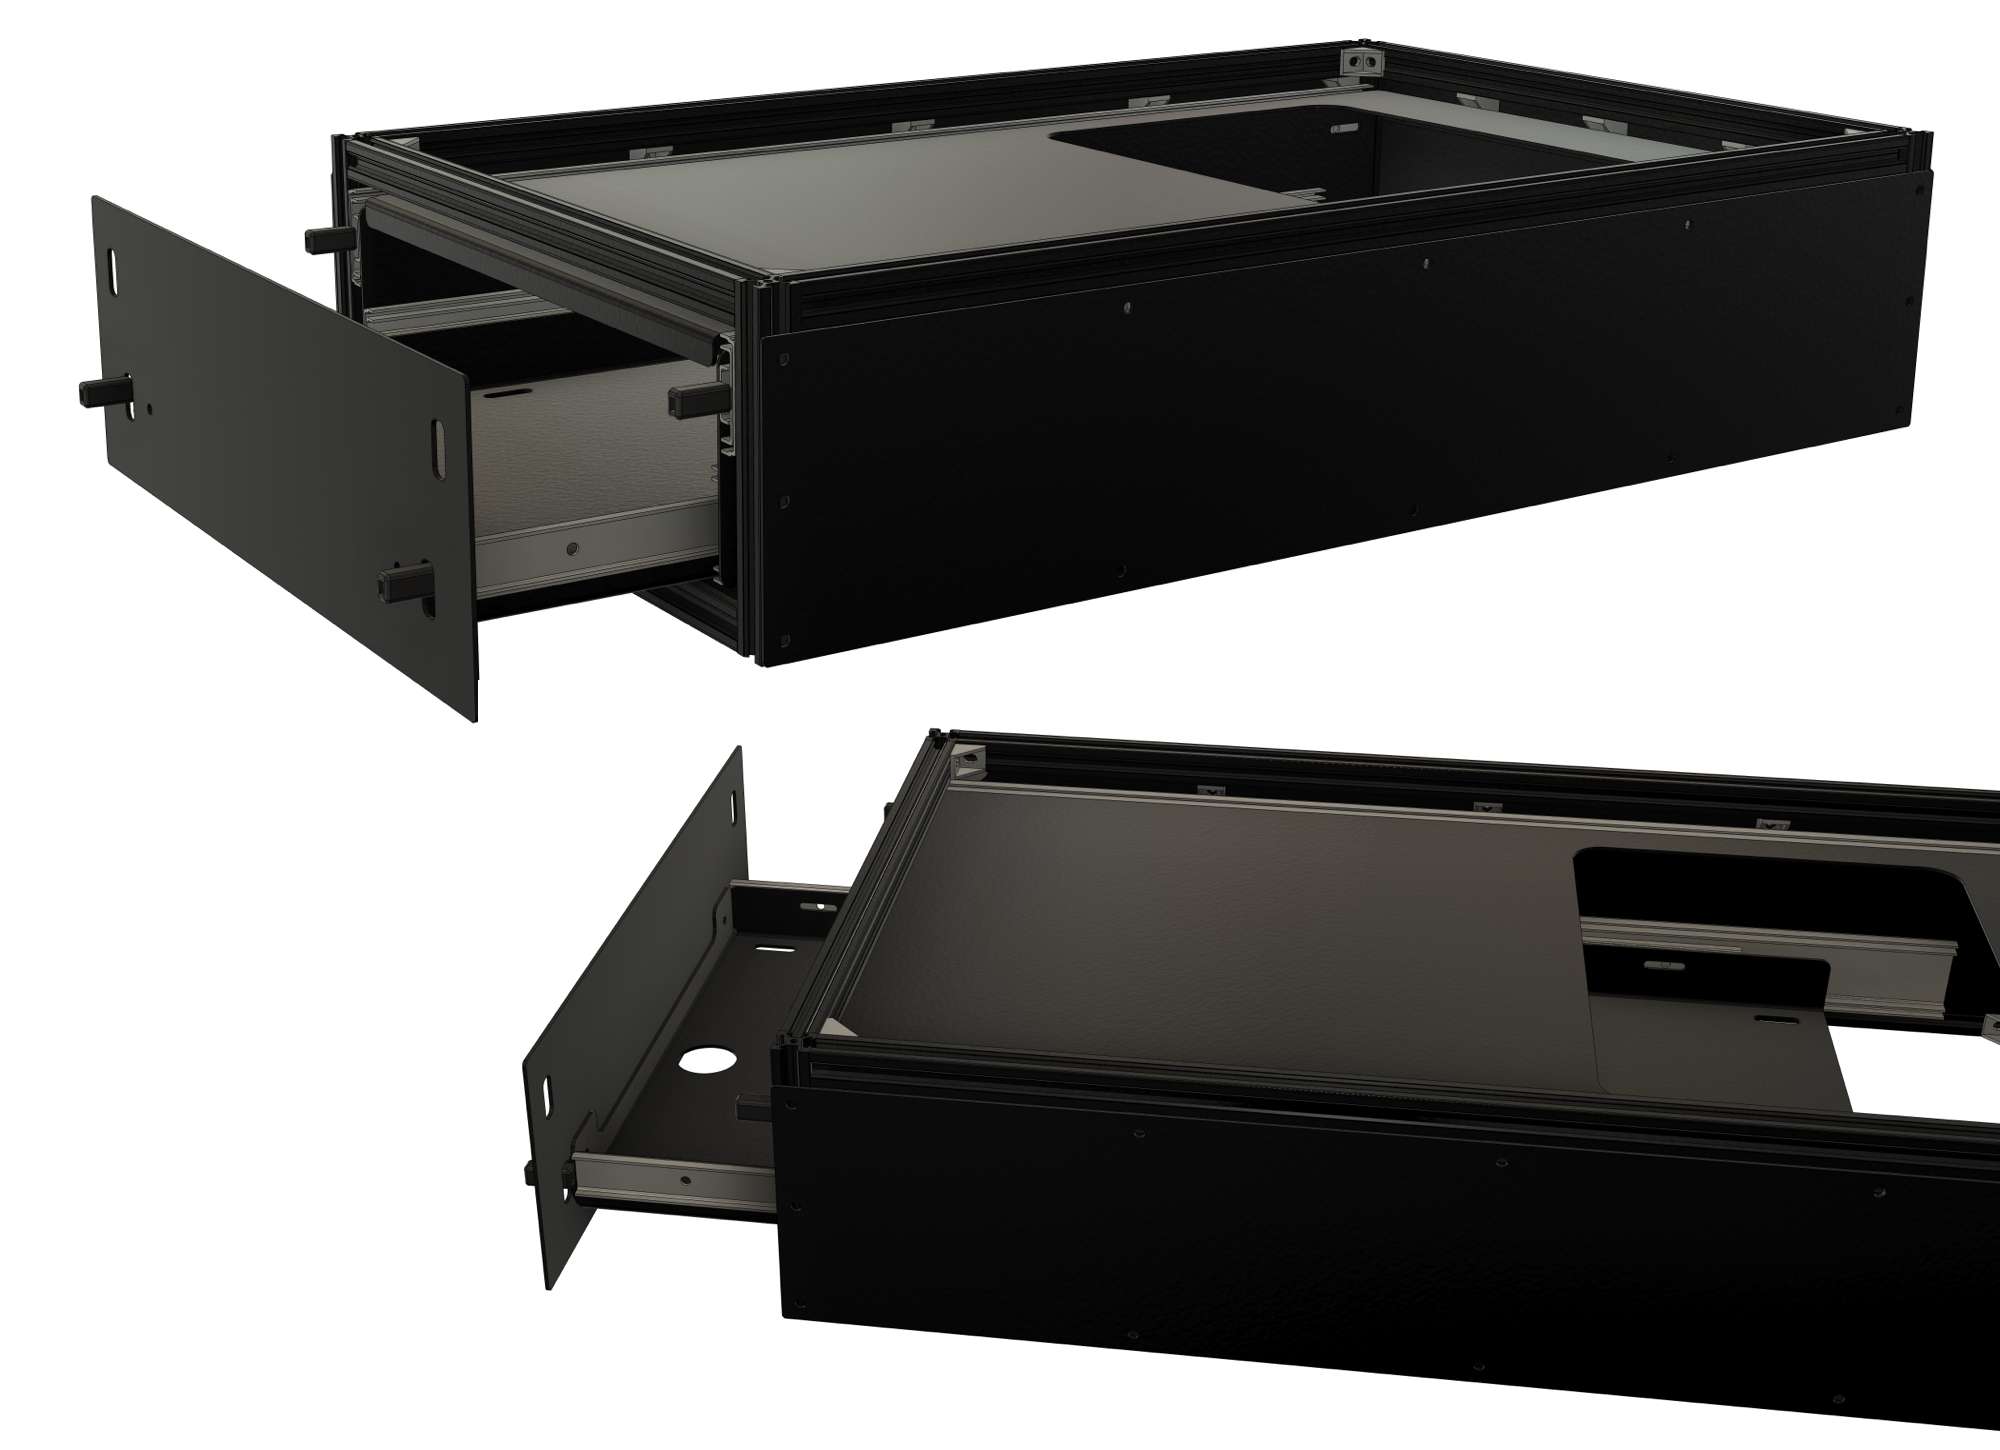
Assembling the 700mm drawer runners to the top table slide
Follow the guide of how to dismantle and install your drawer runners that is provided by the manufacturer. You have the small piece that has the locking levers and the main 2 pieces that fix to the frame.
The top table slide has slotted holes positioned correctly so you can adjust the position of the runners to where they fit best. The heights are taken care of it’s only the horizontal position within the t-slot rails that will need to be adjusted to your needs.
Position them so that outer part of the drawer runner sits flush with the front of the frame.
I used the M5 bolts to fasten into the t-slot rails. I did need to drill the holes in the runners slightly larger as mine were sized M4.
Then attach the inner (narrower) part of the drawer runner to the outside of the top table slide. Once again position it flush with the front of the top table slide.

With both sides attached, slide the drawer runner sections back together again. It should look like the highlighted example below.
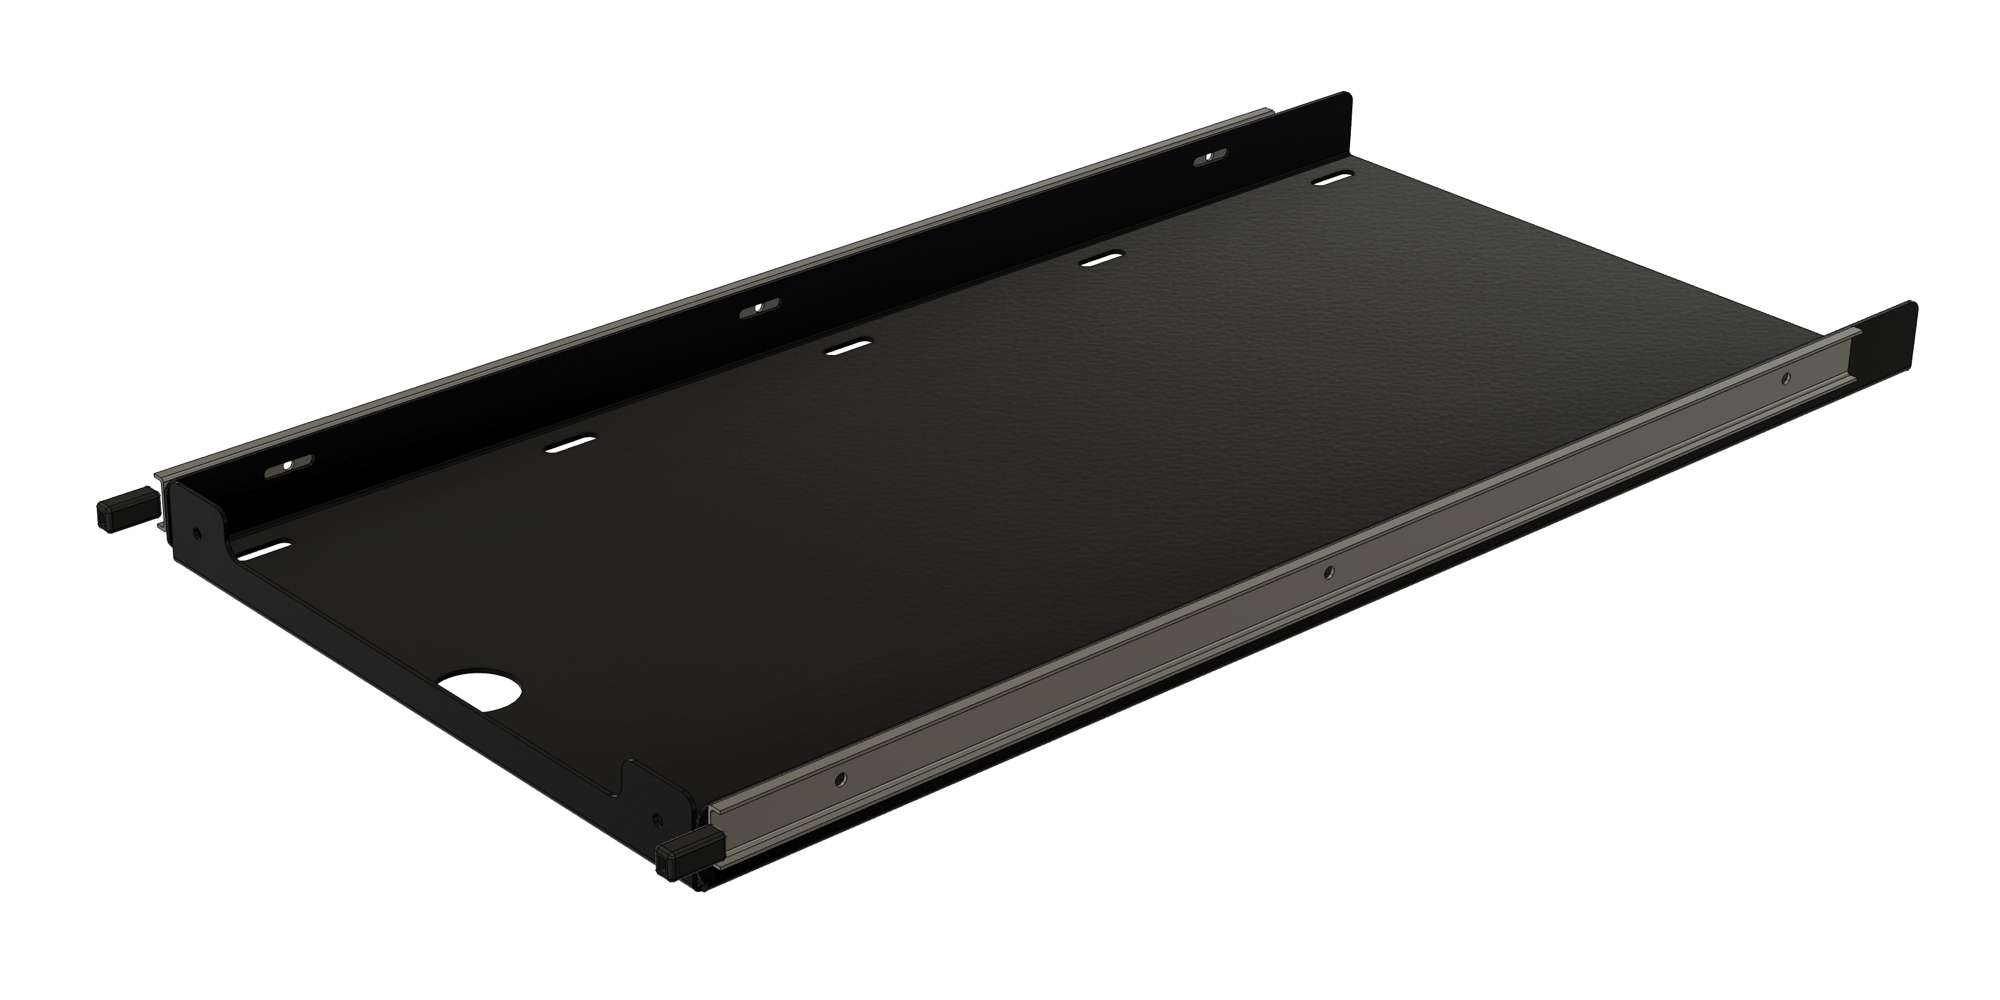
Bottom table slide
There are a few design elements of note on the bottom table slide.
The cut out notches are there to allow you to strap down items that you might want to store inside your kitchen. Perhaps you want the ability to remove the gas store at camp to cook elsewhere, or strap down other kitchen related kit and avoid the dreaded rattles!
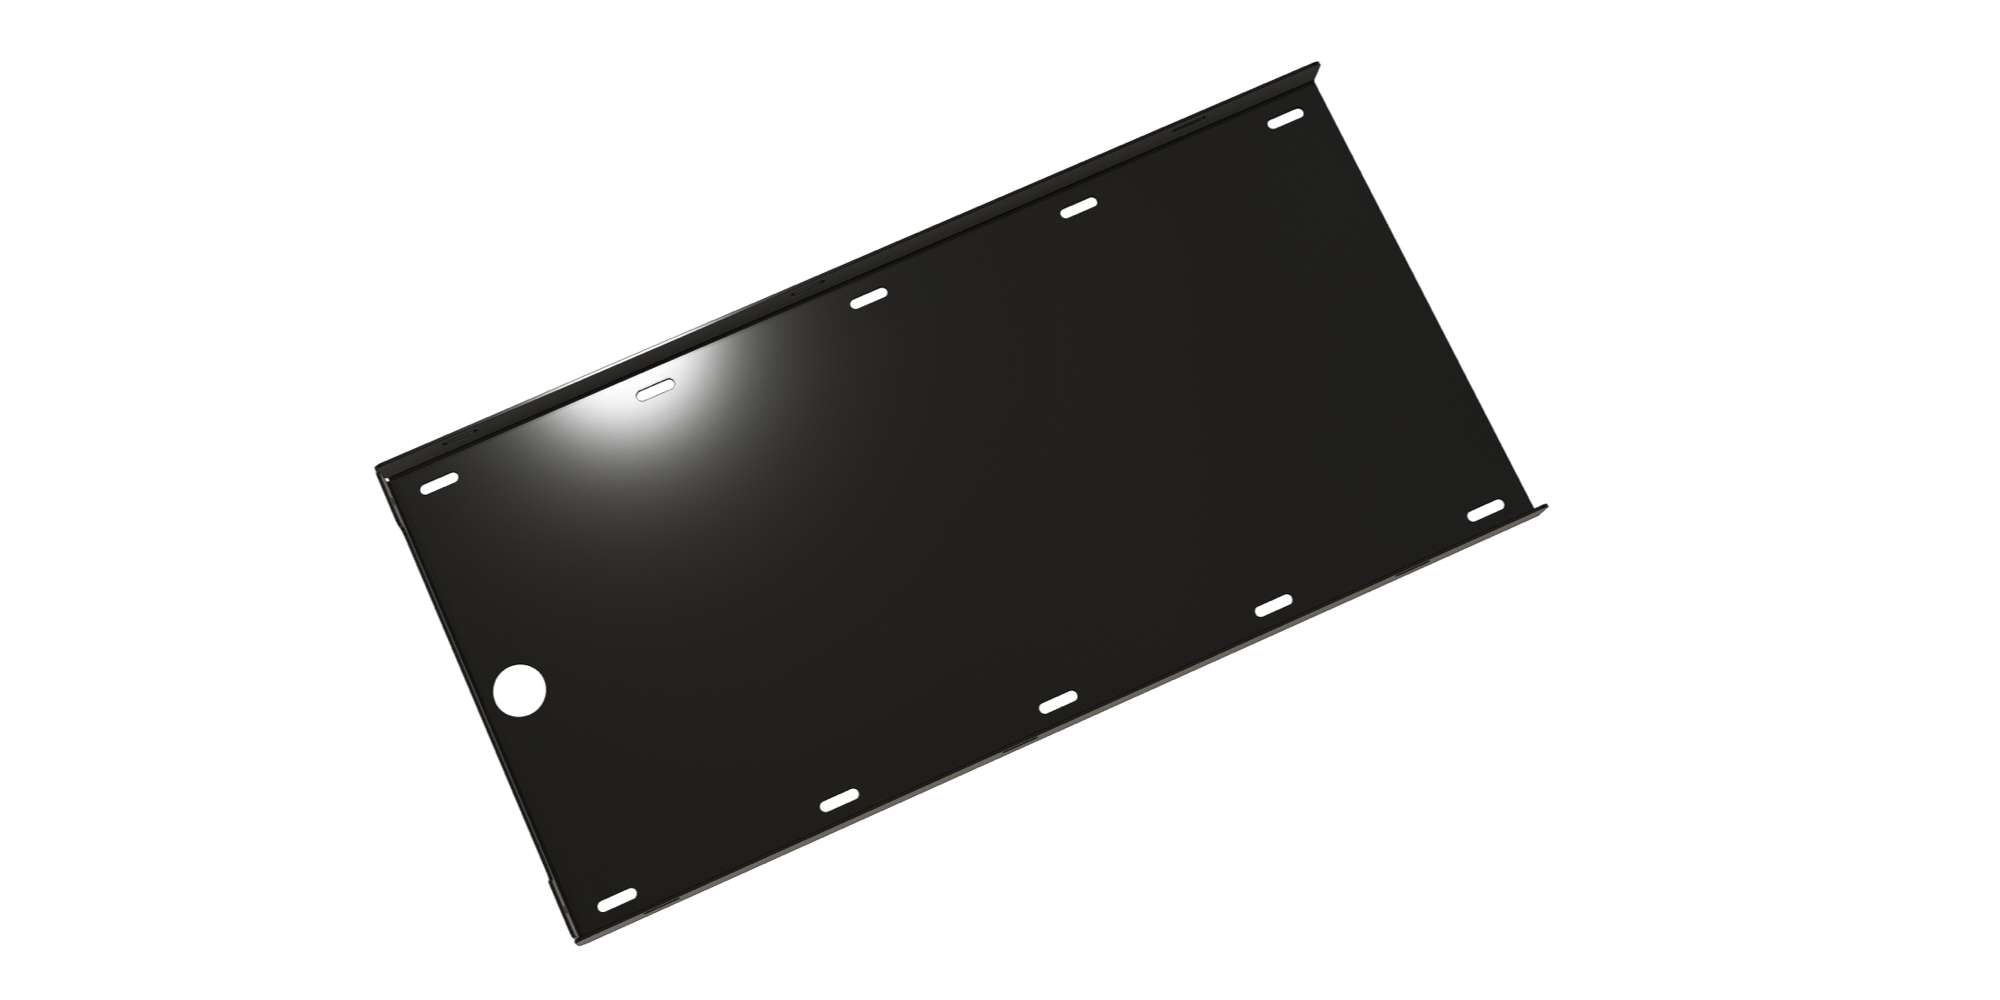
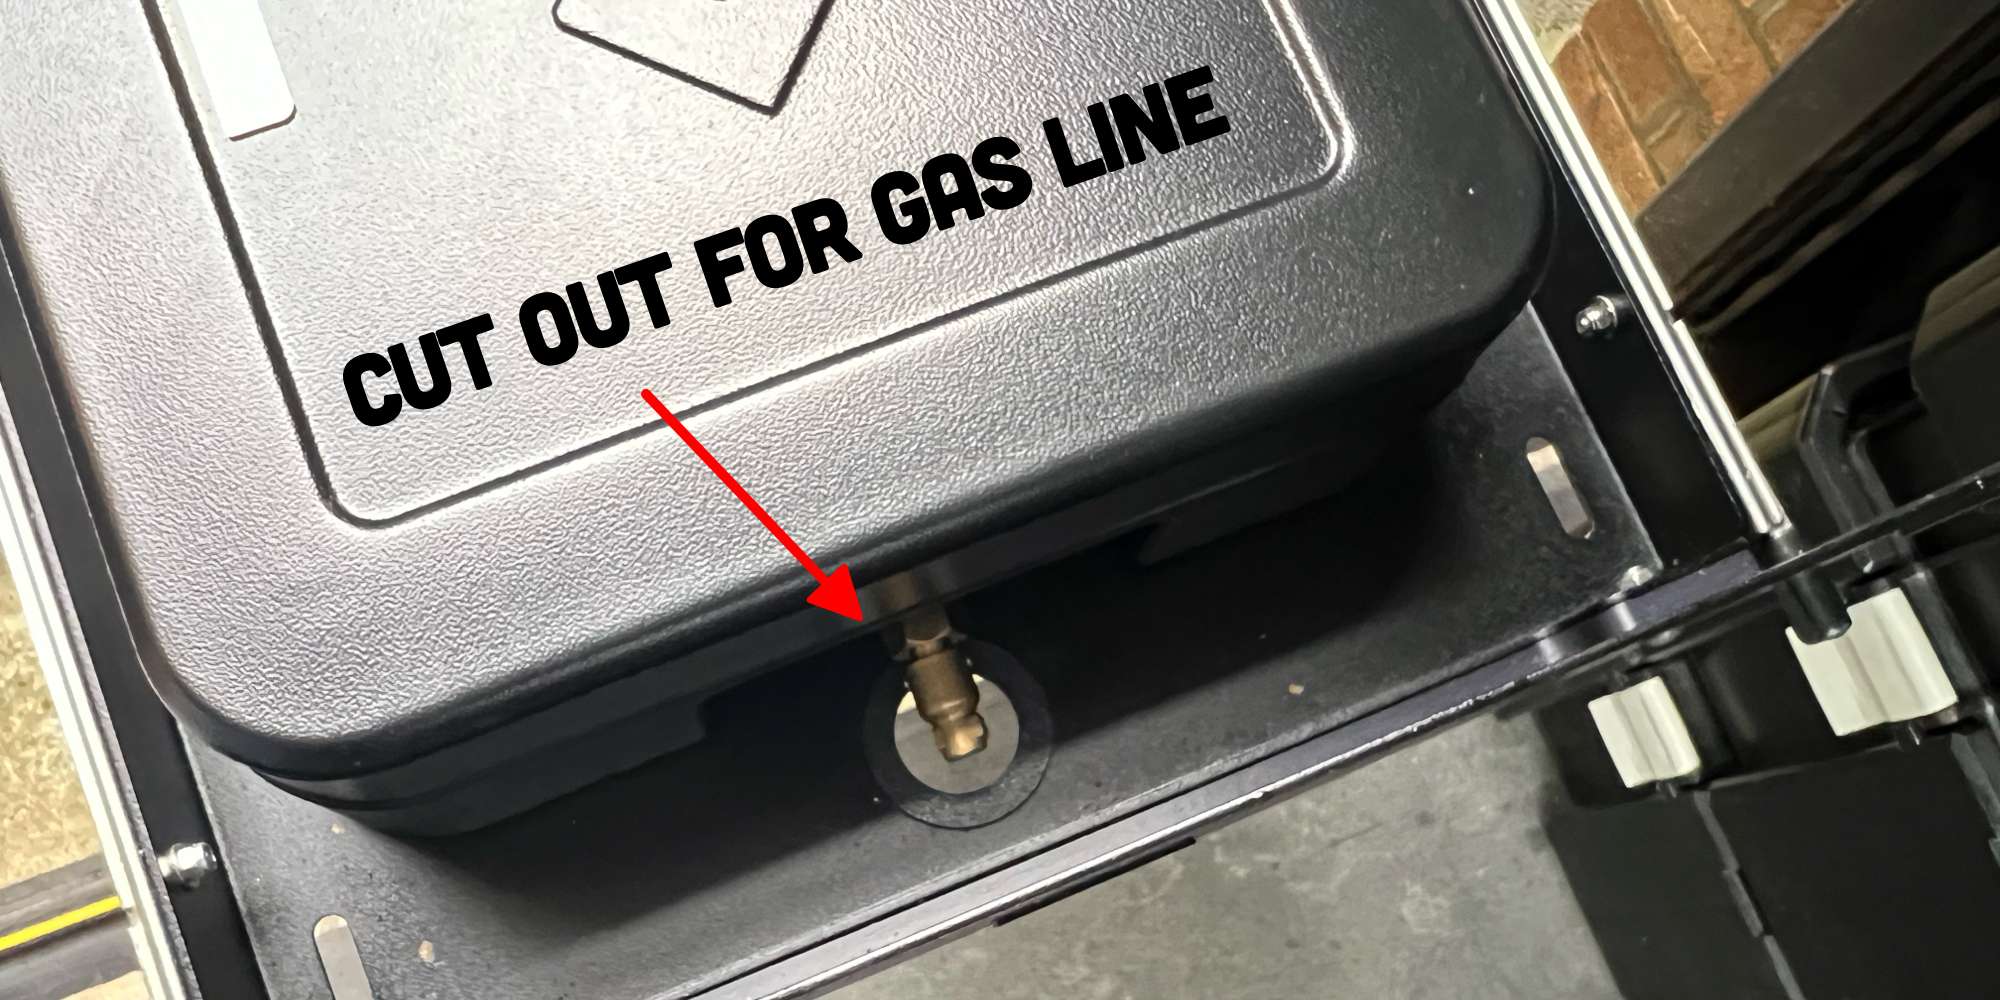
I’ve also included a circular hole for the gas line to avoid it running over the top of the table. Depending upon where your gas outlet is on your stove you may wish to modify this placement.
Bottom table slide drawer runners
These are 50mm shorter but still leaves ample room locked out at full extension.
- AOLISHENG Heavy Duty Drawer Runners With Lock
- 650mm length (26 inch)
- 51mm wide
- 12.7mm thickness
- 60Kg Load Capacity
Assembling the 650mm drawer runners to the top and bottom table slides
Follow the guide of how to dismantle and install your drawer runners that is provided by the manufacturer.
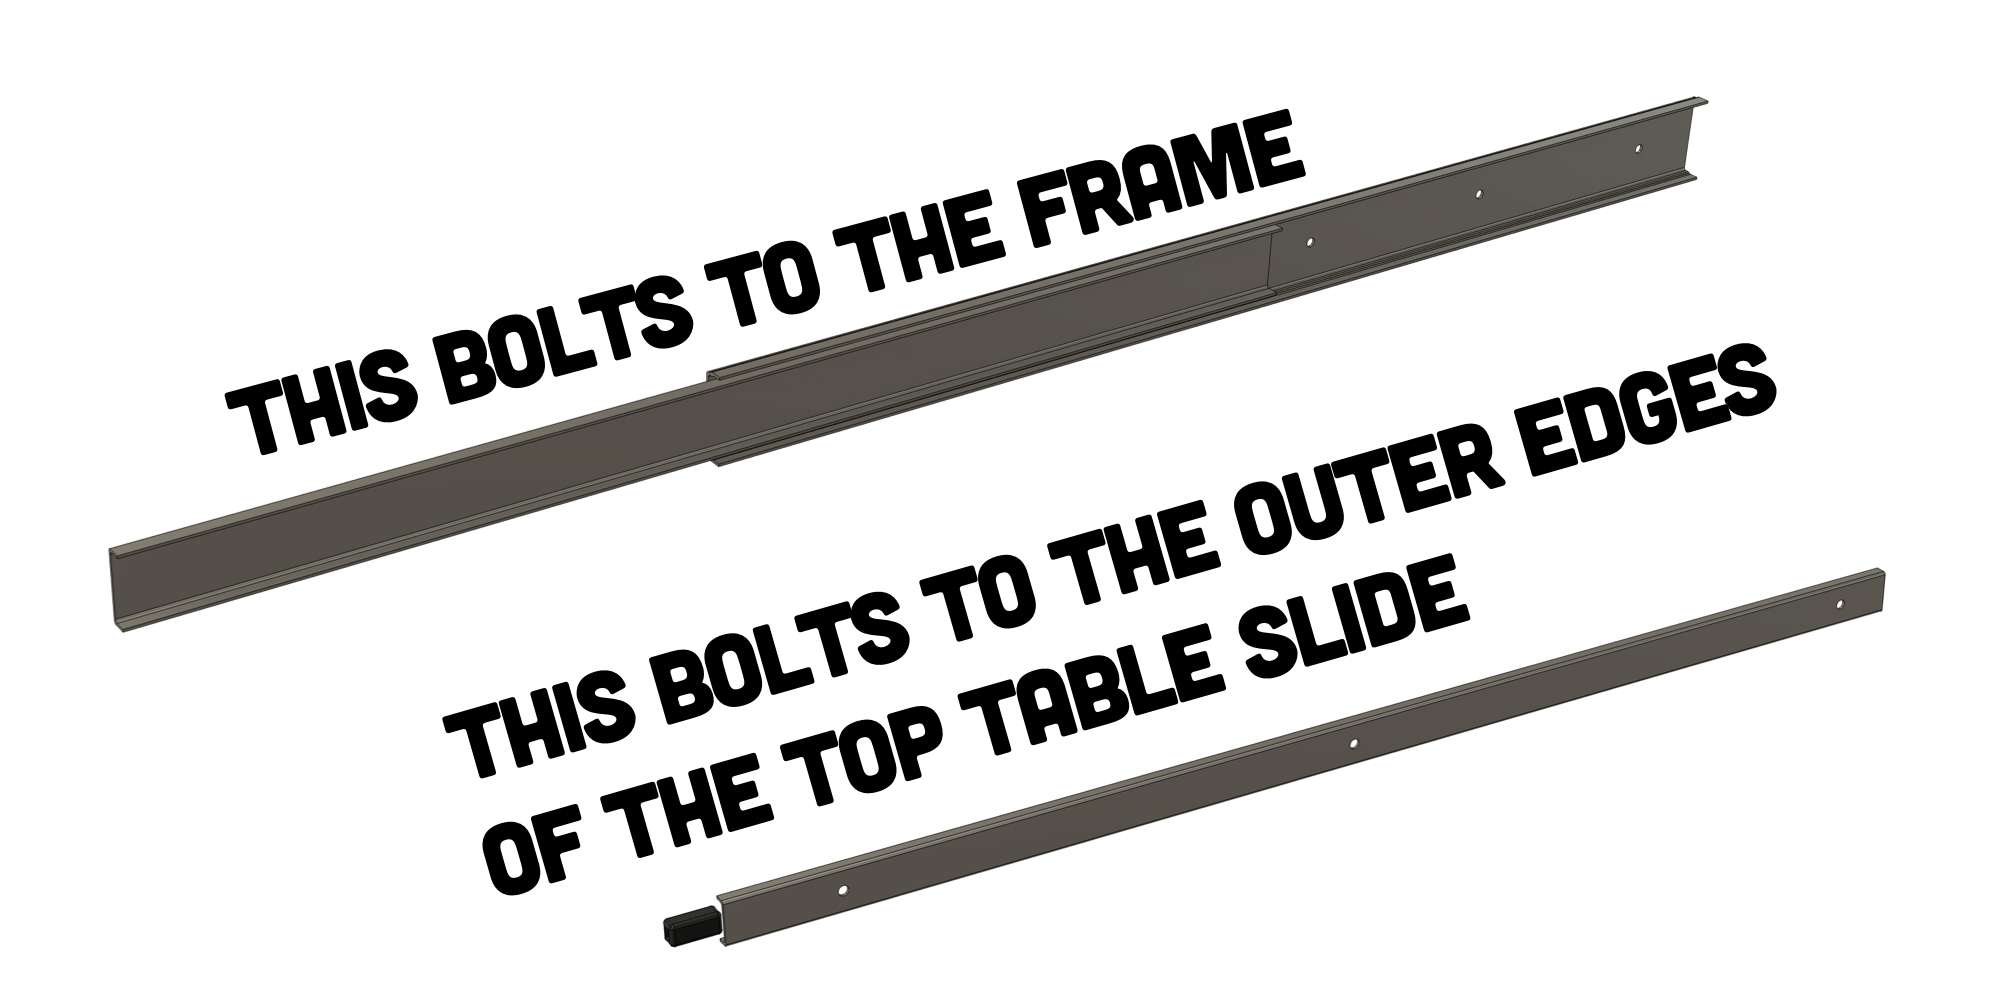
The outer section of the drawer runners bolt to the inside of the bottom table slide. The slotted holes allow for forwards and backwards adjustment. Position it flush with the front of the top table slide as highlighted in red below.
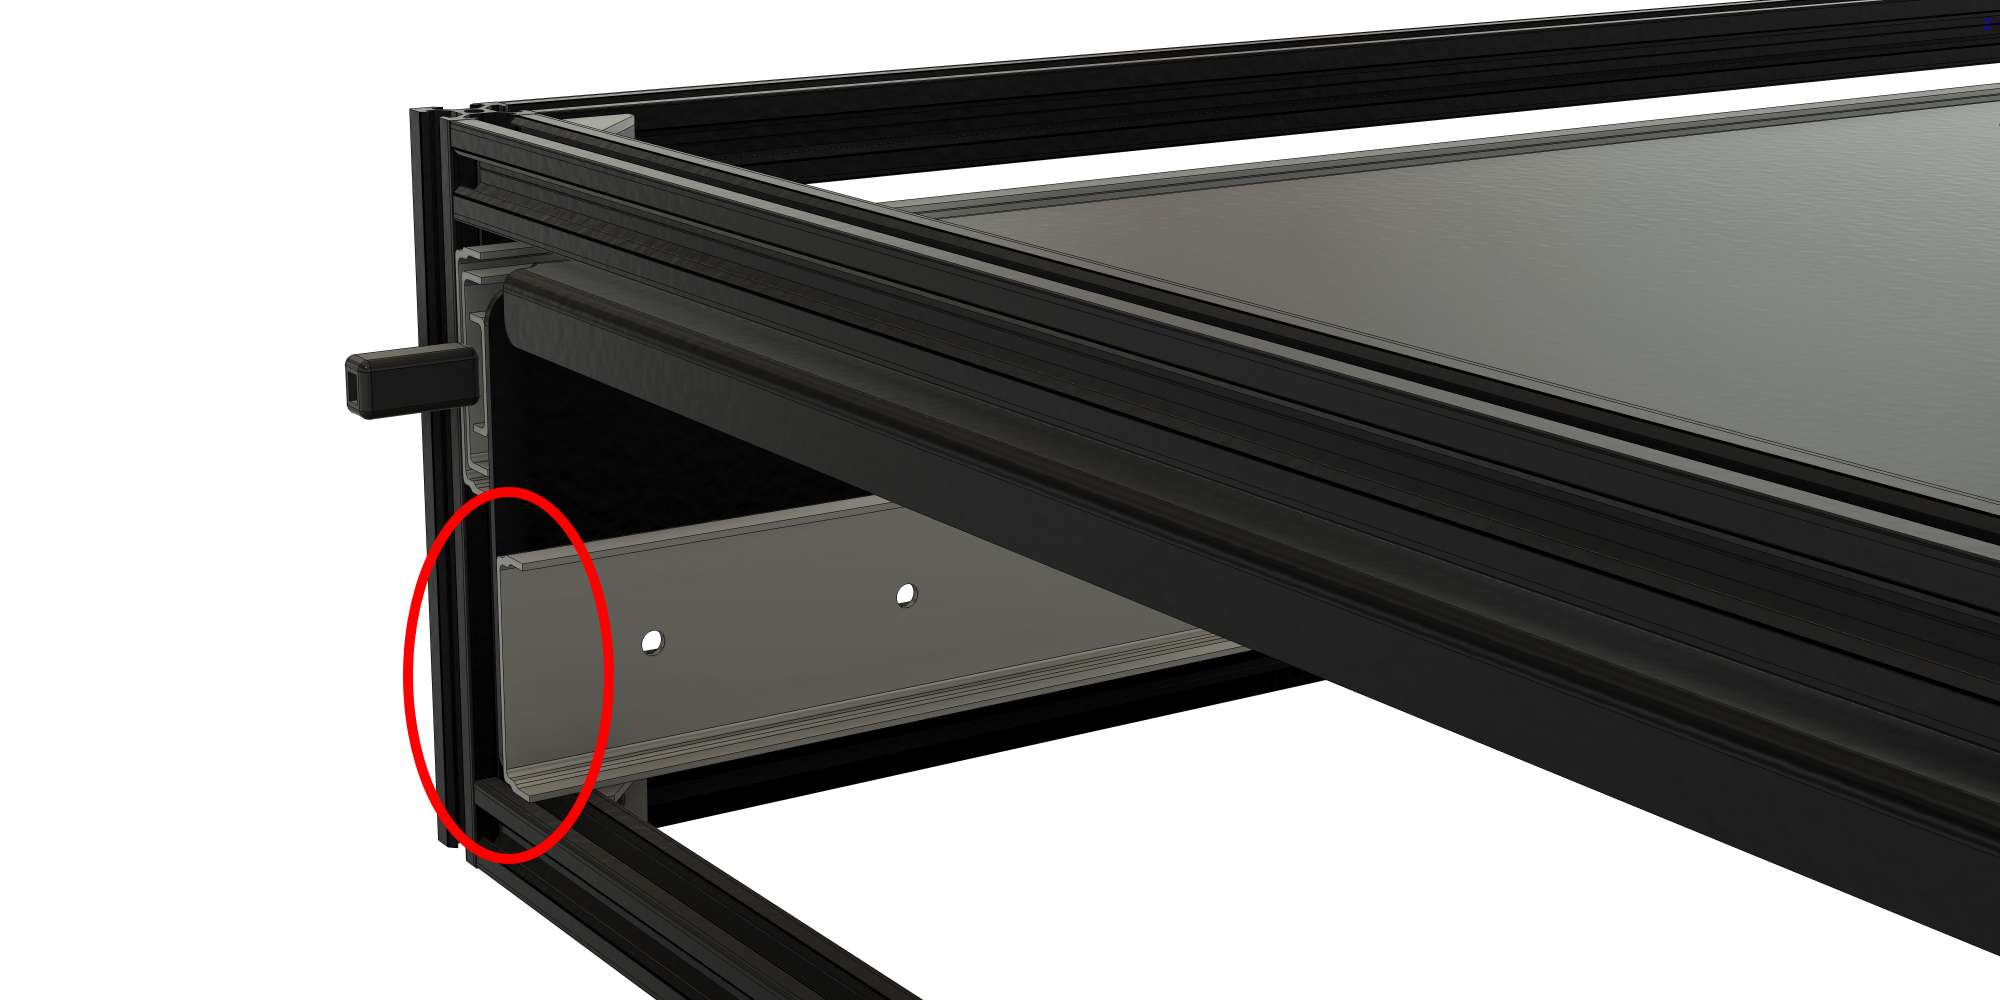
I used the M5 bolts to fasten into the t-slot rails. I did need to drill some of the holes slightly larger in the drawer runners as they were M4 sized.
Bolt the inner sections of the drawer runners to outside of the bottom slide table as shown below.
Bolt the outer section to the inside of the top table slide as shown below.
Then slide the drawer runner sections back together. It should all be positioned flush as highlighted below.

Hints and tips on drawer runners
- You will notice that these drawer runners have some side to side flexing. At one point I added legs to the end slide to attempt to restrict this movement but in all honesty it didn’t work. I’ve never had any practical issues while using it without legs so I’ve not give this any more attention.
- It can be tricky to slot the drawer runners back together, just be patient and follow the guide you get with the drawer runners. I found that once I got them back together they took a few opens and closes to seat right. Once they’re correctly in place you will be able to slide them to full extension a lock into place.
- Don’t keep the levers full down as you reach close to the lock out position or you risk pulling the table out completely! I’ve done that a few times 🙂
- I assume buying better quality runner will help reduce any rattles. The ones I use are ok but if you can find runners that are advertising silent operation I’d give them serious thought.
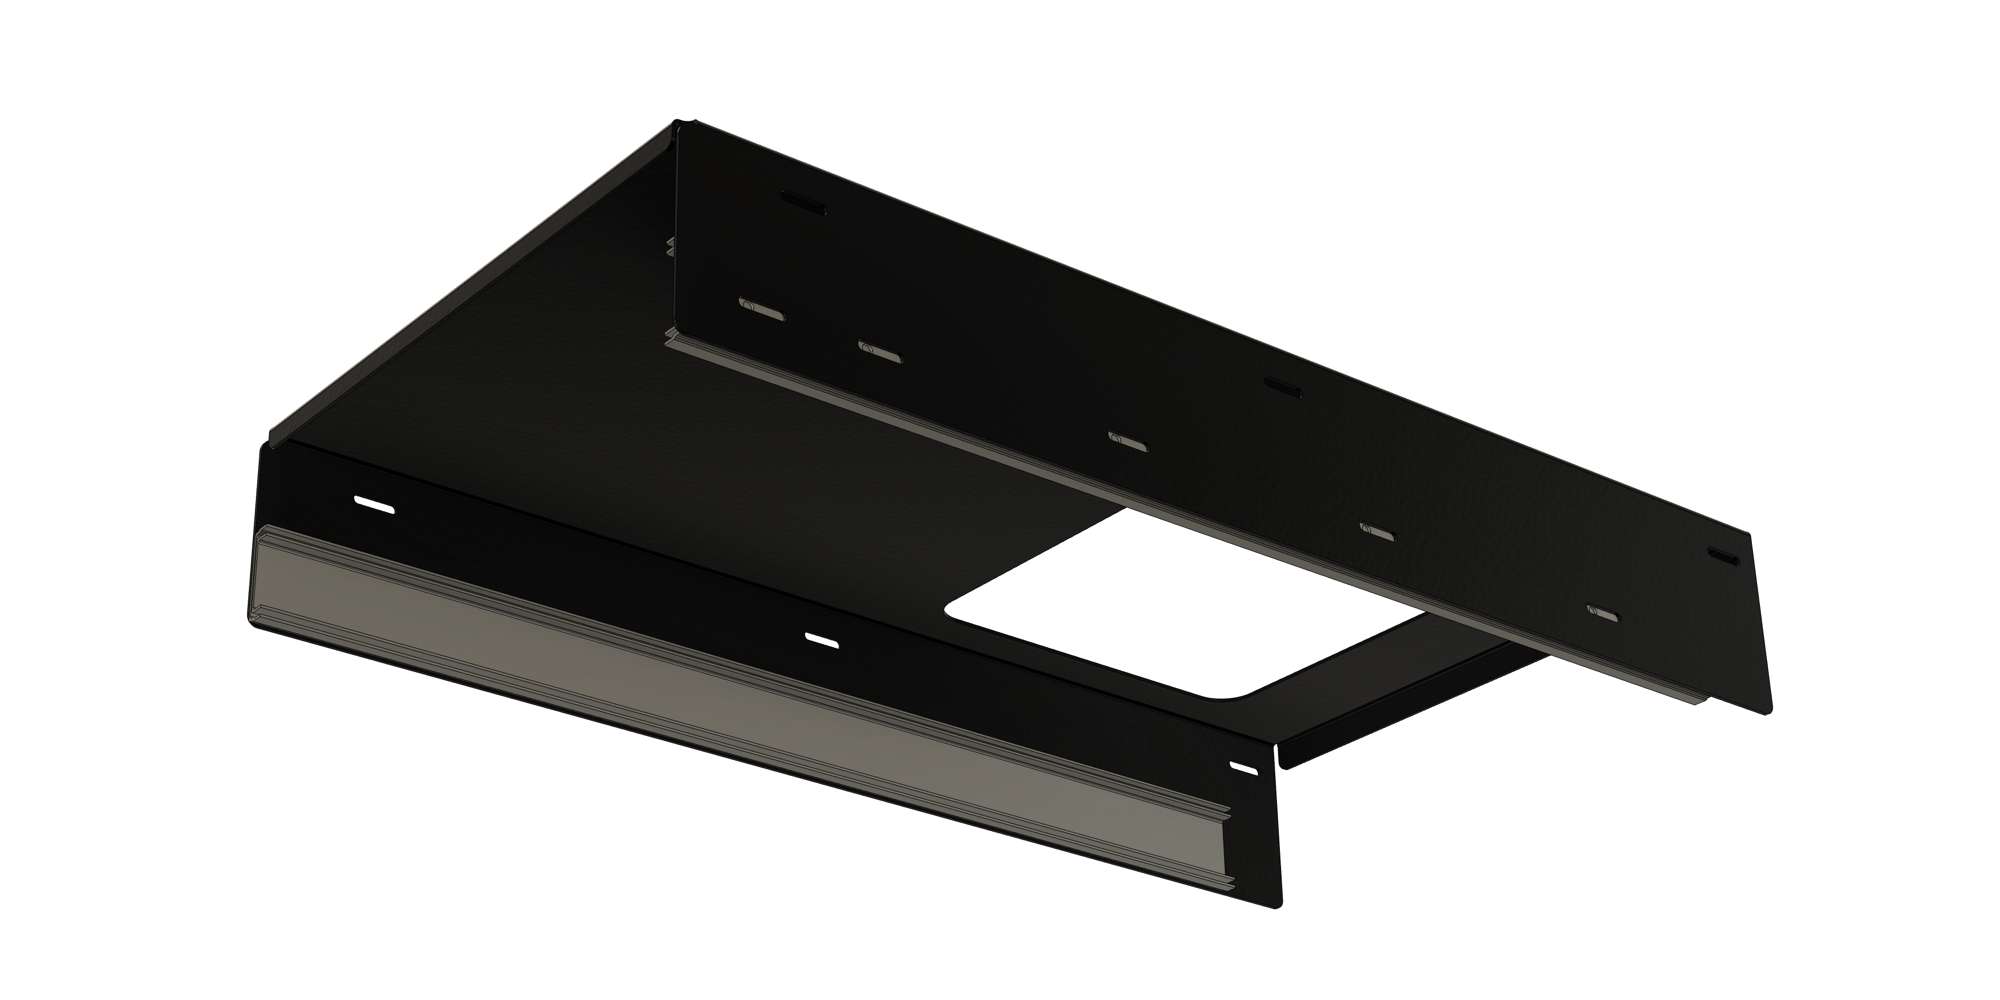
Neatly boxing it in
The last piece of the jigsaw is the panelling the frame.
Once again I chose to get aluminium sheets laser cut then powder coated.
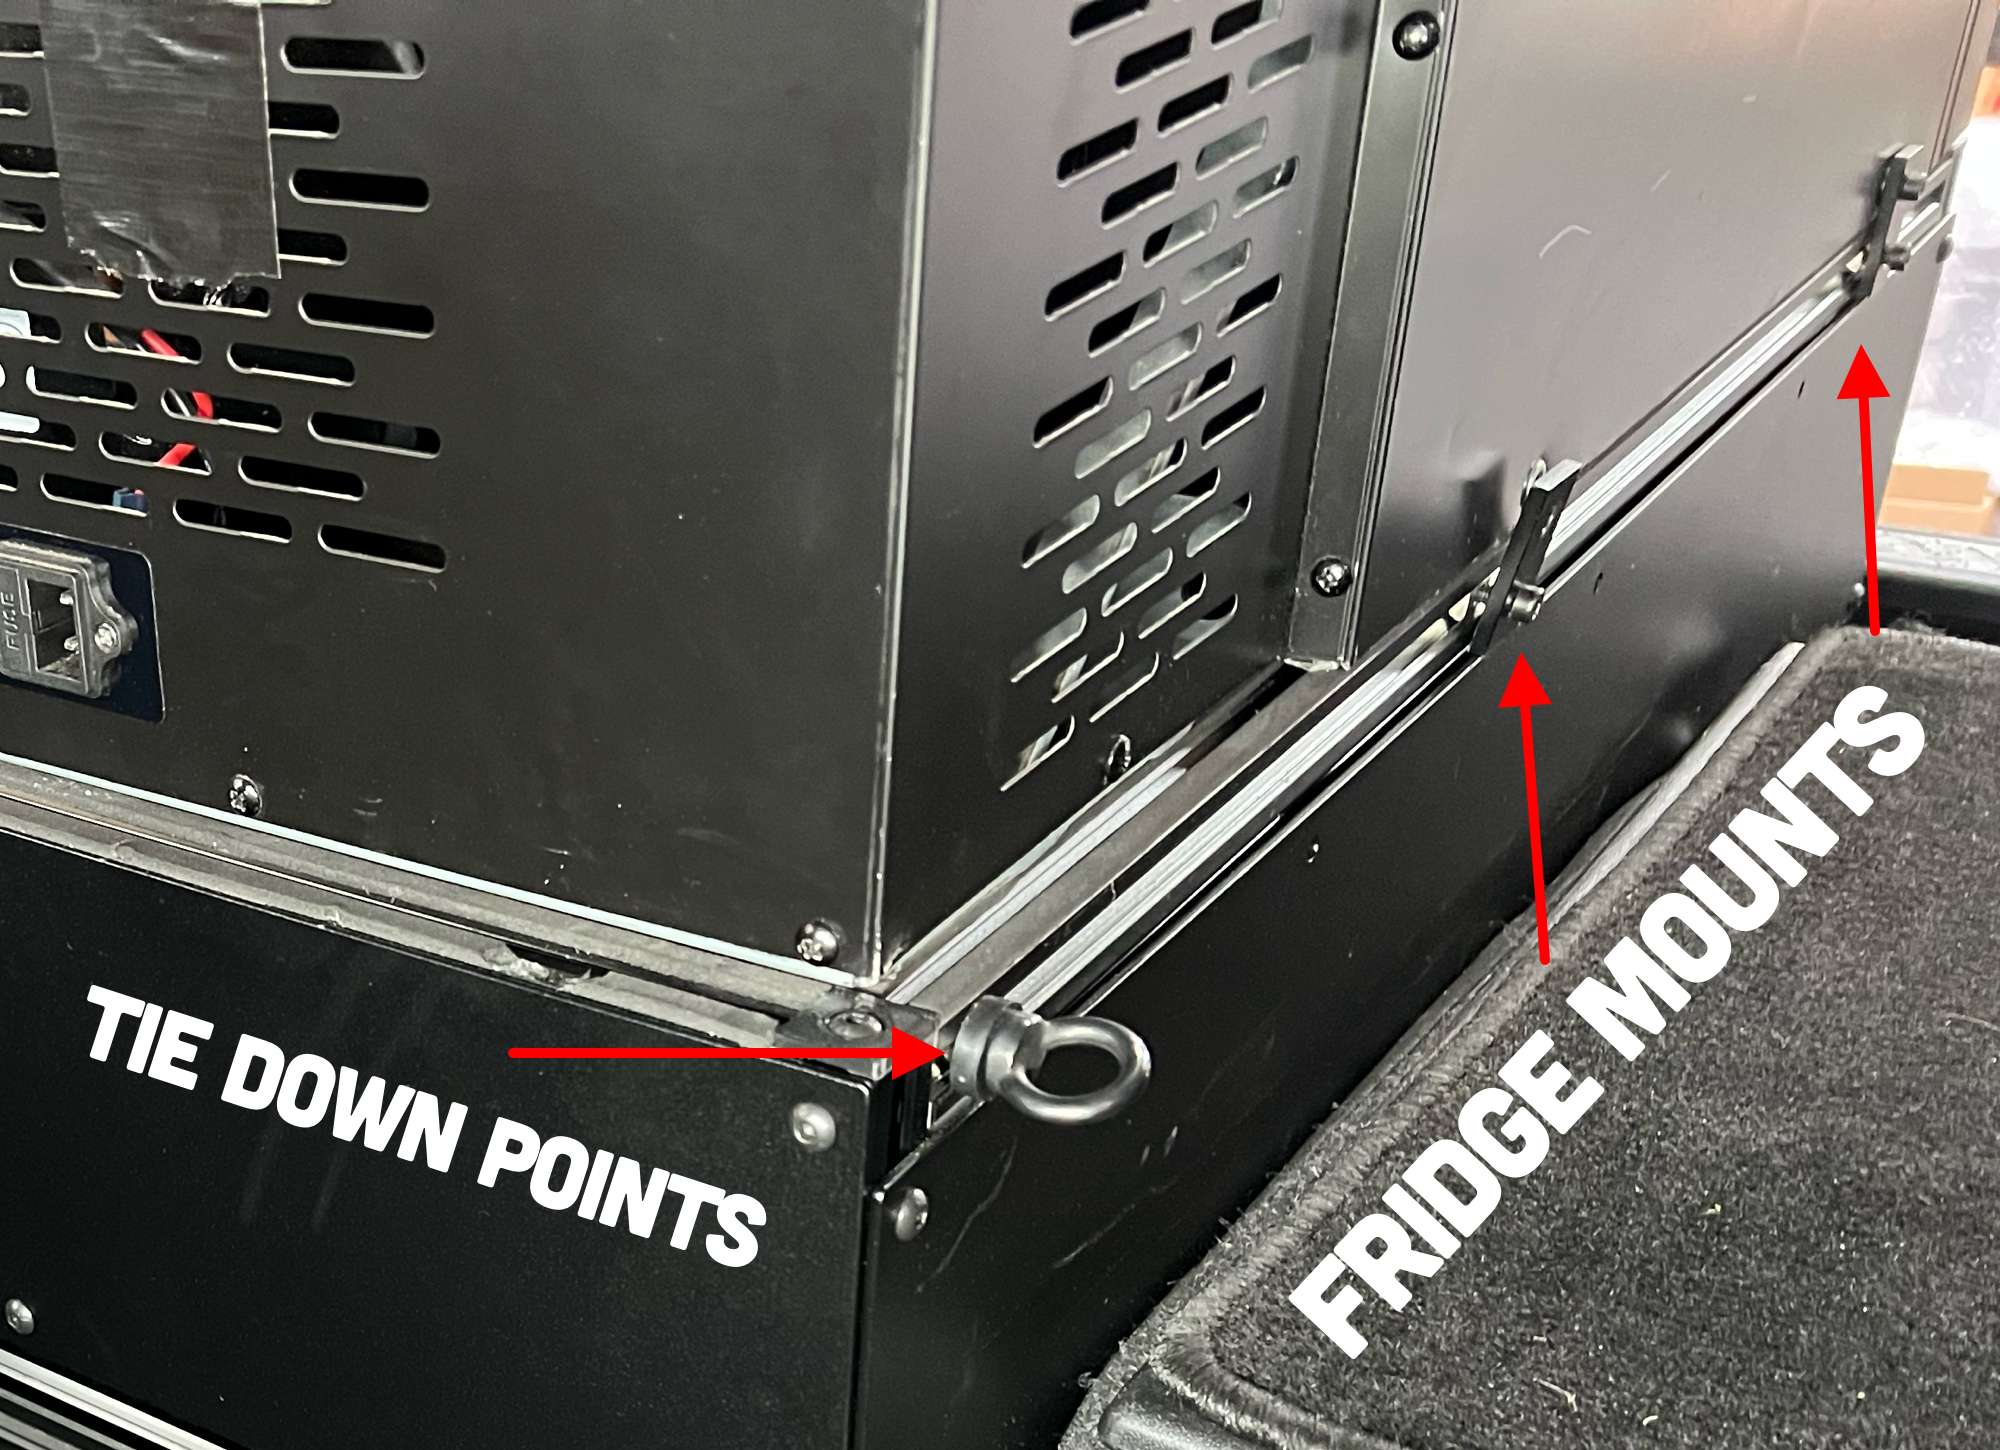
I’ve designed the side and back panels to be 20mm shorter than the full height of the kitchen. This is to allow for access to the extrusion t-slots on the top of the frame. I use these to mount the fridge and add additional tie down points.
Side and back panels
Use 9 corner brackets to fix the tops of the side and back panels to the underside of the frame as highlighted below. This avoids any unwanted rattles.
Front panel
The cut out holes for the drawer slide locks are oversized but you may need to adjust them if your drawer runners are different.
The drawer front is attached with two M5 nut and bolts, I used locking nuts. I also added some 1mm thick foam insulating tape between the front panel and frame where they meet. To help avoid any metal on metal rattling.
Here’s a list of the panel sizes you’ll need and the CAD files if you’re getting them laser cut.
Top panel – 720mm x 440mm (download CAD file)
If you’re adding drawer fridge you do not need the top panel.
Side panels – 720mm x 140mm (download CAD file)
Back panel – 440mm x 160mm (download CAD file)
Front Panel – 440mm x 140mm (download CAD file)
Fitting it to your car
Your kitchen is ready to be fitted and I thought I would add a few extra sections to help complete the project.
With the frame having t-slots you have many options of how to mount this to your car.
On a Jimny you will need some sort of base platform. There are a number of options available, I’ll not list them here as I’ve no personal experience of using and fitting them.
I chose to do a DIY aluminium extrusion base frame with some custom brackets. It was a fair bit of extra work but it meant I could mount the kitchen as low as possible having removed right side rear seat of the Jimny.

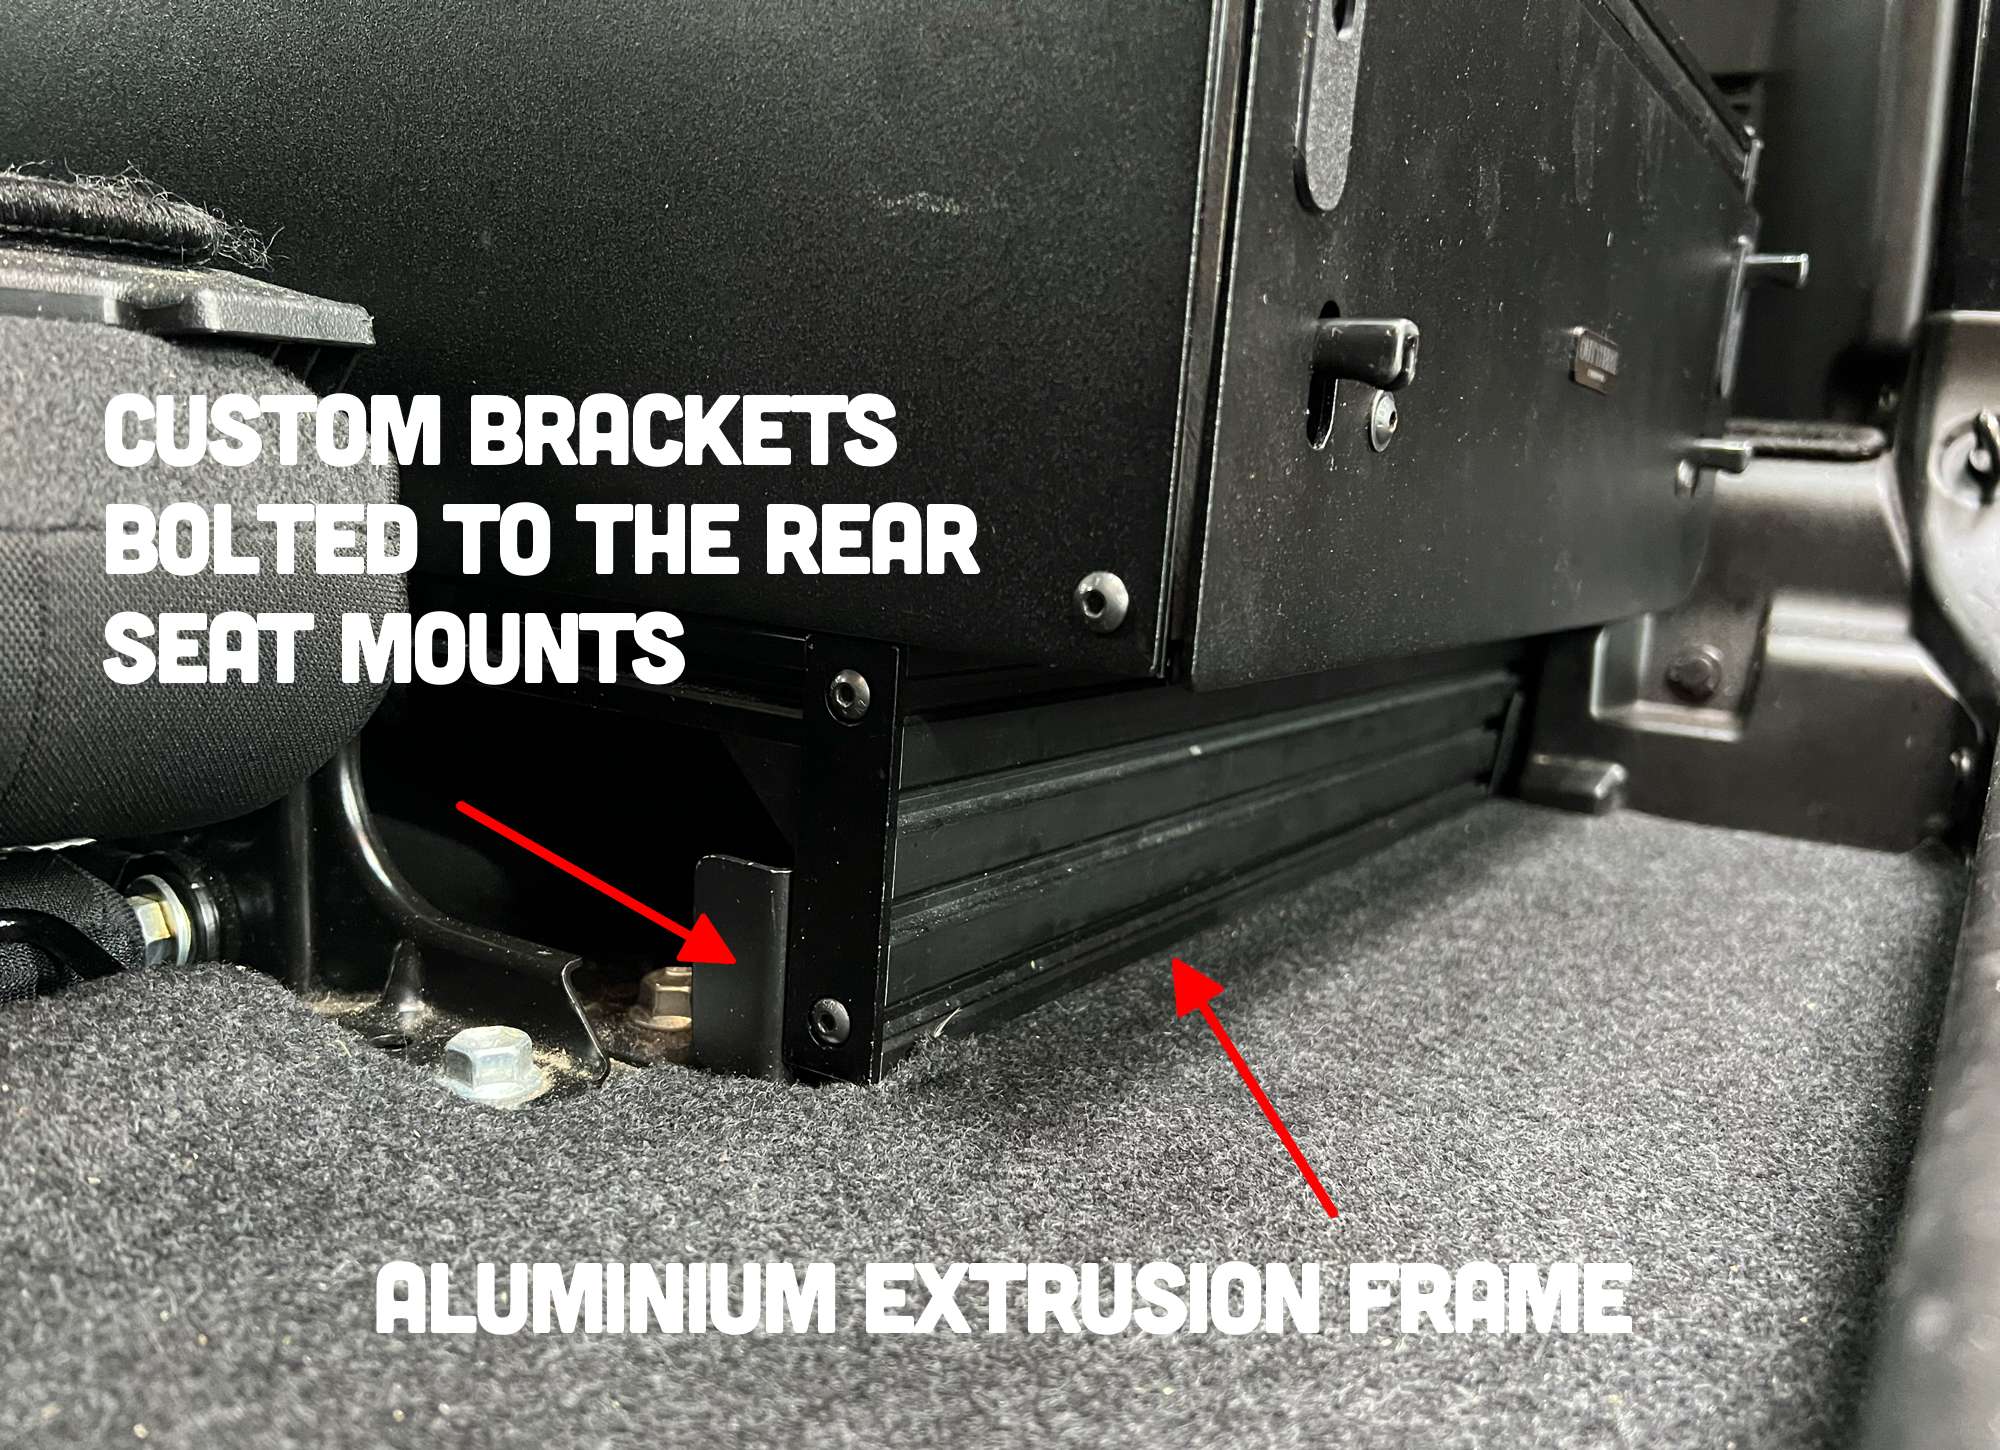
This meant I could raise the kitchen just above the lip of the car door opening which then runs along the length of the tailgate door as seen below.
If you already have a flat base, for example I easily removed the kitchen and bolted it into the boot of the INEOS Grenadier I had some fun with a while back. This kitchen will bolt down to any flat surface.
Gas stove considerations
Depending upon whether you want to leave the sink and gas burner inside the kitchen here are some considerations you’ll need to make.
- Having the gas stove mounted to the bottom slide keeps it further away from the car. This is good for avoiding oil splashes and smells when cooking.
- If you use a double gas burner then the sink will need to be removed to close the slides.
- If you use a single gas burner, as I do, you can close the slides leaving both the stove and sink in place. I even drilled 4 holes to match the gas stoves rubber feet and bolted it to the table. it’s nice to have it there permanently and securely while remaining rattle free!
- Please note if you use thicker materials for your table slides you will need to make sure you have enough clearance for the size of your gas stove. The files provided offer 97mm of clearance inside between the top and bottom table slides when closed.
- The single burner stove I use is the Cadac 1 Cook Turbo FFD which is 90mm high. The double burner version of stove this also fits.
- I recommend a stove with wind deflectors though as it can get blustery in bad weather.
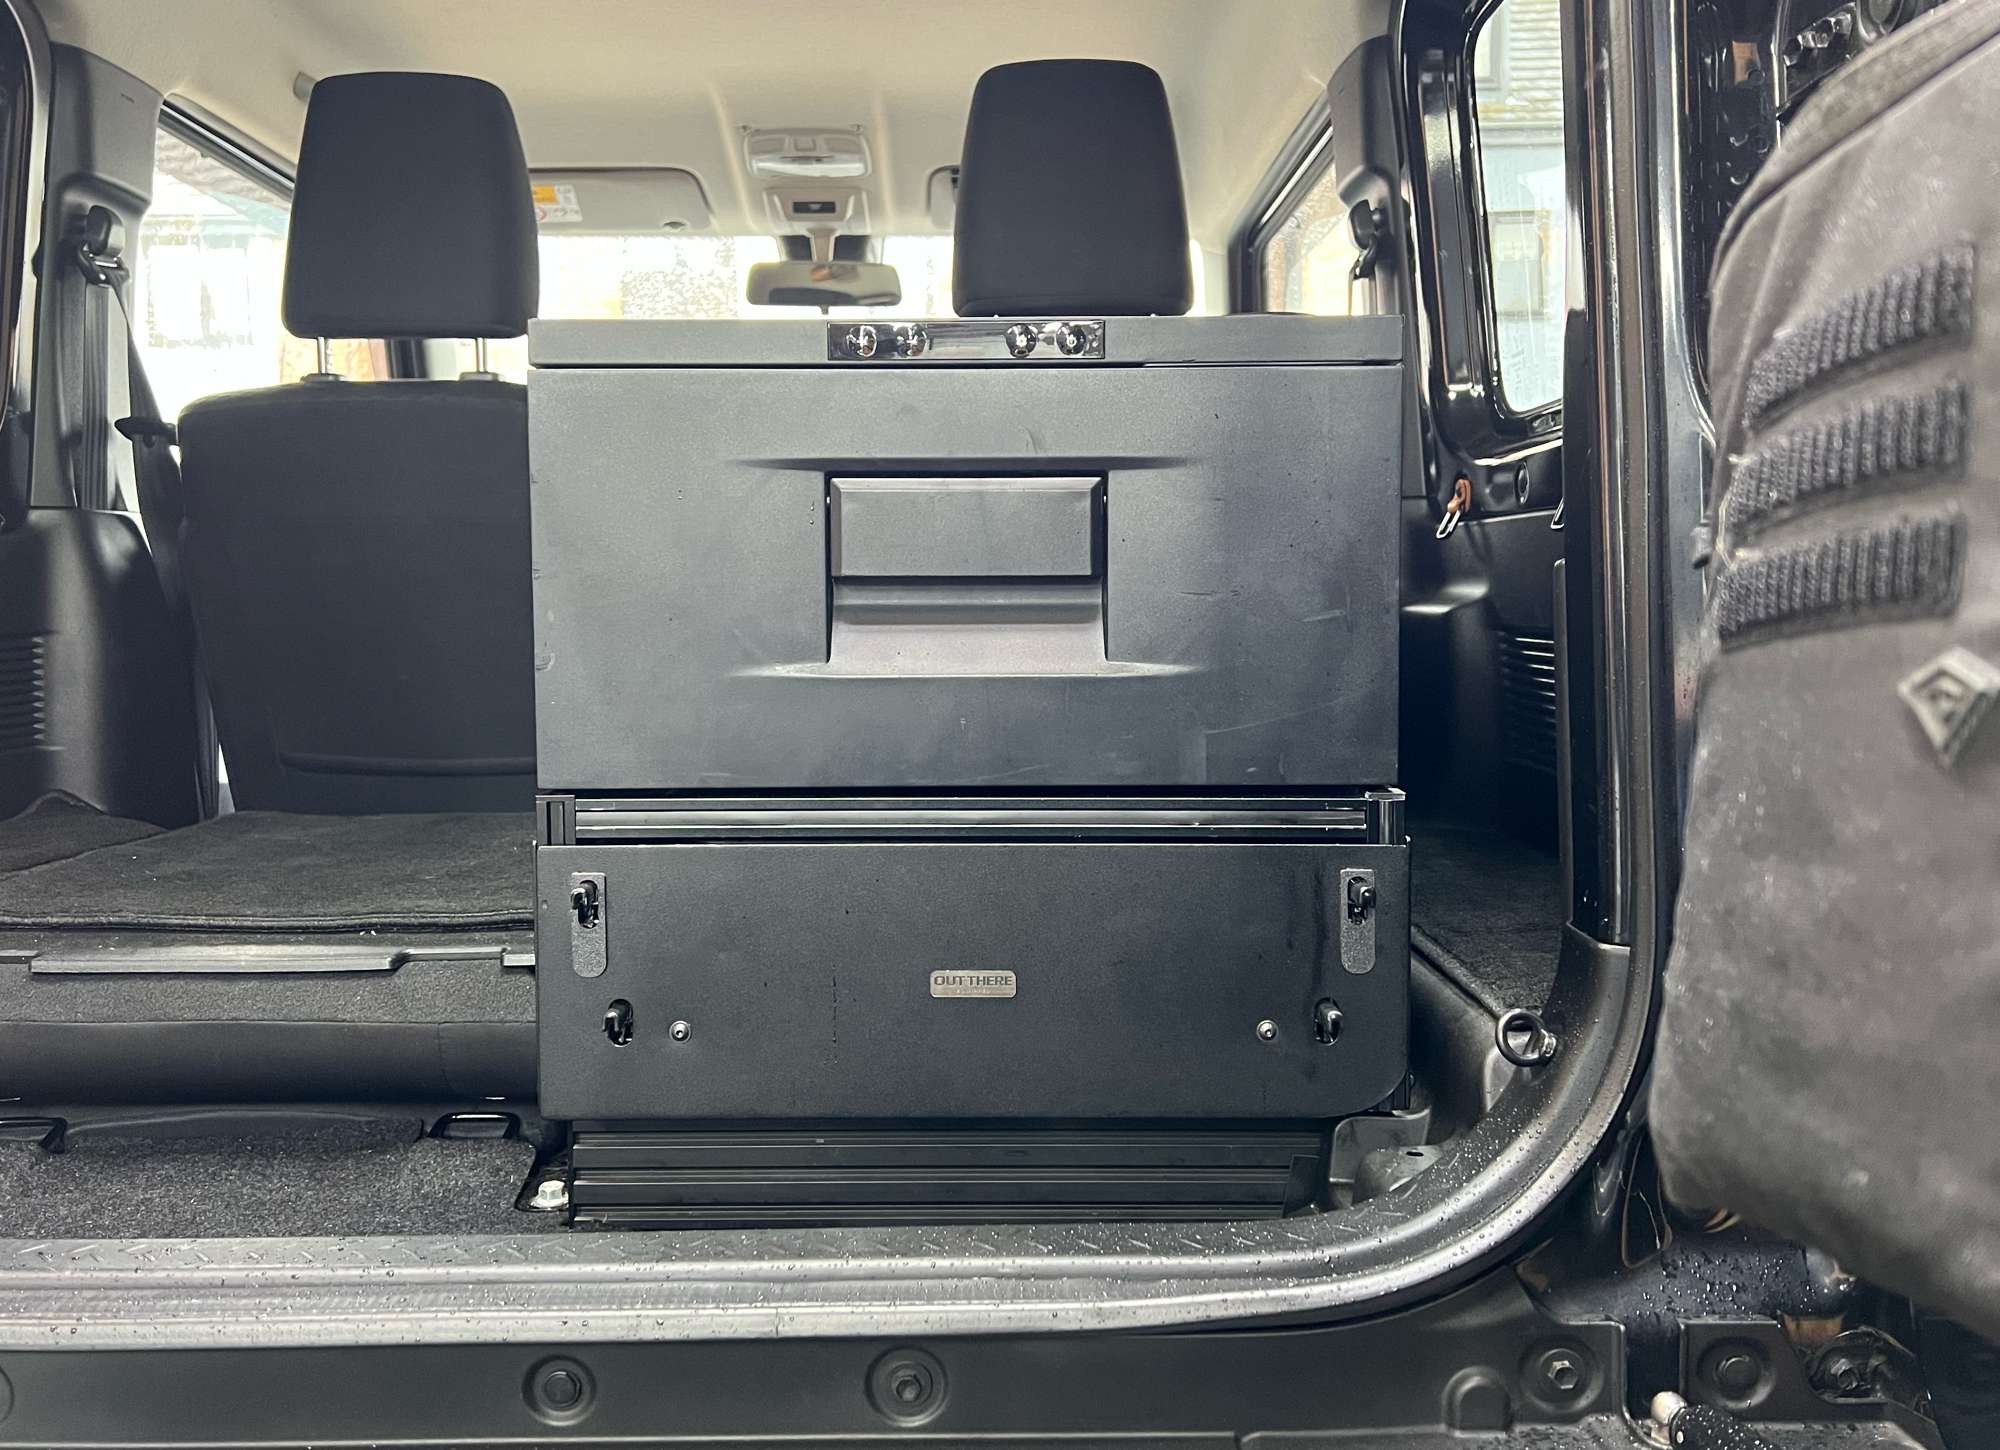
Mounting a drawer fridge
We bought the lowest cost drawer fridge that would fit neatly on top of the frame. In fact I designed the frame specifically to match the 440mm width of our 20L fridge. The length is a little shorter (698mm) than the full length of the kitchen (720mm) but that doesn’t cause any issues.
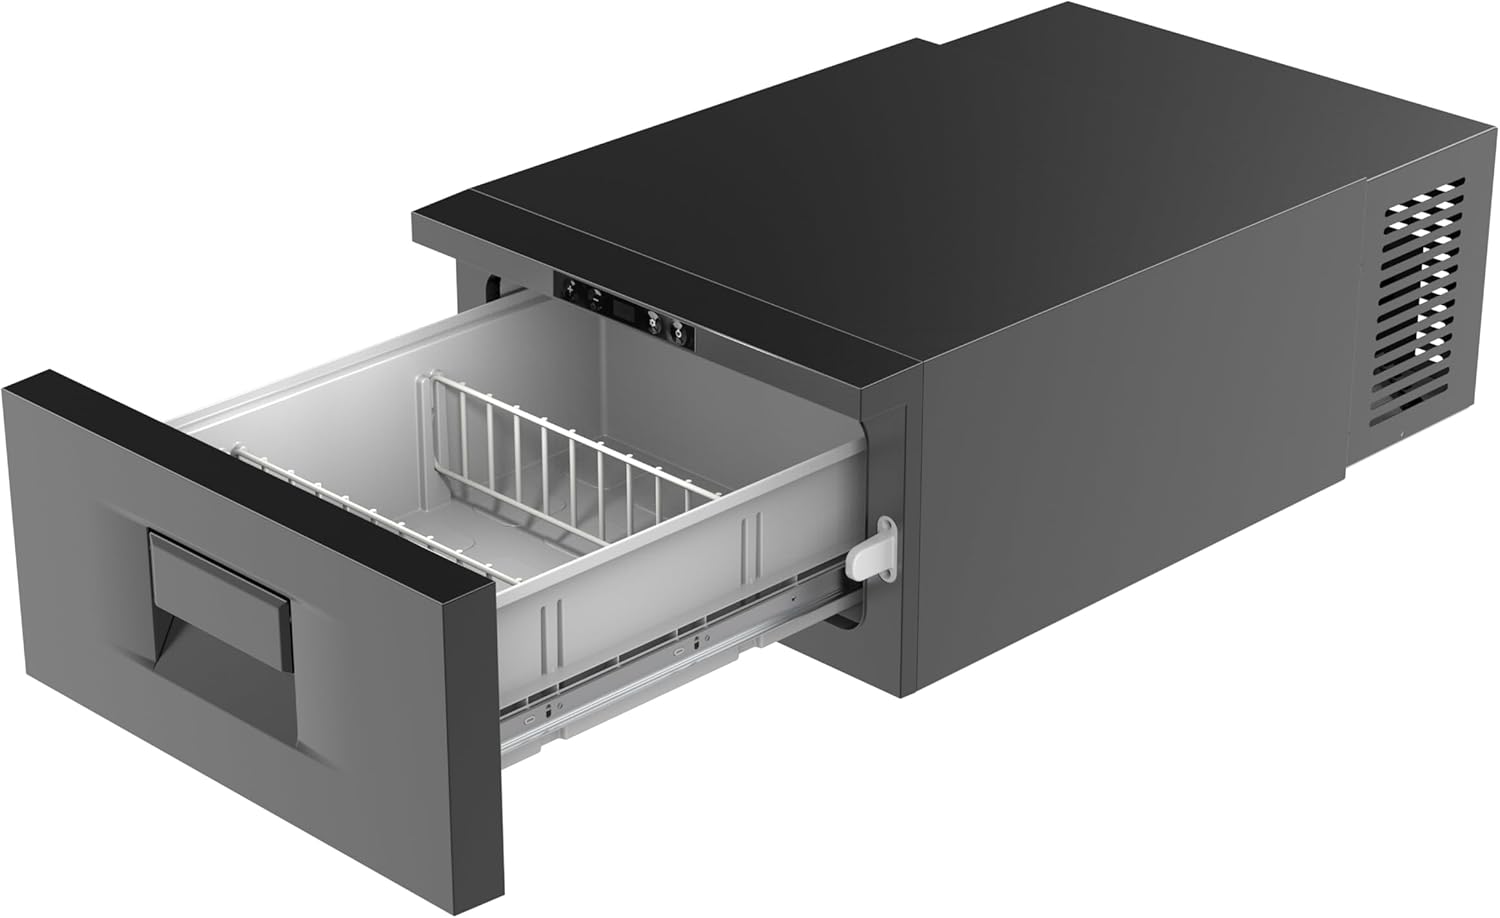
The Dometic Waeco Coolmatic CD30 Under Bench Drawer Fridge also conveniently still measures 440mm wide and has 30L capacity. It is longer (730mm) and more expensive but presumably better quality. I can’t comment as I don’t own one.
I mount the front of the fridge flush with the front of the kitchen for a clean look. I position the kitchen so it allows for clearance of my rear molle panel pouches. You could position it further out if you don’t need to allow for that.
There are no mounting holes on the fridge so I had to drill some holes for threaded inserts. Choosing the sides of the fridge for these holes so the mounting bolts are accessible for quick removal. On a build for a friend who was leaving the set up 24/7 on his hire camper we drilled into the bottom of the fridge case to mount from underneath. It’s a little trickier to access, you essentially fix some corner brackets to the inside of the extrusions on the frame, accessing it with the slides in the open position, or just remove the top slide entirely.
To power the fridge there is a small lithium power bank that slots underneath the kitchen. Your power needs will vary but our fridge stays powered for the duration of our 1-2 day mini adventures, with a little top up charge while driving.
Are you going to build your own?
I think that covers everything I can think of sharing with you to help make your project a success. I’ll update this guide if anything else comes to mind that will help you. Here’s some final shots so you can see exactly what you’re building.
It would be great to hear from you if you build your own kitchen based on this design. Leave a comment, I read them all. Or tag me on instagram if you’re sharing any pictures or videos of your creation @geordiejimny.
CAD files and Parts List
- 2020 Aluminium Extrusion
- 6 x 680mm lengths
- 4 x 400mm lengths
- 4 x 160mm lengths
- 4 x 80mm lengths
- Brackets
- 42 Corner Brackets (26 if drilling thru-hole on 80mm small supports)
- Hardware
- Large pack of M5 x 10mm bolts
- Large pack of Washers
- Large pack of Drop in nuts
- Slide tables
- Top slide table (download CAD file with sink or without sink)
- Bottom Slide table (download CAD file)
- Heavy duty drawer runners
- Laser cut panels
- Top panel – 720mm x 440mm (download CAD file)
If you’re adding drawer fridge you do not need the top panel. - 2 x Side panels – 720mm x 140mm (download CAD file)
- Back panel – 440mm x 160mm (download CAD file)
- Front Panel – 440mm x 140mm (download CAD file)
- Top panel – 720mm x 440mm (download CAD file)
That’s a wrap!
Have fun and I hope you give this project a try. It’s super satisfying to build, even more so to use out in the wild.
See you out there.
Big love,
Paul

